Canon REALiS LCOS WUX10 Mark II D Multimedia Projector WUX10 MarkII Users Manu - Page 32
Steps for Setting Up the Projector and Projecting an Image
 |
View all Canon REALiS LCOS WUX10 Mark II D manuals
Add to My Manuals
Save this manual to your list of manuals |
Page 32 highlights
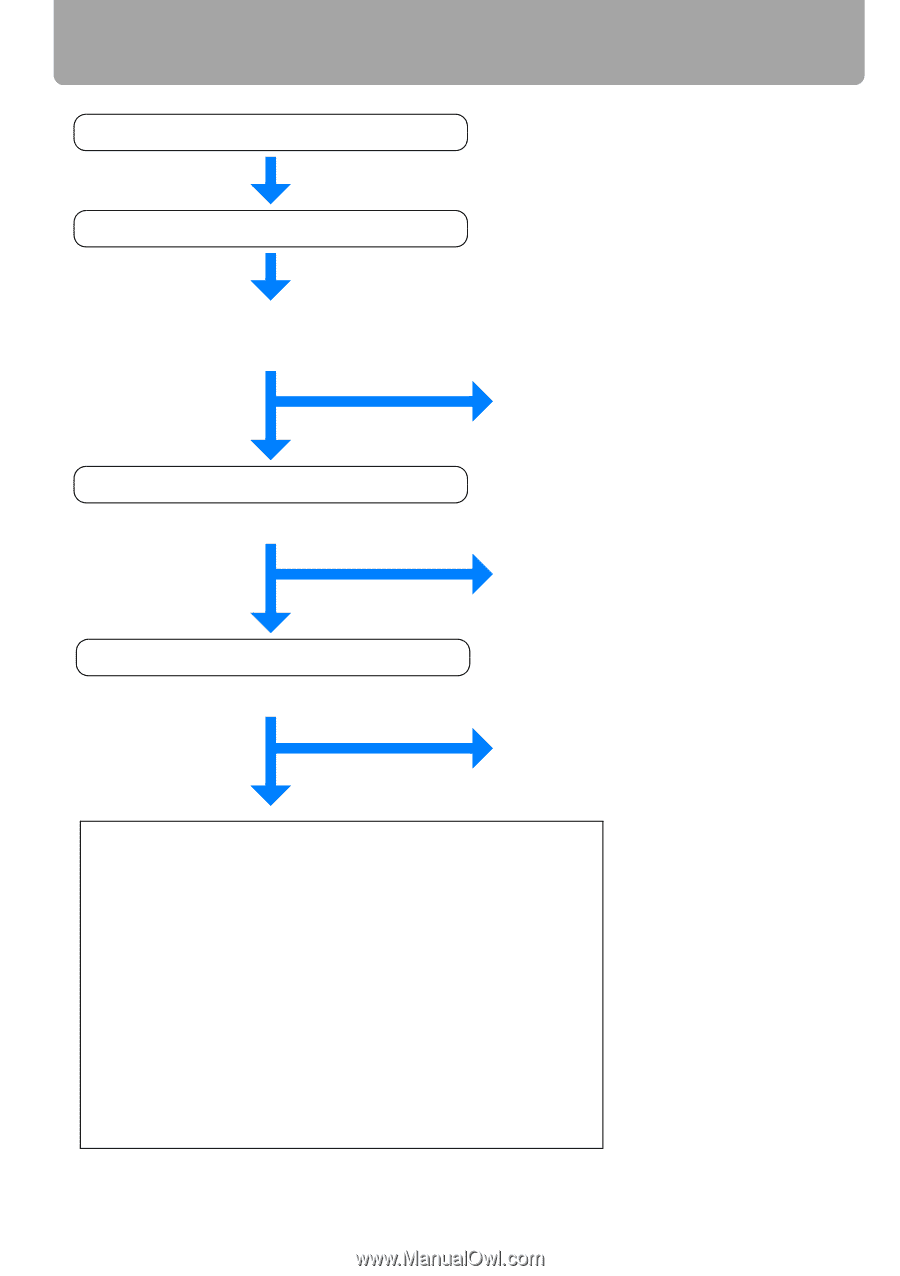
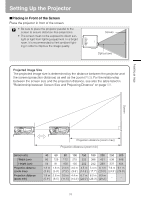
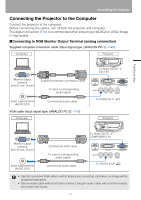
Steps for Setting Up the Projector and Projecting an Image Connecting the Projector to Equipment (P36) Turning on the Power (P44) Do you want to project an image from a notebook computer? Yes No For a notebook computer, turn on the monitor output (P46) and then go to Auto Setup. Performing the Auto Setup (P47) Image projected properly? Yes No Projection is complete. Selecting an Input Signal (P49) Image projected properly? Yes Projection is complete. No Adjusting the Image (P51) Do the following adjustments. • Setting the Display Resolution of the Computer (P51) • Adjusting misaligned images or flickering of the screen using the Auto PC (P52) • Adjusting the Image Size (P53) • Adjusting the Focus (P54) • Adjusting keystone Distortion (P55) Making Fine Adjustments • Selecting an Aspect Ratio of Projected Image (Screen aspect) and a Screen Mode (Aspect) (P57, P61) • Selecting an Image Mode (P63) 32
-
 1
1 -
2
-
3
-
4
-
5
-
6
-
7
-
8
-
9
-
10
-
11
-
12
-
13
-
14
-
15
-
16
-
17
-
18
-
19
-
20
-
21
-
22
-
23
-
24
-
25
-
26
-
 27
27 -
 28
28 -
 29
29 -
 30
30 -
 31
31 -
 32
32 -
 33
33 -
 34
34 -
 35
35 -
 36
36 -
 37
37 -
38
-
39
-
40
-
41
-
42
-
43
-
44
-
45
-
46
-
47
-
48
-
49
-
50
-
51
-
52
-
53
-
54
-
55
-
56
-
57
-
58
-
59
-
60
-
61
-
62
-
63
-
64
-
65
-
66
-
67
-
68
-
69
-
70
-
71
-
72
-
73
-
74
-
75
-
76
-
77
-
78
-
79
-
80
-
81
-
82
-
83
-
84
-
85
-
86
-
87
-
88
-
89
-
90
-
91
-
92
-
93
-
94
-
95
-
96
-
97
-
98
-
99
-
100
-
101
-
102
-
103
-
104
-
105
-
106
-
107
-
108
-
109
-
110
-
111
-
112
-
113
-
114
-
115
-
116
-
117
-
118
-
119
-
120
-
121
-
122
-
123
-
124
-
125
-
126
-
127
-
128
-
129
-
130
-
131
-
132
-
133
-
134
-
135
-
136
-
137
-
138
-
139
-
140
-
141
-
142
-
143
-
144
-
145
-
146
 |
 |