Canon REALiS LCOS WUX10 Mark II D Multimedia Projector WUX10 MarkII Users Manu - Page 45
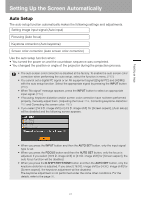
When the Language Selection Screen Appears, Press the AUTO SET button., FOCUS, AUTO SET
 |
View all Canon REALiS LCOS WUX10 Mark II D manuals
Add to My Manuals
Save this manual to your list of manuals |
Page 45 highlights
Projecting an Image Starting Projection Changing Operations When Projector is Turned On You can change operations when the projector is turned on as follows: • You can turn on the projector by connecting the power cord without pressing the POWER button. (P96) • You can specify whether to enable or disable the LED illumination lamp. (P99) • You can change the countdown window. (P85) • You can skip the countdown window. (P44) Using the Power Saving Mode (power management) When you enable the power management mode, the lamp is automatically turned off if the projector receives no signal input for a certain period of time. (P95) 5 Press the AUTO SET button. Performs auto adjustment on focusing, keystone distortion, input signal settings, and screen color correction. For more details, refer to the page 47. If the projector is projecting an image properly with [AUTO SETUP], the projection is complete. For how to turn off the projector, refer to the page 64. Perform the appropriate operation depending on the following situations. ■When the Language Selection Screen Appears A window appears when the projector is turned on for the first time. You can select a language to be used by the projector for displaying menus and messages in the window. Select the desired language with the pointer buttons and press the OK button. You can change the language from the menu at a later time. (P98) If the language selection screen is out of focus, press the FOCUS and then AUTO SET buttons to make focus adjustment. Remote control Top control An item highlighted in orange will be selected. 45
-
 1
1 -
2
-
3
-
4
-
5
-
6
-
7
-
8
-
9
-
10
-
11
-
12
-
13
-
14
-
15
-
16
-
17
-
18
-
19
-
20
-
21
-
22
-
23
-
24
-
25
-
26
-
27
-
28
-
29
-
30
-
31
-
32
-
33
-
34
-
35
-
36
-
37
-
38
-
39
-
 40
40 -
 41
41 -
 42
42 -
 43
43 -
 44
44 -
 45
45 -
 46
46 -
 47
47 -
 48
48 -
 49
49 -
 50
50 -
51
-
52
-
53
-
54
-
55
-
56
-
57
-
58
-
59
-
60
-
61
-
62
-
63
-
64
-
65
-
66
-
67
-
68
-
69
-
70
-
71
-
72
-
73
-
74
-
75
-
76
-
77
-
78
-
79
-
80
-
81
-
82
-
83
-
84
-
85
-
86
-
87
-
88
-
89
-
90
-
91
-
92
-
93
-
94
-
95
-
96
-
97
-
98
-
99
-
100
-
101
-
102
-
103
-
104
-
105
-
106
-
107
-
108
-
109
-
110
-
111
-
112
-
113
-
114
-
115
-
116
-
117
-
118
-
119
-
120
-
121
-
122
-
123
-
124
-
125
-
126
-
127
-
128
-
129
-
130
-
131
-
132
-
133
-
134
-
135
-
136
-
137
-
138
-
139
-
140
-
141
-
142
-
143
-
144
-
145
-
146
 |
 |