Canon REALiS LCOS WUX10 Mark II D Multimedia Projector WUX10 MarkII Users Manu - Page 92
Adjusting Fine Color Adjustment (6-axis color adjust)
 |
View all Canon REALiS LCOS WUX10 Mark II D manuals
Add to My Manuals
Save this manual to your list of manuals |
Page 92 highlights
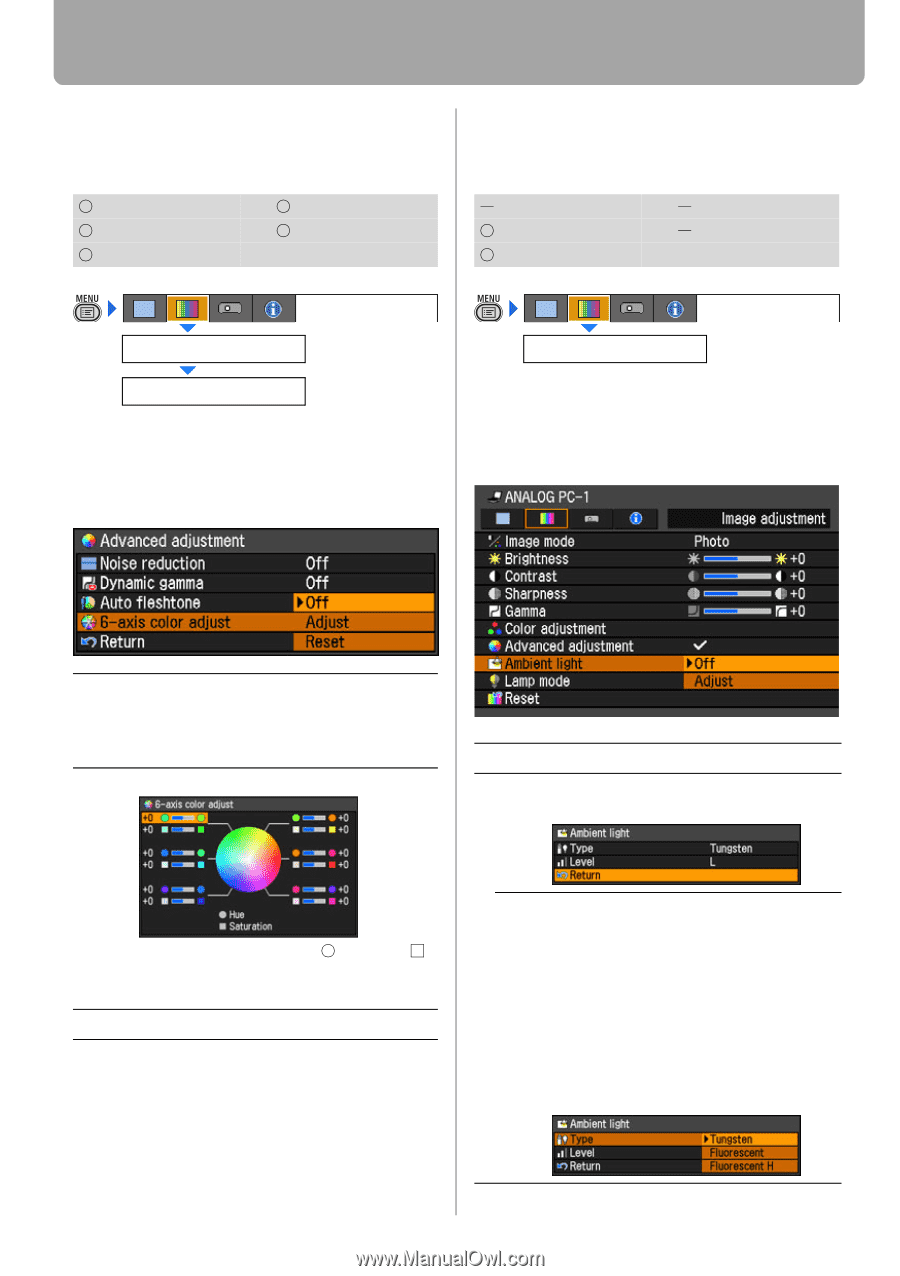
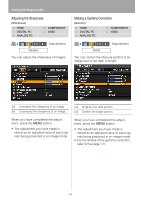
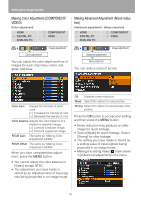
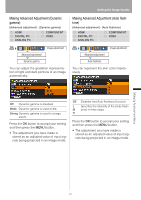
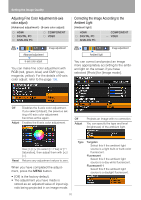
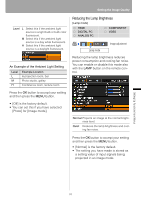
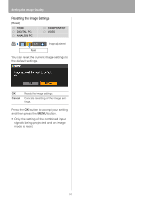
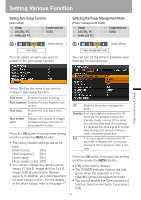
Setting the Image Quality Adjusting Fine Color Adjustment (6-axis color adjust) [Advanced adjustment] - [6-axis color adjust] HDMI DIGITAL PC ANALOG PC COMPONENT VIDEO Image adjustment Advanced adjustment 6-axis color adjust You can make fine color adjustment with RGB (red, green, blue) and CMY (cyan, magenta, yellow). For the details of 6-axis color adjust, refer to the page 135. Correcting the Image According to the Ambient Light [Ambient light] HDMI DIGITAL PC ANALOG PC COMPONENT VIDEO Image adjustment Ambient light You can correct and project an image more appropriately according to the ambient light on the screen if you have selected [Photo] for [Image mode]. Off Disables the 6-axis color adjustment. If you select [Adjust], the previous setting of 6-axis color adjustment becomes active again. Adjust Enables the 6-axis color adjustment. Off Adjust Projects an image with no correction. You can specify the type and level (brightness) of the ambient light. Reset < < Use [ ] / [ ] to select [ Hue] or [ Saturation], then adjust them with []. Returns any adjustment values to zero. When you have completed the adjustment, press the MENU button. • [Off] is the factory default. • The adjustment you have made is stored as an adjusted value of input signals being projected in an image mode. 92 Type Tungsten Select this if the ambient light source is a light bulb or bulb color fluorescent. Fluorescent Select this if the ambient light source is a day white fluorescent. Fluorescent H Select this if the ambient light source is a daylight fluorescent.
-
 1
1 -
2
-
3
-
4
-
5
-
6
-
7
-
8
-
9
-
10
-
11
-
12
-
13
-
14
-
15
-
16
-
17
-
18
-
19
-
20
-
21
-
22
-
23
-
24
-
25
-
26
-
27
-
28
-
29
-
30
-
31
-
32
-
33
-
34
-
35
-
36
-
37
-
38
-
39
-
40
-
41
-
42
-
43
-
44
-
45
-
46
-
47
-
48
-
49
-
50
-
51
-
52
-
53
-
54
-
55
-
56
-
57
-
58
-
59
-
60
-
61
-
62
-
63
-
64
-
65
-
66
-
67
-
68
-
69
-
70
-
71
-
72
-
73
-
74
-
75
-
76
-
77
-
78
-
79
-
80
-
81
-
82
-
83
-
84
-
85
-
86
-
 87
87 -
 88
88 -
 89
89 -
 90
90 -
 91
91 -
 92
92 -
 93
93 -
 94
94 -
 95
95 -
 96
96 -
 97
97 -
98
-
99
-
100
-
101
-
102
-
103
-
104
-
105
-
106
-
107
-
108
-
109
-
110
-
111
-
112
-
113
-
114
-
115
-
116
-
117
-
118
-
119
-
120
-
121
-
122
-
123
-
124
-
125
-
126
-
127
-
128
-
129
-
130
-
131
-
132
-
133
-
134
-
135
-
136
-
137
-
138
-
139
-
140
-
141
-
142
-
143
-
144
-
145
-
146
 |
 |