Canon REALiS LCOS WUX10 Mark II D Multimedia Projector WUX10 MarkII Users Manu - Page 28
Top Control
 |
View all Canon REALiS LCOS WUX10 Mark II D manuals
Add to My Manuals
Save this manual to your list of manuals |
Page 28 highlights
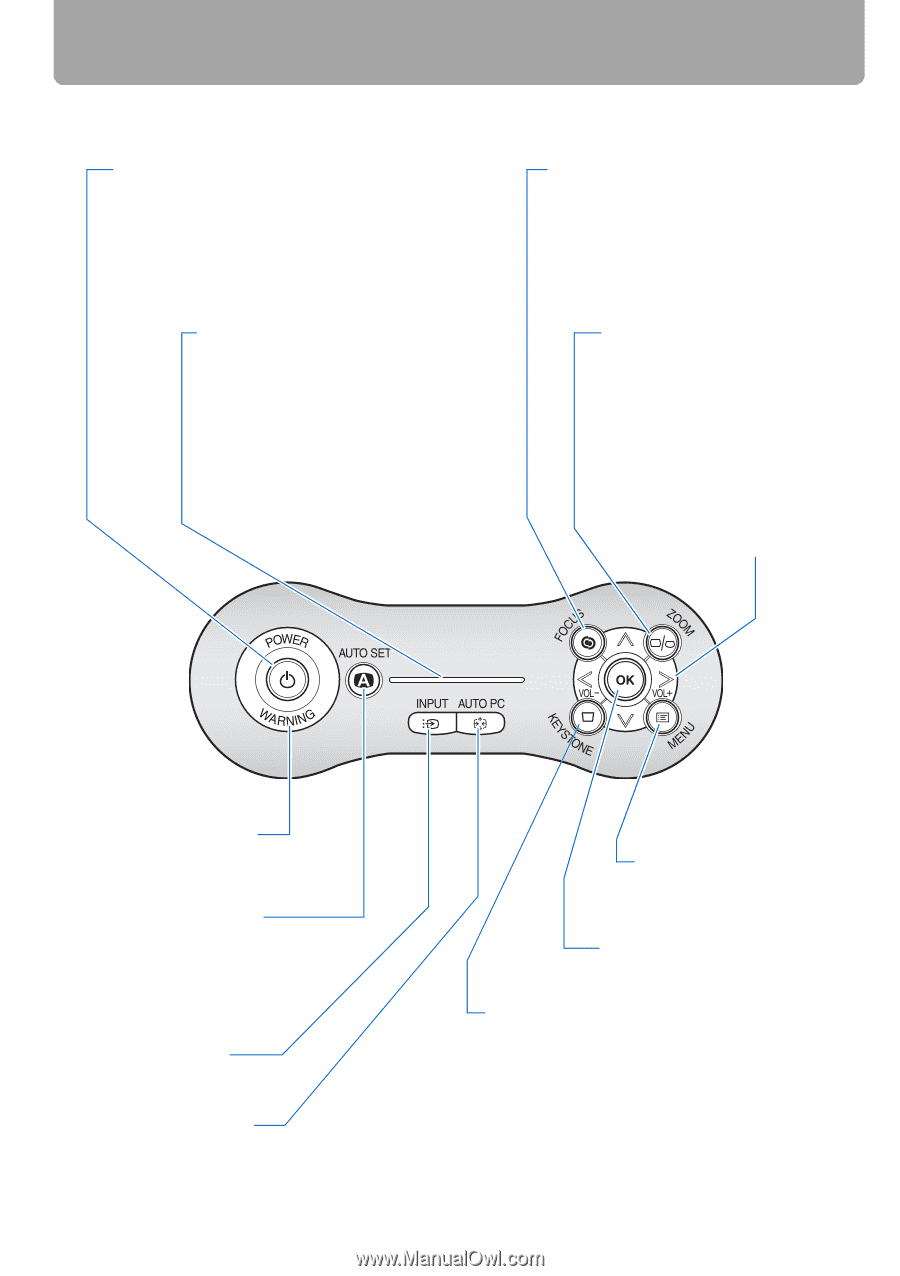
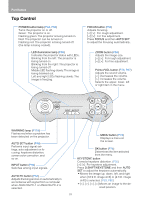
Part Names Top Control POWER button/lamp (P44, P64) Turns the projector on or off. Green: The projector is on. Flashing green: The projector is being turned on. Red: The projector can be turned on. Flashing red: The projector is being turned off (the lamp is being cooled). LED illumination lamp (P99) Indicates the projector status with LEDs. Blinking from the left: The projector is being turned on. Blinking from the right: The projector is being turned off. Middle LED flashing slowly: The image is being blanked out. Left and right LEDs flashing slowly: The image is freezing. < < < < FOCUS button (P54) Adjusts focusing. [ ] [ ]: For rough adjustment. []: For fine adjustment. Press FOCUS and then AUTO SET to adjust the focusing automatically. ZOOM button (P53) Adjusts the image size. [ ] [ ]: For rough adjustment. []: For fine adjustment. Pointer/VOL button (P73, P67) Adjusts the sound volume. []: Increases the volume. Selects the upper, lower, left or right item in the menu. WARNING lamp (P118) Flashes red when a problem has been detected on the projector. AUTO SET button (P48) Performs input signal settings, auto adjustment on focusing, keystone distortion, screen color correction, and so on. INPUT button (P50) Switches among input signals. AUTO PC button (P52) Adjusts tracking and so on automatically in accordance with signal from a computer when ANALOG PC-1 or ANALOG PC-2 is selected. < < < < MENU button (P72) Displays a menu on the screen. OK button (P74) Determines the item selected from the menu. KEYSTONE button Corrects keystone distortion. (P55) [ ] [ ]: For keystone adjustment. Press D.SHIFT/KEYSTONE and then AUTO SET to adjust the keystone automatically. • Moves the image up, down, left, and right when [16:9 D. image shift] or [4:3 D. image shift] is selected. (P59, P60 Moves an image to the de- sired position. 28
-
 1
1 -
2
-
3
-
4
-
5
-
6
-
7
-
8
-
9
-
10
-
11
-
12
-
13
-
14
-
15
-
16
-
17
-
18
-
19
-
20
-
21
-
22
-
 23
23 -
 24
24 -
 25
25 -
 26
26 -
 27
27 -
 28
28 -
 29
29 -
 30
30 -
 31
31 -
 32
32 -
 33
33 -
34
-
35
-
36
-
37
-
38
-
39
-
40
-
41
-
42
-
43
-
44
-
45
-
46
-
47
-
48
-
49
-
50
-
51
-
52
-
53
-
54
-
55
-
56
-
57
-
58
-
59
-
60
-
61
-
62
-
63
-
64
-
65
-
66
-
67
-
68
-
69
-
70
-
71
-
72
-
73
-
74
-
75
-
76
-
77
-
78
-
79
-
80
-
81
-
82
-
83
-
84
-
85
-
86
-
87
-
88
-
89
-
90
-
91
-
92
-
93
-
94
-
95
-
96
-
97
-
98
-
99
-
100
-
101
-
102
-
103
-
104
-
105
-
106
-
107
-
108
-
109
-
110
-
111
-
112
-
113
-
114
-
115
-
116
-
117
-
118
-
119
-
120
-
121
-
122
-
123
-
124
-
125
-
126
-
127
-
128
-
129
-
130
-
131
-
132
-
133
-
134
-
135
-
136
-
137
-
138
-
139
-
140
-
141
-
142
-
143
-
144
-
145
-
146
 |
 |