Canon REALiS LCOS WUX10 Mark II D Multimedia Projector WUX10 MarkII Users Manu - Page 37
Connecting the Projector to the Computer
 |
View all Canon REALiS LCOS WUX10 Mark II D manuals
Add to My Manuals
Save this manual to your list of manuals |
Page 37 highlights
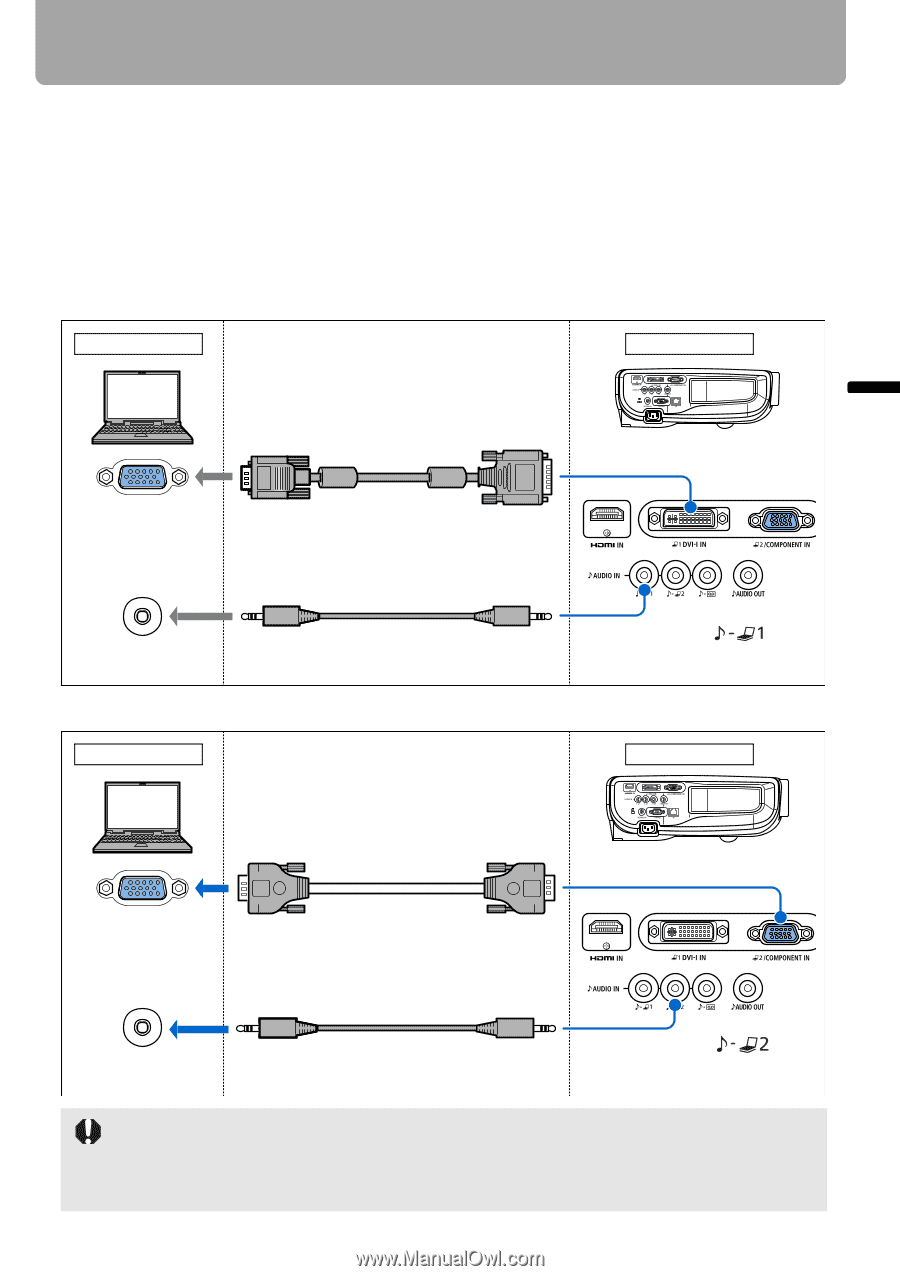
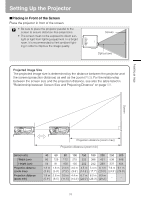
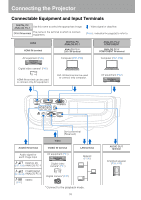
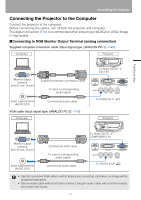
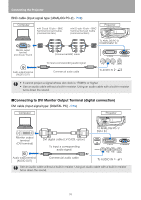
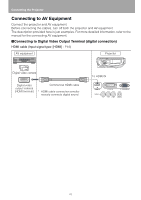
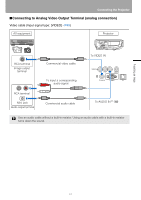
Projecting an Image Connecting the Projector Connecting the Projector to the Computer Connect the projector to the computer. Before connecting the cables, turn off both the projector and computer. The digital connection (P38) is recommended when projecting a WUXGA or UXGA image in high quality. ■Connecting to RGB Monitor Output Terminal (analog connection) Supplied computer connection cable (Input signal type: [ANALOG PC-1] - P49) Computer Projector Monitor output terminal (mini D-sub 15-pin) Supplied computer connection cable To input a corresponding audio signal: Audio output terminal (AUDIO OUT) Commercial audio cable VGA cable (Input signal type: [ANALOG PC-2] - P49) Computer To ANALOG PC-1/ DVI-I IN To AUDIO IN Projector Monitor output terminal (mini D-sub 15-pin) Audio output terminal (AUDIO OUT) Commercial VGA cable To input a corresponding audio signal: Commercial audio cable To ANALOG PC-2/ COMPONENT IN To AUDIO IN • Use full connected VGA cable in which all pins are connected; otherwise, an image will be projected improperly. • Use an audio cable without a built-in resistor. Using an audio cable with a built-in resistor turns down the sound. 37
-
 1
1 -
2
-
3
-
4
-
5
-
6
-
7
-
8
-
9
-
10
-
11
-
12
-
13
-
14
-
15
-
16
-
17
-
18
-
19
-
20
-
21
-
22
-
23
-
24
-
25
-
26
-
27
-
28
-
29
-
30
-
31
-
 32
32 -
 33
33 -
 34
34 -
 35
35 -
 36
36 -
 37
37 -
 38
38 -
 39
39 -
 40
40 -
 41
41 -
 42
42 -
43
-
44
-
45
-
46
-
47
-
48
-
49
-
50
-
51
-
52
-
53
-
54
-
55
-
56
-
57
-
58
-
59
-
60
-
61
-
62
-
63
-
64
-
65
-
66
-
67
-
68
-
69
-
70
-
71
-
72
-
73
-
74
-
75
-
76
-
77
-
78
-
79
-
80
-
81
-
82
-
83
-
84
-
85
-
86
-
87
-
88
-
89
-
90
-
91
-
92
-
93
-
94
-
95
-
96
-
97
-
98
-
99
-
100
-
101
-
102
-
103
-
104
-
105
-
106
-
107
-
108
-
109
-
110
-
111
-
112
-
113
-
114
-
115
-
116
-
117
-
118
-
119
-
120
-
121
-
122
-
123
-
124
-
125
-
126
-
127
-
128
-
129
-
130
-
131
-
132
-
133
-
134
-
135
-
136
-
137
-
138
-
139
-
140
-
141
-
142
-
143
-
144
-
145
-
146
 |
 |