Cisco 7920 Administration Guide - Page 78
Cisco Wireless IP Phone 7920 Battery Installation, Step 2
 |
UPC - 746320774732
View all Cisco 7920 manuals
Add to My Manuals
Save this manual to your list of manuals |
Page 78 highlights
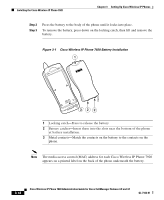
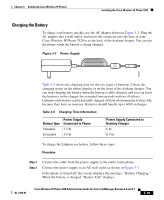
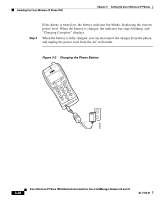
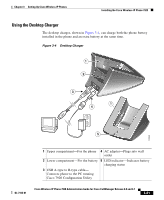
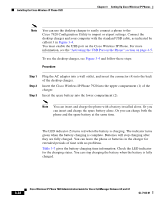
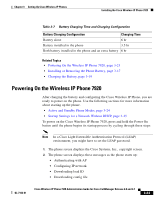
Installing the Cisco Wireless IP Phone 7920 Chapter 3 Setting Up Cisco Wireless IP Phones Step 2 Step 3 Press the battery to the body of the phone until it locks into place. To remove the battery, press down on the locking catch, then lift and remove the battery. Figure 3-1 Cisco Wireless IP Phone 7920 Battery Installation 1 79675 322 1 Locking catch-Press to release the battery 2 Battery catches-Insert these into the slots near the bottom of the phone at battery installation. 3 Metal contacts-Match the contacts on the battery to the contacts on the phone. Note The media access control (MAC) address for each Cisco Wireless IP Phone 7920 appears on a printed label on the back of the phone underneath the battery. 3-18 Cisco Wireless IP Phone 7920 Administration Guide for Cisco CallManager Release 4.0 and 4.1 OL-7104-01
-
 1
1 -
2
-
3
-
4
-
5
-
6
-
7
-
8
-
9
-
10
-
11
-
12
-
13
-
14
-
15
-
16
-
17
-
18
-
19
-
20
-
21
-
22
-
23
-
24
-
25
-
26
-
27
-
28
-
29
-
30
-
31
-
32
-
33
-
34
-
35
-
36
-
37
-
38
-
39
-
40
-
41
-
42
-
43
-
44
-
45
-
46
-
47
-
48
-
49
-
50
-
51
-
52
-
53
-
54
-
55
-
56
-
57
-
58
-
59
-
60
-
61
-
62
-
63
-
64
-
65
-
66
-
67
-
68
-
69
-
70
-
71
-
72
-
 73
73 -
 74
74 -
 75
75 -
 76
76 -
 77
77 -
 78
78 -
 79
79 -
 80
80 -
 81
81 -
 82
82 -
 83
83 -
84
-
85
-
86
-
87
-
88
-
89
-
90
-
91
-
92
-
93
-
94
-
95
-
96
-
97
-
98
-
99
-
100
-
101
-
102
-
103
-
104
-
105
-
106
-
107
-
108
-
109
-
110
-
111
-
112
-
113
-
114
-
115
-
116
-
117
-
118
-
119
-
120
-
121
-
122
-
123
-
124
-
125
-
126
-
127
-
128
-
129
-
130
-
131
-
132
-
133
-
134
-
135
-
136
-
137
-
138
-
139
-
140
-
141
-
142
-
143
-
144
-
145
-
146
-
147
-
148
-
149
-
150
-
151
-
152
-
153
-
154
-
155
-
156
-
157
-
158
-
159
-
160
-
161
-
162
-
163
-
164
-
165
-
166
-
167
-
168
-
169
-
170
-
171
-
172
-
173
-
174
-
175
-
176
-
177
-
178
-
179
-
180
-
181
-
182
-
183
-
184
-
185
-
186
-
187
-
188
-
189
-
190
-
191
-
192
-
193
-
194
-
195
-
196
-
197
-
198
-
199
-
200
-
201
-
202
-
203
-
204
-
205
-
206
-
207
-
208
-
209
-
210
-
211
-
212
-
213
-
214
-
215
-
216
-
217
-
218
-
219
-
220
-
221
-
222
-
223
-
224
-
225
-
226
-
227
-
228
-
229
-
230
-
231
-
232
-
233
-
234
-
235
-
236
-
237
-
238
 |
 |
