Cisco ACE-4710-K9 Administration Guide - Page 30
Enter, Ctrl-C, setup, Cisco Application Control Engine Appliance Hardware Installation Guide
 |
View all Cisco ACE-4710-K9 manuals
Add to My Manuals
Save this manual to your list of manuals |
Page 30 highlights
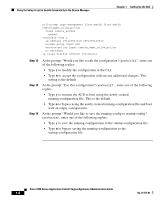
Using the Setup Script to Enable Connectivity to the Device Manager Chapter 1 Setting Up the ACE The ACE provides a default answer in brackets [ ] for each question in the setup script. To accept a default configuration prompt, press Enter, and the ACE accepts the setting. To skip the remaining configuration prompts, press Ctrl-C any time during the configuration sequence. Note The script configuration process described in this section is identical to the script configuration process performed using the setup CLI command. To configure the ACE from the setup script, perform the following steps: Step 1 Step 2 Step 3 Ensure that you have established a direct serial connection between your terminal or a PC and the ACE (see the "Establishing a Console Connection on the ACE" section). Press the power button on the front of the ACE and the boot process occurs. See the Cisco Application Control Engine Appliance Hardware Installation Guide for details. At the login prompt, log into the ACE by entering the login username and password. By default, the username and password are admin. For example, enter: switch login: admin Password: admin ---- Basic System Configuration Dialog ---- This setup utility will guide you through the basic configuration of the system. Setup configures only enough connectivity to the ACE appliance Device Manager GUI of the system. *Note: setup is mainly used for configuring the system initially, when no configuration is present. So setup always assumes system defaults and not the current system configuration values. Press Enter at anytime to skip a dialog. Use ctrl-c at anytime to skip the remaining dialogs. Would you like to enter the basic configuration dialog (yes/no): Caution For software versions A1(8.0a) and higher, you must change the default Admin password if you have not already done so. Otherwise, you will be able to log in to the ACE only through the console port. Cisco 4700 Series Application Control Engine Appliance Administration Guide 1-4 OL-11157-01
-
 1
1 -
2
-
3
-
4
-
5
-
6
-
7
-
8
-
9
-
10
-
11
-
12
-
13
-
14
-
15
-
16
-
17
-
18
-
19
-
20
-
21
-
22
-
23
-
24
-
 25
25 -
 26
26 -
 27
27 -
 28
28 -
 29
29 -
 30
30 -
 31
31 -
 32
32 -
 33
33 -
 34
34 -
 35
35 -
36
-
37
-
38
-
39
-
40
-
41
-
42
-
43
-
44
-
45
-
46
-
47
-
48
-
49
-
50
-
51
-
52
-
53
-
54
-
55
-
56
-
57
-
58
-
59
-
60
-
61
-
62
-
63
-
64
-
65
-
66
-
67
-
68
-
69
-
70
-
71
-
72
-
73
-
74
-
75
-
76
-
77
-
78
-
79
-
80
-
81
-
82
-
83
-
84
-
85
-
86
-
87
-
88
-
89
-
90
-
91
-
92
-
93
-
94
-
95
-
96
-
97
-
98
-
99
-
100
-
101
-
102
-
103
-
104
-
105
-
106
-
107
-
108
-
109
-
110
-
111
-
112
-
113
-
114
-
115
-
116
-
117
-
118
-
119
-
120
-
121
-
122
-
123
-
124
-
125
-
126
-
127
-
128
-
129
-
130
-
131
-
132
-
133
-
134
-
135
-
136
-
137
-
138
-
139
-
140
-
141
-
142
-
143
-
144
-
145
-
146
-
147
-
148
-
149
-
150
-
151
-
152
-
153
-
154
-
155
-
156
-
157
-
158
-
159
-
160
-
161
-
162
-
163
-
164
-
165
-
166
-
167
-
168
-
169
-
170
-
171
-
172
-
173
-
174
-
175
-
176
-
177
-
178
-
179
-
180
-
181
-
182
-
183
-
184
-
185
-
186
-
187
-
188
-
189
-
190
-
191
-
192
-
193
-
194
-
195
-
196
-
197
-
198
-
199
-
200
-
201
-
202
-
203
-
204
-
205
-
206
-
207
-
208
-
209
-
210
-
211
-
212
-
213
-
214
-
215
-
216
-
217
-
218
-
219
-
220
-
221
-
222
-
223
-
224
-
225
-
226
-
227
-
228
-
229
-
230
-
231
-
232
-
233
-
234
-
235
-
236
-
237
-
238
-
239
-
240
-
241
-
242
-
243
-
244
-
245
-
246
-
247
-
248
-
249
-
250
-
251
-
252
-
253
-
254
-
255
-
256
-
257
-
258
-
259
-
260
-
261
-
262
-
263
-
264
-
265
-
266
-
267
-
268
-
269
-
270
-
271
-
272
-
273
-
274
-
275
-
276
-
277
-
278
-
279
-
280
-
281
-
282
-
283
-
284
-
285
-
286
-
287
-
288
-
289
-
290
-
291
-
292
-
293
-
294
-
295
-
296
-
297
-
298
-
299
-
300
-
301
-
302
-
303
-
304
-
305
-
306
-
307
-
308
-
309
-
310
-
311
-
312
-
313
-
314
-
315
-
316
-
317
-
318
-
319
-
320
-
321
-
322
-
323
-
324
-
325
-
326
-
327
-
328
-
329
-
330
-
331
-
332
-
333
-
334
-
335
-
336
-
337
-
338
-
339
-
340
-
341
-
342
-
343
-
344
-
345
-
346
-
347
-
348
-
349
-
350
-
351
-
352
-
353
-
354
-
355
-
356
-
357
-
358
-
359
-
360
-
361
-
362
-
363
-
364
-
365
-
366
-
367
-
368
-
369
-
370
-
371
-
372
-
373
-
374
-
375
-
376
-
377
-
378
-
379
-
380
-
381
-
382
-
383
-
384
-
385
-
386
-
387
-
388
-
389
-
390
-
391
-
392
-
393
-
394
-
395
-
396
-
397
-
398
-
399
-
400
-
401
-
402
-
403
-
404
-
405
-
406
-
407
-
408
-
409
-
410
-
411
-
412
-
413
-
414
-
415
-
416
-
417
-
418
 |
 |
