Dell E514dw Dell Color Multifunction Printer Users Guide - Page 100
Scan Using Web Services from the Dell Machine (Windows Vista® SP2 or greater
 |
View all Dell E514dw manuals
Add to My Manuals
Save this manual to your list of manuals |
Page 100 highlights
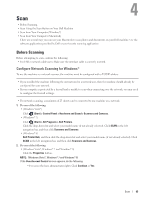
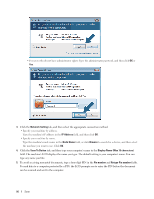
• Scan Using Web Services from the Dell Machine (Windows Vista® SP2 or greater, Windows® 7 and Windows® 8) If you have installed the driver for scanning via Web Services, you can access the Web Services scanning menu on your Dell machine's LCD. • Configure Scan Settings for Web Services Scan Using Web Services from the Dell Machine (Windows Vista® SP2 or greater, Windows® 7 and Windows® 8) If you have installed the driver for scanning via Web Services, you can access the Web Services scanning menu on your Dell machine's LCD. Certain characters in the messages displayed on the LCD may be replaced with spaces if the language settings of your OS and your Dell machine are different. 1. Load your document. 2. Press (Scan). 3. Press p or q to select the Web Service option, and then press OK. 4. Press p or q to select the type of scan you want to do, and then press OK. 5. Press p or q to select the destination computer where you want to send the scan, and then press OK. 6. Press Start. The machine starts scanning. Configure Scan Settings for Web Services 1. Do one of the following: • (Windows Vista®) Click (Start) > Control Panel > Hardware and Sound > Scanners and Cameras. • (Windows® 7) Click (Start) > Devices and Printers. • (Windows® 8) Move your mouse to the lower right corner of your desktop. When the menu bar appears, click Settings, and then click Control Panel. In the Hardware and Sound group, click View devices and printers. 2. Do one of the following: • (Windows Vista®) Click your machine, and then click the Scan Profiles button. The Scan Profiles dialog box appears. • (Windows® 7) and (Windows® 8) Right-click on the machine icon, and then select Scan profiles.... The Scan Profiles dialog box appears. 3. Select the scan profile you want to use. 4. Make sure the scanner selected in the Scanner list is a Dell machine that supports Web Services for scanning, 100 Scan
-
 1
1 -
2
-
3
-
4
-
5
-
6
-
7
-
8
-
9
-
10
-
11
-
12
-
13
-
14
-
15
-
16
-
17
-
18
-
19
-
20
-
21
-
22
-
23
-
24
-
25
-
26
-
27
-
28
-
29
-
30
-
31
-
32
-
33
-
34
-
35
-
36
-
37
-
38
-
39
-
40
-
41
-
42
-
43
-
44
-
45
-
46
-
47
-
48
-
49
-
50
-
51
-
52
-
53
-
54
-
55
-
56
-
57
-
58
-
59
-
60
-
61
-
62
-
63
-
64
-
65
-
66
-
67
-
68
-
69
-
70
-
71
-
72
-
73
-
74
-
75
-
76
-
77
-
78
-
79
-
80
-
81
-
82
-
83
-
84
-
85
-
86
-
87
-
88
-
89
-
90
-
91
-
92
-
93
-
94
-
 95
95 -
 96
96 -
 97
97 -
 98
98 -
 99
99 -
 100
100 -
 101
101 -
 102
102 -
 103
103 -
 104
104 -
 105
105 -
106
-
107
-
108
-
109
-
110
-
111
-
112
-
113
-
114
-
115
-
116
-
117
-
118
-
119
-
120
-
121
-
122
-
123
-
124
-
125
-
126
-
127
-
128
-
129
-
130
-
131
-
132
-
133
-
134
-
135
-
136
-
137
-
138
-
139
-
140
-
141
-
142
-
143
-
144
-
145
-
146
-
147
-
148
-
149
-
150
-
151
-
152
-
153
-
154
-
155
-
156
-
157
-
158
-
159
-
160
-
161
-
162
-
163
-
164
-
165
-
166
-
167
-
168
-
169
-
170
-
171
-
172
-
173
-
174
-
175
-
176
-
177
-
178
-
179
-
180
-
181
-
182
-
183
-
184
-
185
-
186
-
187
-
188
-
189
-
190
-
191
-
192
-
193
-
194
-
195
-
196
-
197
-
198
-
199
-
200
-
201
-
202
-
203
-
204
-
205
-
206
-
207
-
208
-
209
-
210
-
211
-
212
-
213
-
214
-
215
-
216
-
217
-
218
-
219
-
220
-
221
-
222
-
223
-
224
-
225
-
226
-
227
-
228
-
229
-
230
-
231
-
232
-
233
-
234
-
235
-
236
-
237
-
238
-
239
-
240
-
241
-
242
-
243
-
244
-
245
-
246
-
247
-
248
-
249
-
250
-
251
-
252
-
253
-
254
-
255
-
256
-
257
-
258
-
259
-
260
-
261
-
262
-
263
-
264
-
265
-
266
-
267
-
268
-
269
-
270
-
271
-
272
-
273
-
274
-
275
-
276
-
277
-
278
-
279
-
280
-
281
-
282
-
283
-
284
-
285
-
286
-
287
-
288
-
289
-
290
-
291
-
292
-
293
-
294
-
295
-
296
-
297
-
298
-
299
-
300
-
301
-
302
-
303
-
304
-
305
-
306
-
307
-
308
-
309
-
310
-
311
-
312
-
313
-
314
-
315
-
316
-
317
-
318
-
319
-
320
-
321
-
322
-
323
-
324
-
325
-
326
-
327
-
328
-
329
-
330
-
331
-
332
-
333
-
334
-
335
-
336
-
337
-
338
-
339
-
340
-
341
-
342
-
343
-
344
-
345
-
346
-
347
-
348
-
349
-
350
-
351
-
352
-
353
-
354
-
355
-
356
-
357
-
358
-
359
-
360
-
361
-
362
-
363
-
364
-
365
-
366
-
367
-
368
-
369
-
370
-
371
-
372
-
373
-
374
-
375
-
376
-
377
-
378
-
379
-
380
-
381
-
382
-
383
-
384
-
385
-
386
 |
 |
