Dell E514dw Dell Color Multifunction Printer Users Guide - Page 232
Use Vertical Pairing to Install Drivers Used for Printing and Scanning in Infrastructure Mode (Windows® 7 and Windows® 8)
 |
View all Dell E514dw manuals
Add to My Manuals
Save this manual to your list of manuals |
Page 232 highlights
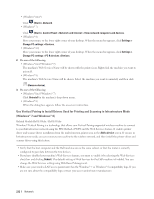
• (Windows Vista®) Click (Start) > Network. • (Windows® 7) Click (Start) > Control Panel > Network and Internet > View network computers and devices. • (Windows® 8) Move your mouse to the lower right corner of your desktop. When the menu bar appears, click Settings > Change PC settings > Devices. • (Windows® 8.1) Move your mouse to the lower right corner of your desktop. When the menu bar appears, click Settings > Change PC settings > PC & devices >Devices. 2. Do one of the following: • (Windows Vista®/Windows® 7) The machine's Web Services Name will be shown with the printer icon. Right-click the machine you want to uninstall. • (Windows® 8) The machine's Web Service Name will be shown. Select the machine you want to uninstall, and then click (Remove device). 3. Do one of the following: • (Windows Vista®/Windows® 7) Click Uninstall in the machine's drop-down menu. • (Windows® 8) When the dialog box appears, follow the on-screen instruction. Use Vertical Pairing to Install Drivers Used for Printing and Scanning in Infrastructure Mode (Windows® 7 and Windows® 8) Related Models:Dell E514dw / Dell E515dw Windows® Vertical Pairing is a technology that allows your Vertical Pairing-supported wireless machine to connect to your Infrastructure network using the PIN Method of WPS and the Web Services feature. It enables printer driver and scanner driver installation from the multi-function printer icon in the Add a device screen. If you are in Infrastructure mode, you can connect your machine to the wireless network, and then install the printer driver and scanner driver using this feature. • Verify that the host computer and the Dell machine are on the same subnet, or that the router is correctly configured to pass data between the two devices. • If you have disabled your machine's Web Services feature, you must re-enable it by selecting the Web Services check box and clicking Submit. The default setting of Web Services for the Dell machine is Enabled. You can change the Web Services setting using Web Based Management. • Make sure your wireless LAN access point/router has the Windows® 7 or Windows® 8 compatibility logo. If you are not sure about the compatibility logo, contact your access point/router manufacturer. 232 Network
-
 1
1 -
2
-
3
-
4
-
5
-
6
-
7
-
8
-
9
-
10
-
11
-
12
-
13
-
14
-
15
-
16
-
17
-
18
-
19
-
20
-
21
-
22
-
23
-
24
-
25
-
26
-
27
-
28
-
29
-
30
-
31
-
32
-
33
-
34
-
35
-
36
-
37
-
38
-
39
-
40
-
41
-
42
-
43
-
44
-
45
-
46
-
47
-
48
-
49
-
50
-
51
-
52
-
53
-
54
-
55
-
56
-
57
-
58
-
59
-
60
-
61
-
62
-
63
-
64
-
65
-
66
-
67
-
68
-
69
-
70
-
71
-
72
-
73
-
74
-
75
-
76
-
77
-
78
-
79
-
80
-
81
-
82
-
83
-
84
-
85
-
86
-
87
-
88
-
89
-
90
-
91
-
92
-
93
-
94
-
95
-
96
-
97
-
98
-
99
-
100
-
101
-
102
-
103
-
104
-
105
-
106
-
107
-
108
-
109
-
110
-
111
-
112
-
113
-
114
-
115
-
116
-
117
-
118
-
119
-
120
-
121
-
122
-
123
-
124
-
125
-
126
-
127
-
128
-
129
-
130
-
131
-
132
-
133
-
134
-
135
-
136
-
137
-
138
-
139
-
140
-
141
-
142
-
143
-
144
-
145
-
146
-
147
-
148
-
149
-
150
-
151
-
152
-
153
-
154
-
155
-
156
-
157
-
158
-
159
-
160
-
161
-
162
-
163
-
164
-
165
-
166
-
167
-
168
-
169
-
170
-
171
-
172
-
173
-
174
-
175
-
176
-
177
-
178
-
179
-
180
-
181
-
182
-
183
-
184
-
185
-
186
-
187
-
188
-
189
-
190
-
191
-
192
-
193
-
194
-
195
-
196
-
197
-
198
-
199
-
200
-
201
-
202
-
203
-
204
-
205
-
206
-
207
-
208
-
209
-
210
-
211
-
212
-
213
-
214
-
215
-
216
-
217
-
218
-
219
-
220
-
221
-
222
-
223
-
224
-
225
-
226
-
 227
227 -
 228
228 -
 229
229 -
 230
230 -
 231
231 -
 232
232 -
 233
233 -
 234
234 -
 235
235 -
 236
236 -
 237
237 -
238
-
239
-
240
-
241
-
242
-
243
-
244
-
245
-
246
-
247
-
248
-
249
-
250
-
251
-
252
-
253
-
254
-
255
-
256
-
257
-
258
-
259
-
260
-
261
-
262
-
263
-
264
-
265
-
266
-
267
-
268
-
269
-
270
-
271
-
272
-
273
-
274
-
275
-
276
-
277
-
278
-
279
-
280
-
281
-
282
-
283
-
284
-
285
-
286
-
287
-
288
-
289
-
290
-
291
-
292
-
293
-
294
-
295
-
296
-
297
-
298
-
299
-
300
-
301
-
302
-
303
-
304
-
305
-
306
-
307
-
308
-
309
-
310
-
311
-
312
-
313
-
314
-
315
-
316
-
317
-
318
-
319
-
320
-
321
-
322
-
323
-
324
-
325
-
326
-
327
-
328
-
329
-
330
-
331
-
332
-
333
-
334
-
335
-
336
-
337
-
338
-
339
-
340
-
341
-
342
-
343
-
344
-
345
-
346
-
347
-
348
-
349
-
350
-
351
-
352
-
353
-
354
-
355
-
356
-
357
-
358
-
359
-
360
-
361
-
362
-
363
-
364
-
365
-
366
-
367
-
368
-
369
-
370
-
371
-
372
-
373
-
374
-
375
-
376
-
377
-
378
-
379
-
380
-
381
-
382
-
383
-
384
-
385
-
386
 |
 |
