Dell IP4700 Service Guide - Page 71
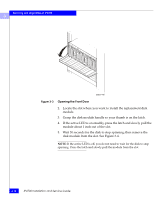
guides in the slot., Grasp the disk module handle, and align the module with
 |
View all Dell IP4700 manuals
Add to My Manuals
Save this manual to your list of manuals |
Page 71 highlights
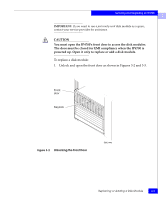
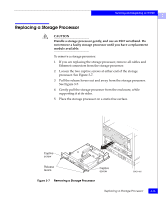
Servicing and Upgrading an IP4700 3 Figure 3-4 Removing a Disk Module EMC1447 IMPORTANT: After removing a disk module, wait for the activity lights on the other disk modules to resume a steady flicker before removing another disk module. The activity lights show that the system software has rediscovered the Fibre Channel loop. To install a disk module: 1. Grasp the disk module handle, and align the module with the guides in the slot. 2. Gently push the disk module into the slot until the latch engages. The disk module active LED flashes to reflect the spin-up sequence (see Figure 3-1, and Tables 3-1 and 3-2). IMPORTANT: After inserting a disk module, wait for the activity lights on the other drives to resume a steady flicker before inserting another module. The activity lights show that the system software has rediscovered the Fibre Channel loop. 3. Remove and store the ESD wristband. Replacing or Adding a Disk Module 3-11
-
 1
1 -
2
-
3
-
4
-
5
-
6
-
7
-
8
-
9
-
10
-
11
-
12
-
13
-
14
-
15
-
16
-
17
-
18
-
19
-
20
-
21
-
22
-
23
-
24
-
25
-
26
-
27
-
28
-
29
-
30
-
31
-
32
-
33
-
34
-
35
-
36
-
37
-
38
-
39
-
40
-
41
-
42
-
43
-
44
-
45
-
46
-
47
-
48
-
49
-
50
-
51
-
52
-
53
-
54
-
55
-
56
-
57
-
58
-
59
-
60
-
61
-
62
-
63
-
64
-
65
-
 66
66 -
 67
67 -
 68
68 -
 69
69 -
 70
70 -
 71
71 -
 72
72 -
 73
73 -
 74
74 -
 75
75 -
 76
76 -
77
-
78
-
79
-
80
-
81
-
82
-
83
-
84
-
85
-
86
-
87
-
88
-
89
-
90
-
91
-
92
-
93
-
94
-
95
-
96
-
97
-
98
-
99
-
100
-
101
-
102
-
103
-
104
-
105
-
106
-
107
-
108
-
109
-
110
-
111
-
112
-
113
-
114
-
115
-
116
-
117
-
118
-
119
-
120
-
121
-
122
-
123
-
124
-
125
-
126
 |
 |
