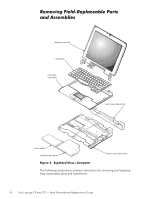
Dell Latitude CP Replacement Instructions - Page 21
Hard-Disk Drive Assembly, The drive is on the left side of the computer.
 |
View all Dell Latitude CP manuals
Add to My Manuals
Save this manual to your list of manuals |
Page 21 highlights
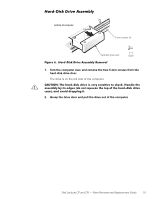
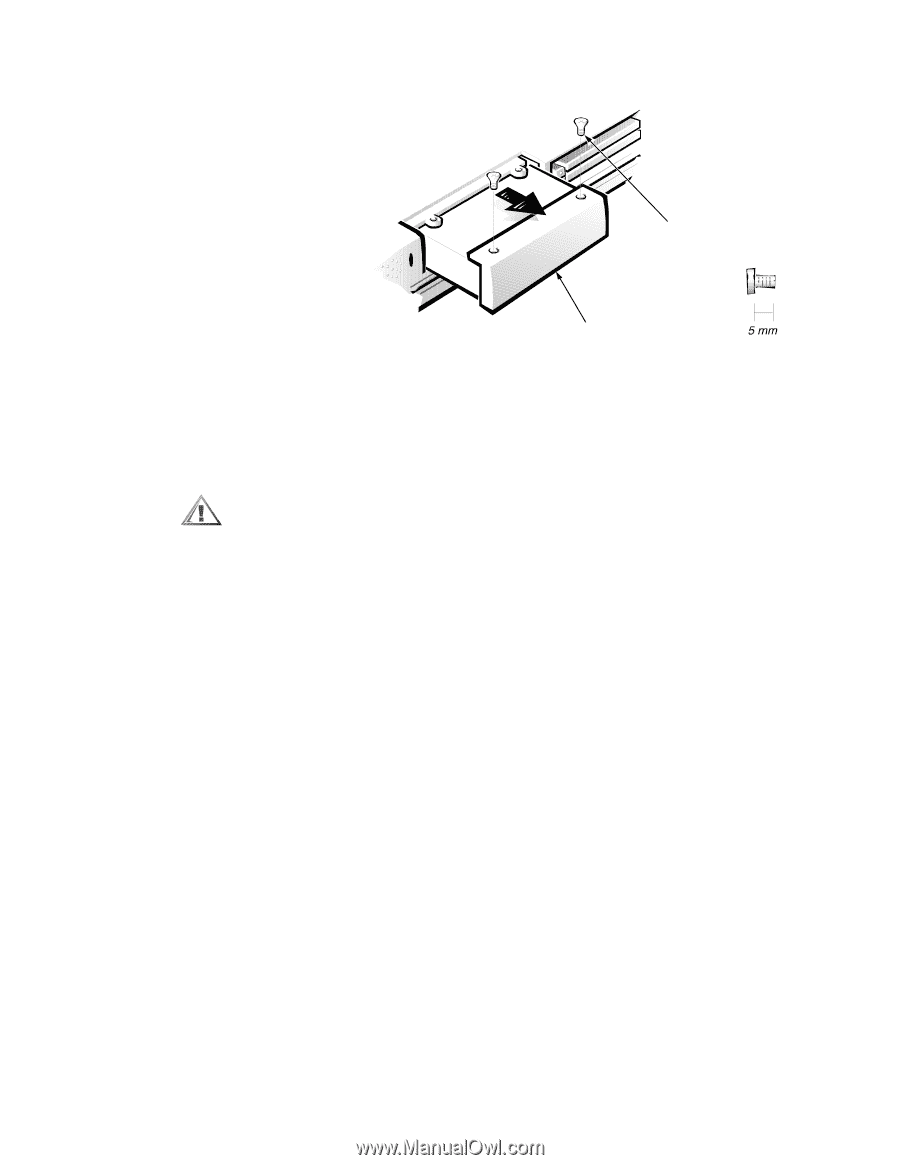
5-mm screws (2) hard-disk drive door 1. Turn the computer over, and remove the two 5-mm screws from the hard-disk drive door. The drive is on the left side of the computer. 2. Grasp the drive door and pull the drive out of the computer. Dell Latitude CP and CPi - Parts Removal and Replacement Guide 15
-
 1
1 -
2
-
3
-
4
-
5
-
6
-
7
-
8
-
9
-
10
-
11
-
12
-
13
-
14
-
15
-
 16
16 -
 17
17 -
 18
18 -
 19
19 -
 20
20 -
 21
21 -
 22
22 -
 23
23 -
 24
24 -
 25
25 -
 26
26 -
27
-
28
-
29
-
30
-
31
-
32
-
33
-
34
-
35
-
36
-
37
-
38
-
39
-
40
-
41
-
42
-
43
-
44
-
45
-
46
-
47
-
48
-
49
-
50
-
51
-
52
-
53
-
54
-
55
-
56
-
57
-
58
 |
 |
Dell Latitude CP and CPi
—
Parts Removal and Replacement Guide
15
±²³´µ¶·¸¹º¶³·»¼º½¸¸¼¾¿ÀÁ
±²³´µ¶·,¹··-Áµ!.$²Ç/·$µ²Ë¶·ÆÇǶ¼ÈÉŷʶ¼»ËÁÉ
1.
Turn the computer over, and remove the two 5-mm screws from the
hard-disk drive door.
The drive is on the left side of the computer.
±²³´µ¶·¸ ´Á¿ Á½Â»)»¹À' »Â¹Ì¿ ¹À Ì¿ÂÊ À¿ºÀ¹¾¹Ì¿ ¾Ä ÀÁļ'Î *½º»Å¿ ¾Á¿
½ÀÀ¿ÆÍÅÊ ÍÊ ¹¾À ¿»Ç¿À +»Ä ºÄ¾ À$Ë¿¿,¿ ¾Á¿ ¾Äà ÄÉ ¾Á¿ Á½Â»)»¹À' »Â¹Ì¿
¼½À¿-% ½º» ½ÌĹ» »ÂÄÃùºÇ ¹¾Î
2.
Grasp the drive door and pull the drive out of the computer.
±²³³²´µ²¶µ·²´¸¹³º»
hard-disk drive door
5-mm screws (2)