Dell Latitude CP Replacement Instructions - Page 30
Power Button, Display Assembly Components
 |
View all Dell Latitude CP manuals
Add to My Manuals
Save this manual to your list of manuals |
Page 30 highlights
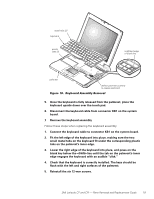
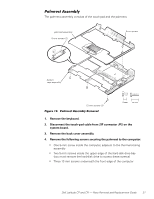
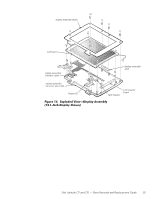
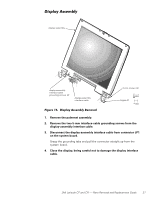
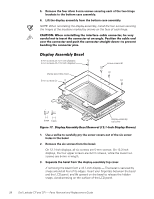
1. Remove the palmrest assembly. 2. Turn the palmrest assembly upside down on a flat work surface. 3. Compress the two catches securing the power button, and remove the power button and spring from the palmrest assembly. For removal purposes, the display assembly consists of the following components: Display assembly bezel LCD panel LCD inverter board LCD inverter board shield (13.3-inch display only) Display-assembly interface cable Display assembly latch Display assembly top-cover assembly Display assembly hinges Display assembly right bracket (12.1-inch display only) 24 Dell Latitude CP and CPi - Parts Removal and Replacement Guide
-
 1
1 -
2
-
3
-
4
-
5
-
6
-
7
-
8
-
9
-
10
-
11
-
12
-
13
-
14
-
15
-
16
-
17
-
18
-
19
-
20
-
21
-
22
-
23
-
24
-
 25
25 -
 26
26 -
 27
27 -
 28
28 -
 29
29 -
 30
30 -
 31
31 -
 32
32 -
 33
33 -
 34
34 -
 35
35 -
36
-
37
-
38
-
39
-
40
-
41
-
42
-
43
-
44
-
45
-
46
-
47
-
48
-
49
-
50
-
51
-
52
-
53
-
54
-
55
-
56
-
57
-
58
 |
 |

24
Dell Latitude CP and CPi
—
Parts Removal and Replacement Guide
É𼳺ÇÄÊÊÃκººº
1.
Remove the palmrest assembly.
2.
Turn the palmrest assembly upside down on a flat work surface.
3.
Compress the two catches securing the power button, and remove
the power button and spring from the palmrest assembly.
¶·¸!À²Áº½¸¸¼¾¿ÀÁºÅþ!ÃμÎʸº
For removal purposes, the display assembly consists of the following
components:
±
Display assembly bezel
±
LCD panel
±
LCD inverter board
±
LCD inverter board shield (13.3-inch display only)
±
Display-assembly interface cable
±
Display assembly latch
±
Display assembly top-cover assembly
±
Display assembly hinges
±
Display assembly right bracket (12.1-inch display only)