Dell Latitude CP Replacement Instructions - Page 37
-Inch LCD Displays, access to the LCD inverter board in the display-assembly top cover.
 |
View all Dell Latitude CP manuals
Add to My Manuals
Save this manual to your list of manuals |
Page 37 highlights
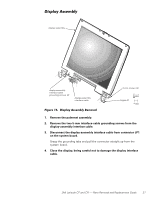
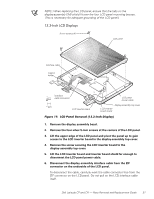
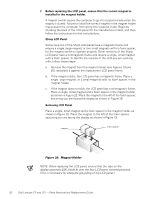
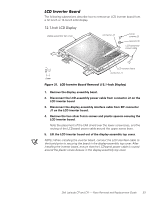
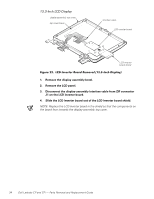
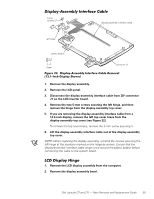
NOTE: When replacing the LCD panel, ensure that the tabs on the display-assembly EMI shield fit over the four LCD panel mounting bosses. (This is necessary for adequate grounding of the LCD panel.) 5-mm screws (4) LCD panel interface cable magnet holder interface cable connector LCD inverter board LCD panel power cable display-assembly top cover LCD inverter board shield 1. Remove the display assembly bezel. 2. Remove the four silver 5-mm screws at the corners of the LCD panel. 3. Lift the upper edge of the LCD panel and pivot the panel up to gain access to the LCD inverter board in the display-assembly top cover. 4. Remove the screw securing the LCD inverter board to the display-assembly top cover. 5. Lift the LCD inverter board and inverter board shield far enough to disconnect the LCD panel power cable. 6. Disconnect the display-assembly interface cable from the ZIF connector on the underside of the LCD panel. To disconnect the cable, carefully work the cable connector free from the ZIF connector on the LCD panel. Do not pull on the LCD interface cable itself. Dell Latitude CP and CPi - Parts Removal and Replacement Guide 31
-
 1
1 -
2
-
3
-
4
-
5
-
6
-
7
-
8
-
9
-
10
-
11
-
12
-
13
-
14
-
15
-
16
-
17
-
18
-
19
-
20
-
21
-
22
-
23
-
24
-
25
-
26
-
27
-
28
-
29
-
30
-
31
-
 32
32 -
 33
33 -
 34
34 -
 35
35 -
 36
36 -
 37
37 -
 38
38 -
 39
39 -
 40
40 -
 41
41 -
 42
42 -
43
-
44
-
45
-
46
-
47
-
48
-
49
-
50
-
51
-
52
-
53
-
54
-
55
-
56
-
57
-
58
 |
 |