Dell Latitude CP Replacement Instructions - Page 24
Keyboard Assembly, Turn the computer right-side up and open the display.
 |
View all Dell Latitude CP manuals
Add to My Manuals
Save this manual to your list of manuals |
Page 24 highlights
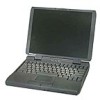
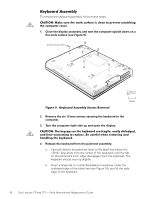
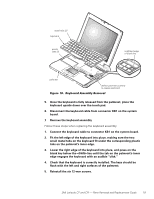
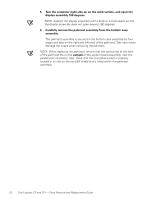
To remove the keyboard assembly, follow these steps. 1. Close the display assembly, and turn the computer upside down on a flat work surface (see Figure 9). 12-mm screws (6) 2. Remove the six 12-mm screws securing the keyboard to the computer. 3. Turn the computer right-side up and open the display. 4. Release the keyboard from the palmrest assembly: a. Carefully deflect the palmrest (next to the blank key below the key) away from the center of the keyboard, until the tab on the palmrest's inner edge disengages from the keyboard. The keyboard should raise up slightly. b. Insert a fingernail or a small flat-bladed screwdriver under the scalloped edge of the blank key (see Figure 10), and lift the right edge of the keyboard. 18 Dell Latitude CP and CPi - Parts Removal and Replacement Guide
-
 1
1 -
2
-
3
-
4
-
5
-
6
-
7
-
8
-
9
-
10
-
11
-
12
-
13
-
14
-
15
-
16
-
17
-
18
-
 19
19 -
 20
20 -
 21
21 -
 22
22 -
 23
23 -
 24
24 -
 25
25 -
 26
26 -
 27
27 -
 28
28 -
 29
29 -
30
-
31
-
32
-
33
-
34
-
35
-
36
-
37
-
38
-
39
-
40
-
41
-
42
-
43
-
44
-
45
-
46
-
47
-
48
-
49
-
50
-
51
-
52
-
53
-
54
-
55
-
56
-
57
-
58
 |
 |