Dell Latitude CP Replacement Instructions - Page 9
Screw Identification and Tightening - latitude cpi hard drive
 |
View all Dell Latitude CP manuals
Add to My Manuals
Save this manual to your list of manuals |
Page 9 highlights
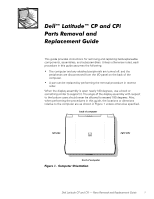
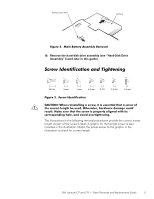
battery bay latch battery 10. Remove the hard-disk drive assembly (see "Hard-Disk Drive Assembly" found later in this guide). The illustrations in the following removal procedures provide the correct screw length as part of the screw's label. A graphic for that length screw is also included in the illustration. Match the actual screw to the graphic in the illustration to check for correct length. Dell Latitude CP and CPi - Parts Removal and Replacement Guide 3
-
 1
1 -
2
-
3
-
 4
4 -
 5
5 -
 6
6 -
 7
7 -
 8
8 -
 9
9 -
 10
10 -
 11
11 -
 12
12 -
 13
13 -
 14
14 -
15
-
16
-
17
-
18
-
19
-
20
-
21
-
22
-
23
-
24
-
25
-
26
-
27
-
28
-
29
-
30
-
31
-
32
-
33
-
34
-
35
-
36
-
37
-
38
-
39
-
40
-
41
-
42
-
43
-
44
-
45
-
46
-
47
-
48
-
49
-
50
-
51
-
52
-
53
-
54
-
55
-
56
-
57
-
58
 |
 |
Dell Latitude CP and CPi
—
Parts Removal and Replacement Guide
3
±²³´µ¶·Â¹··ÃÁ²À·ÄÁ¾¾¶µÅ·ÆÇǶ¼ÈÉŷʶ¼»ËÁÉ
10.
Remove the hard-disk drive assembly (see
“
Hard-Disk Drive
Assembly
”
found later in this guide).
ËÅ»²ÌµÍ´²Â¼¸Î¸Å³¼¸¾Âµ³Â´µ¶¸Ä·¼²Â¸ÂÄ
±²³´µ¶·Ì¹··Íε¶Ï·°!¶À¾²"²ÎÁ¾²»À
±²³´µ¶·¸ °Á¿º ¿¹ºÀ¾½ÅŹºÇ ½ À¼Â¿È% ¹¾ ¹À ¿ÀÀ¿º¾¹½Å ¾Á½¾ ½ À¼Â¿È ÄÉ
¾Á¿ ¼Ä¿¼¾ Å¿ºÇ¾Á Í¿ ËÀ¿»Î ¶¾Á¿ÂȹÀ¿% Á½Â»È½Â¿ »½Æ½Ç¿ ¼ÄËÅ»
¿ÀËžΠ&½'¿ ÀË¿ ¾Á½¾ ¾Á¿ À¼Â¿È ¹À ÃÂÄÿÂÅÊ ½Å¹Çº¿» ȹ¾Á ¹¾À
¼Ä¿ÀÃĺ»¹ºÇ ÁÄÅ¿% ½º» ½ÌĹ» Ä̿¾¹ÇÁ¾¿º¹ºÇÎ
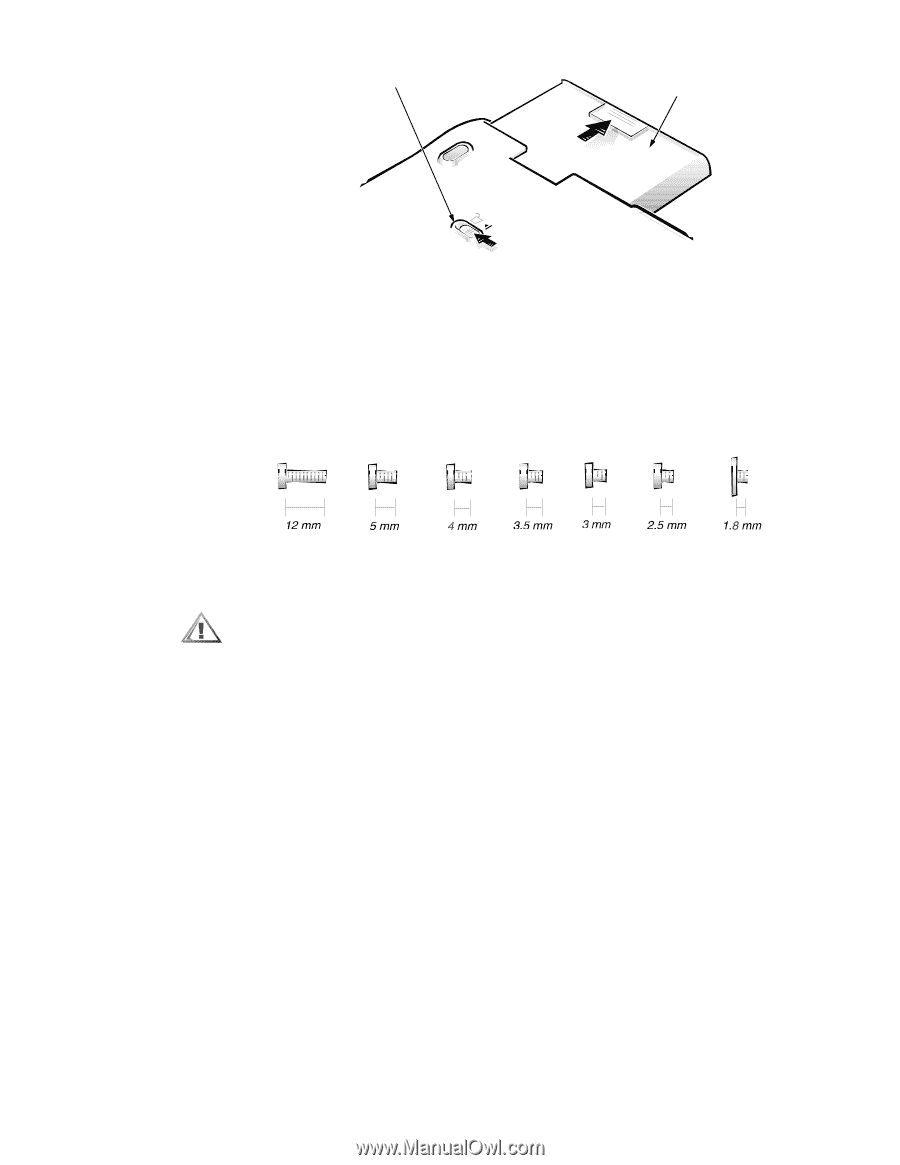
The illustrations in the following removal procedures provide the correct screw
length as part of the screw
’
s label. A graphic for that length screw is also
included in the illustration. Match the actual screw to the graphic in the
illustration to check for correct length.
battery bay latch
battery