Dell PowerEdge 4300 Dell PowerEdge 4300 Systems Service Manual - Page 71
drive. When installing the drive, raise the carrier handle until it latches
 |
View all Dell PowerEdge 4300 manuals
Add to My Manuals
Save this manual to your list of manuals |
Page 71 highlights
5. Remove the drive from its carrier by removing the four screws (two on each side) that secure it in the carrier. Before installing a new drive, set all jumpers and remove termination from the drive. When installing the drive, raise the carrier handle until it latches to ensure that the drive is fully seated in the backplane board. Removing and Replacing Parts 4-13
-
 1
1 -
2
-
3
-
4
-
5
-
6
-
7
-
8
-
9
-
10
-
11
-
12
-
13
-
14
-
15
-
16
-
17
-
18
-
19
-
20
-
21
-
22
-
23
-
24
-
25
-
26
-
27
-
28
-
29
-
30
-
31
-
32
-
33
-
34
-
35
-
36
-
37
-
38
-
39
-
40
-
41
-
42
-
43
-
44
-
45
-
46
-
47
-
48
-
49
-
50
-
51
-
52
-
53
-
54
-
55
-
56
-
57
-
58
-
59
-
60
-
61
-
62
-
63
-
64
-
65
-
 66
66 -
 67
67 -
 68
68 -
 69
69 -
 70
70 -
 71
71 -
 72
72 -
 73
73 -
 74
74 -
 75
75 -
 76
76 -
77
-
78
-
79
-
80
-
81
-
82
-
83
-
84
-
85
-
86
-
87
-
88
-
89
-
90
-
91
-
92
-
93
-
94
-
95
-
96
-
97
-
98
-
99
-
100
-
101
-
102
-
103
-
104
 |
 |

Removing and Replacing Parts
4-13
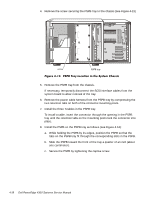
5.
Remove the drive from its carrier by removing the four screws (two on
each side) that secure it in the carrier.
Before installing a new drive, set all jumpers and remove termination from the
drive. When installing the drive, raise the carrier handle until it latches to
ensure that the drive is fully seated in the backplane board.