Dell PowerEdge 4300 Dell PowerEdge 4300 Systems Service Manual - Page 76
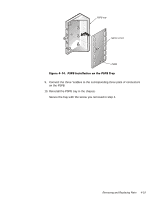
While holding the PSPB by its edges, position the PSPB so that
 |
View all Dell PowerEdge 4300 manuals
Add to My Manuals
Save this manual to your list of manuals |
Page 76 highlights
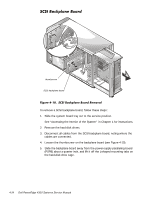
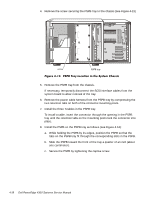
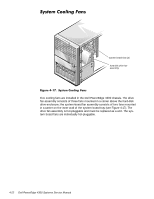
4. Remove the screw securing the PSPB tray to the chassis (see Figure 4-13). screw PSPB tray 5. Remove the PSPB tray from the chassis. If necessary, temporarily disconnect the SCSI interface cables from the system board to allow removal of the tray. 6. Remove the power cable harness from the PSPB tray by compressing the two retention tabs on both of the connector-mounting posts. 7. Install the three Y-cables in the PSPB tray. To install a cable, insert the connector through the opening in the PSPB tray until the retention tabs on the mounting posts lock the connector into place. 8. Install the PSPB on the PSPB tray as follows (see Figure 4-14): a. While holding the PSPB by its edges, position the PSPB so that the tabs on the PSPB tray fit through the corresponding slots in the PSPB. b. Slide the PSPB toward the front of the tray a quarter of an inch (about one centimeter). c. Secure the PSPB by tightening the captive screw. 4-18 Dell PowerEdge 4300 Systems Service Manual
-
 1
1 -
2
-
3
-
4
-
5
-
6
-
7
-
8
-
9
-
10
-
11
-
12
-
13
-
14
-
15
-
16
-
17
-
18
-
19
-
20
-
21
-
22
-
23
-
24
-
25
-
26
-
27
-
28
-
29
-
30
-
31
-
32
-
33
-
34
-
35
-
36
-
37
-
38
-
39
-
40
-
41
-
42
-
43
-
44
-
45
-
46
-
47
-
48
-
49
-
50
-
51
-
52
-
53
-
54
-
55
-
56
-
57
-
58
-
59
-
60
-
61
-
62
-
63
-
64
-
65
-
66
-
67
-
68
-
69
-
70
-
 71
71 -
 72
72 -
 73
73 -
 74
74 -
 75
75 -
 76
76 -
 77
77 -
 78
78 -
 79
79 -
 80
80 -
 81
81 -
82
-
83
-
84
-
85
-
86
-
87
-
88
-
89
-
90
-
91
-
92
-
93
-
94
-
95
-
96
-
97
-
98
-
99
-
100
-
101
-
102
-
103
-
104
 |
 |
