Dell PowerEdge 4300 Dell PowerEdge 4300 Systems Service Manual - Page 91
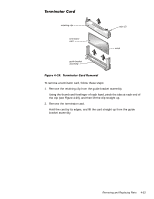
Remove the terminator card.
 |
View all Dell PowerEdge 4300 manuals
Add to My Manuals
Save this manual to your list of manuals |
Page 91 highlights
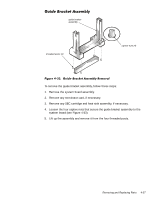
retaining clip terminator card guide bracket assembly tabs (2) notch To remove a terminator card, follow these steps: 1. Remove the retaining clip from the guide bracket assembly. Using the thumb and forefinger of each hand, pinch the tabs at each end of the clip (see Figure 4-29), and then lift the clip straight up. 2. Remove the terminator card. Hold the card by its edges, and lift the card straight up from the guide bracket assembly. Removing and Replacing Parts 4-33
-
 1
1 -
2
-
3
-
4
-
5
-
6
-
7
-
8
-
9
-
10
-
11
-
12
-
13
-
14
-
15
-
16
-
17
-
18
-
19
-
20
-
21
-
22
-
23
-
24
-
25
-
26
-
27
-
28
-
29
-
30
-
31
-
32
-
33
-
34
-
35
-
36
-
37
-
38
-
39
-
40
-
41
-
42
-
43
-
44
-
45
-
46
-
47
-
48
-
49
-
50
-
51
-
52
-
53
-
54
-
55
-
56
-
57
-
58
-
59
-
60
-
61
-
62
-
63
-
64
-
65
-
66
-
67
-
68
-
69
-
70
-
71
-
72
-
73
-
74
-
75
-
76
-
77
-
78
-
79
-
80
-
81
-
82
-
83
-
84
-
85
-
 86
86 -
 87
87 -
 88
88 -
 89
89 -
 90
90 -
 91
91 -
 92
92 -
 93
93 -
 94
94 -
 95
95 -
 96
96 -
97
-
98
-
99
-
100
-
101
-
102
-
103
-
104
 |
 |

Removing and Replacing Parts
4-33
7HUPLQDWRU±&DUG
)LJXUH±·´µ¿³±±7HUPLQDWRU±&DUG±5HPRYDO
To remove a terminator card, follow these steps:
1.
Remove the retaining clip from the guide bracket assembly.
Using the thumb and forefinger of each hand, pinch the tabs at each end of
the clip (see Figure 4-29), and then lift the clip straight up.
2.
Remove the terminator card.
Hold the card by its edges, and lift the card straight up from the guide
bracket assembly.
terminator
card
guide bracket
assembly
notch
retaining clip
tabs (2)