Dell PowerEdge 4300 Dell PowerEdge 4300 Systems Service Manual - Page 94
inner
 |
View all Dell PowerEdge 4300 manuals
Add to My Manuals
Save this manual to your list of manuals |
Page 94 highlights
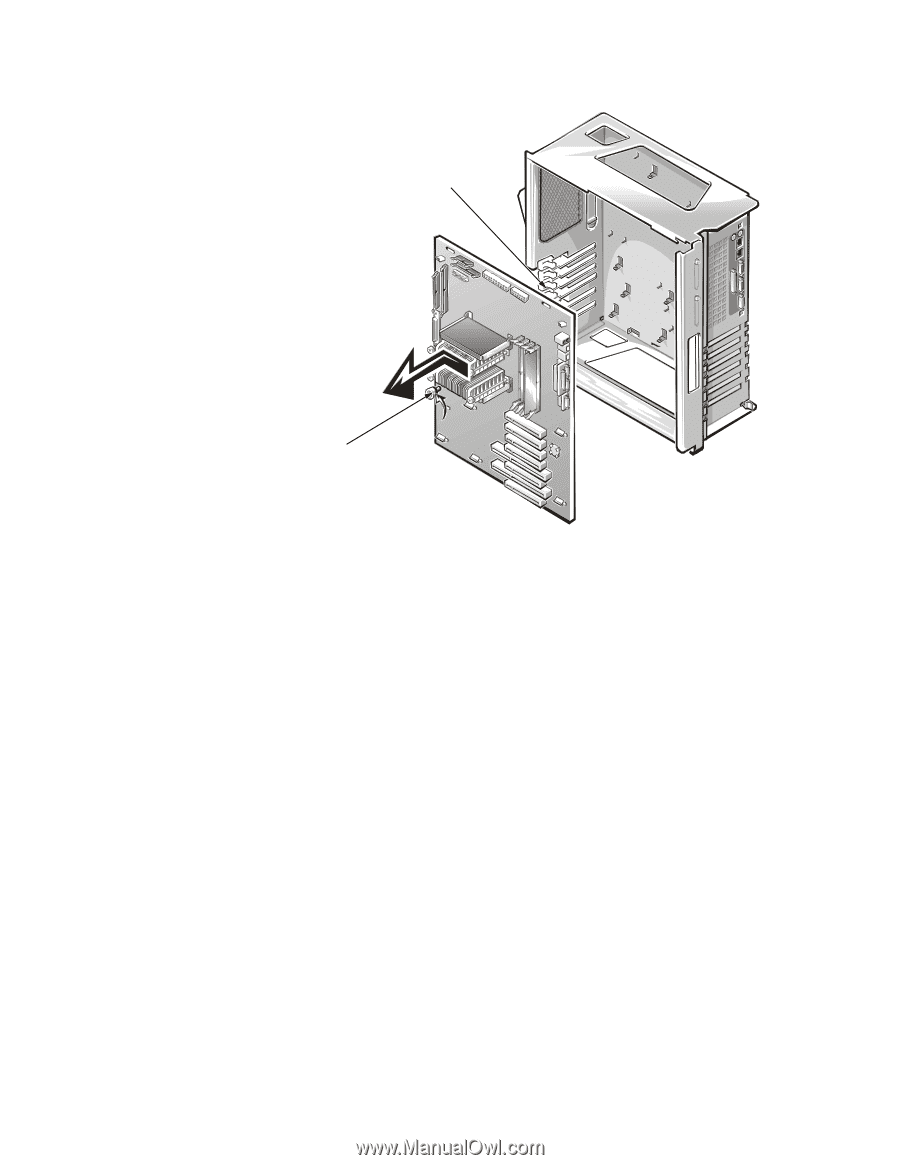
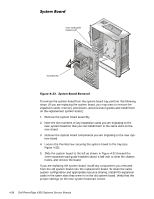
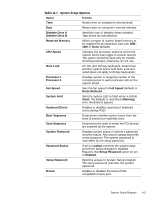
inner card-guide brackets (6) thumbscrew To remove the system board from the system board tray, perform the following steps. (If you are replacing the system board, you may want to remove the expansion cards, memory, processors, and processor guides and install them on the replacement system board.) 1. Remove the system board assembly. 2. Note the slot numbers of any expansion cards you are migrating to the new system board so that you can install them in the same slots on the new board. 3. Remove the system board components you are migrating to the new system board. 4. Loosen the thumbscrew securing the system board to the tray (see Figure 4-32). 5. Slide the system board to the left as shown in Figure 4-32 (toward the inner expansion-card guide brackets) about a half inch to clear the chassis hooks, and remove the board. If you are replacing the system board, install any components you removed from the old system board onto the replacement board. To retain the same system configuration and appropriate resource sharing, install PCI expansion cards in the same slots they were in on the old system board. Verify that the jumper settings on the new system board are correct. 4-36 Dell PowerEdge 4300 Systems Service Manual
-
 1
1 -
2
-
3
-
4
-
5
-
6
-
7
-
8
-
9
-
10
-
11
-
12
-
13
-
14
-
15
-
16
-
17
-
18
-
19
-
20
-
21
-
22
-
23
-
24
-
25
-
26
-
27
-
28
-
29
-
30
-
31
-
32
-
33
-
34
-
35
-
36
-
37
-
38
-
39
-
40
-
41
-
42
-
43
-
44
-
45
-
46
-
47
-
48
-
49
-
50
-
51
-
52
-
53
-
54
-
55
-
56
-
57
-
58
-
59
-
60
-
61
-
62
-
63
-
64
-
65
-
66
-
67
-
68
-
69
-
70
-
71
-
72
-
73
-
74
-
75
-
76
-
77
-
78
-
79
-
80
-
81
-
82
-
83
-
84
-
85
-
86
-
87
-
88
-
 89
89 -
 90
90 -
 91
91 -
 92
92 -
 93
93 -
 94
94 -
 95
95 -
 96
96 -
 97
97 -
 98
98 -
 99
99 -
100
-
101
-
102
-
103
-
104
 |
 |