Dell PowerEdge 4300 Dell PowerEdge 4300 Systems Service Manual - Page 92
Khuh² Lv² D² Gdqjhu² Ri² Wkh² Qhz² Edwwhu\² H[sorglqj² Li² Lqfruuhfwo
 |
View all Dell PowerEdge 4300 manuals
Add to My Manuals
Save this manual to your list of manuals |
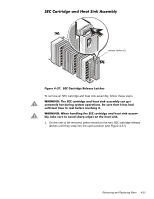
Page 92 highlights
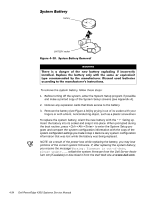
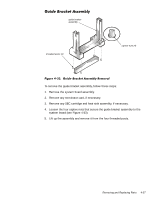
battery BATTERY socket To remove the system battery, follow these steps: 1. Before turning off the system, enter the System Setup program if possible and make a printed copy of the System Setup screens (see Appendix A). 2. Remove any expansion cards that block access to the battery. 3. Remove the battery (see Figure 4-30) by prying it out of its socket with your fingers or with a blunt, nonconducting object, such as a plastic screwdriver. To replace the system battery, orient the new battery with the "+" facing up. Insert the battery into its socket and snap it into place. When prompted during the boot routine, press to enter the System Setup program and compare the system configuration information with the copy of the system configuration settings you made in step 1. Restore any system configuration information that was lost while the battery was being replaced. NOTE: As a result of the power loss while replacing the battery, you may lose portions of the current system firmware. If, after replacing the system battery, you receive the message , reflash the system firmware from the Dell Server Assistant CD (if available) or download it from the Dell Web site at www.dell.com. 4-34 Dell PowerEdge 4300 Systems Service Manual
-
 1
1 -
2
-
3
-
4
-
5
-
6
-
7
-
8
-
9
-
10
-
11
-
12
-
13
-
14
-
15
-
16
-
17
-
18
-
19
-
20
-
21
-
22
-
23
-
24
-
25
-
26
-
27
-
28
-
29
-
30
-
31
-
32
-
33
-
34
-
35
-
36
-
37
-
38
-
39
-
40
-
41
-
42
-
43
-
44
-
45
-
46
-
47
-
48
-
49
-
50
-
51
-
52
-
53
-
54
-
55
-
56
-
57
-
58
-
59
-
60
-
61
-
62
-
63
-
64
-
65
-
66
-
67
-
68
-
69
-
70
-
71
-
72
-
73
-
74
-
75
-
76
-
77
-
78
-
79
-
80
-
81
-
82
-
83
-
84
-
85
-
86
-
 87
87 -
 88
88 -
 89
89 -
 90
90 -
 91
91 -
 92
92 -
 93
93 -
 94
94 -
 95
95 -
 96
96 -
 97
97 -
98
-
99
-
100
-
101
-
102
-
103
-
104
 |
 |
