Dell PowerEdge 4300 Dell PowerEdge 4300 Systems Service Manual - Page 79
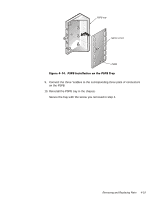
wall so that the tabs on the chassis wall fit through the corresponding slots
 |
View all Dell PowerEdge 4300 manuals
Add to My Manuals
Save this manual to your list of manuals |
Page 79 highlights
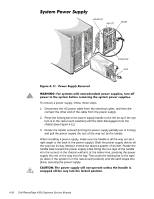
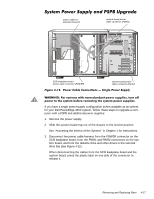
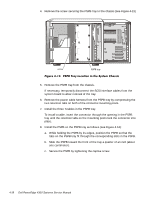
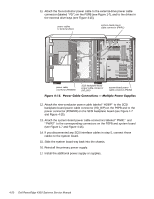
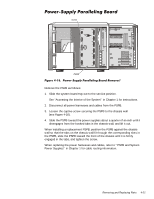
screw PSPB Remove the PSPB as follows: 1. Slide the system board tray out to the service position. See "Accessing the Interior of the System" in Chapter 1 for instructions. 2. Disconnect all power harnesses and cables from the PSPB. 3. Loosen the captive screw securing the PSPB to the chassis wall (see Figure 4-16). 4. Slide the PSPB toward the power supplies about a quarter of an inch until it disengages from the hooked tabs in the chassis wall, and lift it out. When installing a replacement PSPB, position the PSPB against the chassis wall so that the tabs on the chassis wall fit through the corresponding slots in the PSPB, slide the PSPB toward the front of the chassis until it is firmly engaged in the tabs, and tighten the screw. When replacing the power harnesses and cables, refer to "PSPB and System Power Supplies" in Chapter 1 for cable routing information. Removing and Replacing Parts 4-21
-
 1
1 -
2
-
3
-
4
-
5
-
6
-
7
-
8
-
9
-
10
-
11
-
12
-
13
-
14
-
15
-
16
-
17
-
18
-
19
-
20
-
21
-
22
-
23
-
24
-
25
-
26
-
27
-
28
-
29
-
30
-
31
-
32
-
33
-
34
-
35
-
36
-
37
-
38
-
39
-
40
-
41
-
42
-
43
-
44
-
45
-
46
-
47
-
48
-
49
-
50
-
51
-
52
-
53
-
54
-
55
-
56
-
57
-
58
-
59
-
60
-
61
-
62
-
63
-
64
-
65
-
66
-
67
-
68
-
69
-
70
-
71
-
72
-
73
-
 74
74 -
 75
75 -
 76
76 -
 77
77 -
 78
78 -
 79
79 -
 80
80 -
 81
81 -
 82
82 -
 83
83 -
 84
84 -
85
-
86
-
87
-
88
-
89
-
90
-
91
-
92
-
93
-
94
-
95
-
96
-
97
-
98
-
99
-
100
-
101
-
102
-
103
-
104
 |
 |
