Dell PowerEdge C4140 EMC Installation and Service Manual - Page 107
Installing a GPU riser cable board
 |
View all Dell PowerEdge C4140 manuals
Add to My Manuals
Save this manual to your list of manuals |
Page 107 highlights
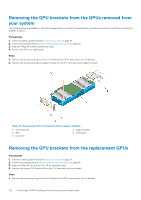
Figure 75. Installing the GPU I/O brackets and the support brackets 1. Torx screw (2) 3. GPU 5. screw (5) 2. support bracket 4. I/O bracket Next steps Follow the procedure listed in After working inside your system on page 58. Installing a GPU riser cable board Prerequisites 1. Follow the safety guidelines listed in Safety instructions on page 57. 2. Keep the Philips #2 screwdriver ready. 3. Install the custom GPU brackets on the replacement GPU. Steps 1. Route the riser cable through the riser cable clip. 2. Align the connector on the riser cable board with the card edge connector on the GPU and press till it clicks into place. 3. Align the screw holes on the riser cable board with the screw holes on the GPU bracket. 4. Secure the riser cable board to the GPU by using the screws. PowerEdge C4140 installing and removing system components 107
-
 1
1 -
2
-
3
-
4
-
5
-
6
-
7
-
8
-
9
-
10
-
11
-
12
-
13
-
14
-
15
-
16
-
17
-
18
-
19
-
20
-
21
-
22
-
23
-
24
-
25
-
26
-
27
-
28
-
29
-
30
-
31
-
32
-
33
-
34
-
35
-
36
-
37
-
38
-
39
-
40
-
41
-
42
-
43
-
44
-
45
-
46
-
47
-
48
-
49
-
50
-
51
-
52
-
53
-
54
-
55
-
56
-
57
-
58
-
59
-
60
-
61
-
62
-
63
-
64
-
65
-
66
-
67
-
68
-
69
-
70
-
71
-
72
-
73
-
74
-
75
-
76
-
77
-
78
-
79
-
80
-
81
-
82
-
83
-
84
-
85
-
86
-
87
-
88
-
89
-
90
-
91
-
92
-
93
-
94
-
95
-
96
-
97
-
98
-
99
-
100
-
101
-
 102
102 -
 103
103 -
 104
104 -
 105
105 -
 106
106 -
 107
107 -
 108
108 -
 109
109 -
 110
110 -
 111
111 -
 112
112 -
113
-
114
-
115
-
116
-
117
-
118
-
119
-
120
-
121
-
122
-
123
-
124
-
125
-
126
-
127
-
128
-
129
-
130
-
131
-
132
-
133
-
134
-
135
-
136
-
137
-
138
-
139
-
140
-
141
 |
 |
