Dell PowerEdge C4140 EMC Installation and Service Manual - Page 99
Removing a GPU
 |
View all Dell PowerEdge C4140 manuals
Add to My Manuals
Save this manual to your list of manuals |
Page 99 highlights
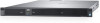
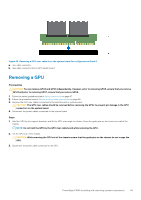
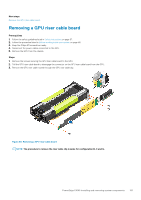
Figure 66. Removing a GPU riser cable from the system board for configurations B and G a. riser cable connector b. riser cable connector slot on GPU switch board Removing a GPU Prerequisites CAUTION: You can remove GPU4 and GPU6 independently. However, prior to removing GPU5, ensure that you remove GPU4 and prior to removing GPU7, ensure that you remove GPU6. 1. Follow the safety guidelines listed in Safety instructions on page 57. 2. Follow the procedure listed in Before working inside your system on page 58. 3. Remove the GPU riser cables connected to the switch board or system board. CAUTION: The GPU riser cables should be removed before removing the GPUs to prevent pin damage in the GPU connectors on the system board. 4. Disconnect the power cables connected to the system board. Steps 1. Hold the GPU by the support brackets, and lift the GPU at an angle to release it from the guide pins on the front inner wall of the chassis. NOTE: Do not hold the GPU by the GPU riser cable board while removing the GPU. 2. Lift the GPU out of the chassis. CAUTION: While removing the GPU out of the chassis ensure that the guide pins on the chassis do not scrape the GPU. 3. Disconnect the power cable connected to the GPU. PowerEdge C4140 installing and removing system components 99
-
 1
1 -
2
-
3
-
4
-
5
-
6
-
7
-
8
-
9
-
10
-
11
-
12
-
13
-
14
-
15
-
16
-
17
-
18
-
19
-
20
-
21
-
22
-
23
-
24
-
25
-
26
-
27
-
28
-
29
-
30
-
31
-
32
-
33
-
34
-
35
-
36
-
37
-
38
-
39
-
40
-
41
-
42
-
43
-
44
-
45
-
46
-
47
-
48
-
49
-
50
-
51
-
52
-
53
-
54
-
55
-
56
-
57
-
58
-
59
-
60
-
61
-
62
-
63
-
64
-
65
-
66
-
67
-
68
-
69
-
70
-
71
-
72
-
73
-
74
-
75
-
76
-
77
-
78
-
79
-
80
-
81
-
82
-
83
-
84
-
85
-
86
-
87
-
88
-
89
-
90
-
91
-
92
-
93
-
 94
94 -
 95
95 -
 96
96 -
 97
97 -
 98
98 -
 99
99 -
 100
100 -
 101
101 -
 102
102 -
 103
103 -
 104
104 -
105
-
106
-
107
-
108
-
109
-
110
-
111
-
112
-
113
-
114
-
115
-
116
-
117
-
118
-
119
-
120
-
121
-
122
-
123
-
124
-
125
-
126
-
127
-
128
-
129
-
130
-
131
-
132
-
133
-
134
-
135
-
136
-
137
-
138
-
139
-
140
-
141
 |
 |
