Dell PowerEdge C4140 EMC Installation and Service Manual - Page 68
Installing the 2.5-inch drive cage
 |
View all Dell PowerEdge C4140 manuals
Add to My Manuals
Save this manual to your list of manuals |
Page 68 highlights
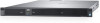
Figure 34. Removing the 2.5-inch drive cage Next steps If you are removing the drive cage permanently, install any one of the following: • PSU blank • PSU 2 • 2.5-inch drive cage Installing the 2.5-inch drive cage Prerequisites 1. Follow the safety guidelines listed in the Safety instructions section. 2. Follow the procedure listed in Before working inside your system. 3. Remove the PSU or PSU blank, if installed. 4. Install the 2.5-inch drives in drive cage. 5. Route the power and signal cables through the drive cage slot. 6. Keep the Phillips #1 screwdriver ready. Steps 1. Slide the drive cage into the PSU 2 bay in the chassis. 2. Secure the drive cage to the drive cage slot by using the screws. 68 PowerEdge C4140 installing and removing system components
-
 1
1 -
2
-
3
-
4
-
5
-
6
-
7
-
8
-
9
-
10
-
11
-
12
-
13
-
14
-
15
-
16
-
17
-
18
-
19
-
20
-
21
-
22
-
23
-
24
-
25
-
26
-
27
-
28
-
29
-
30
-
31
-
32
-
33
-
34
-
35
-
36
-
37
-
38
-
39
-
40
-
41
-
42
-
43
-
44
-
45
-
46
-
47
-
48
-
49
-
50
-
51
-
52
-
53
-
54
-
55
-
56
-
57
-
58
-
59
-
60
-
61
-
62
-
 63
63 -
 64
64 -
 65
65 -
 66
66 -
 67
67 -
 68
68 -
 69
69 -
 70
70 -
 71
71 -
 72
72 -
 73
73 -
74
-
75
-
76
-
77
-
78
-
79
-
80
-
81
-
82
-
83
-
84
-
85
-
86
-
87
-
88
-
89
-
90
-
91
-
92
-
93
-
94
-
95
-
96
-
97
-
98
-
99
-
100
-
101
-
102
-
103
-
104
-
105
-
106
-
107
-
108
-
109
-
110
-
111
-
112
-
113
-
114
-
115
-
116
-
117
-
118
-
119
-
120
-
121
-
122
-
123
-
124
-
125
-
126
-
127
-
128
-
129
-
130
-
131
-
132
-
133
-
134
-
135
-
136
-
137
-
138
-
139
-
140
-
141
 |
 |
