Dell PowerEdge C4140 EMC Installation and Service Manual - Page 65
Installing the system air shroud or B, C, G, K and M Configurations,
 |
View all Dell PowerEdge C4140 manuals
Add to My Manuals
Save this manual to your list of manuals |
Page 65 highlights
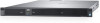
Figure 30. Installing the system air shroud or B, C, G, K and M Configurations 3. Align the guide slots on the NVLink air shroud with the screws on the graphics heat sink. 4. Lower the NVLink air shroud into the NVLink board until it is firmly seated. Figure 31. Installing the air shroud for K and M Configurations Next steps Follow the procedure listed in After working inside your system on page 58. PowerEdge C4140 installing and removing system components 65
-
 1
1 -
2
-
3
-
4
-
5
-
6
-
7
-
8
-
9
-
10
-
11
-
12
-
13
-
14
-
15
-
16
-
17
-
18
-
19
-
20
-
21
-
22
-
23
-
24
-
25
-
26
-
27
-
28
-
29
-
30
-
31
-
32
-
33
-
34
-
35
-
36
-
37
-
38
-
39
-
40
-
41
-
42
-
43
-
44
-
45
-
46
-
47
-
48
-
49
-
50
-
51
-
52
-
53
-
54
-
55
-
56
-
57
-
58
-
59
-
 60
60 -
 61
61 -
 62
62 -
 63
63 -
 64
64 -
 65
65 -
 66
66 -
 67
67 -
 68
68 -
 69
69 -
 70
70 -
71
-
72
-
73
-
74
-
75
-
76
-
77
-
78
-
79
-
80
-
81
-
82
-
83
-
84
-
85
-
86
-
87
-
88
-
89
-
90
-
91
-
92
-
93
-
94
-
95
-
96
-
97
-
98
-
99
-
100
-
101
-
102
-
103
-
104
-
105
-
106
-
107
-
108
-
109
-
110
-
111
-
112
-
113
-
114
-
115
-
116
-
117
-
118
-
119
-
120
-
121
-
122
-
123
-
124
-
125
-
126
-
127
-
128
-
129
-
130
-
131
-
132
-
133
-
134
-
135
-
136
-
137
-
138
-
139
-
140
-
141
 |
 |

Figure 30. Installing the system air shroud or B, C, G, K and M Configurations
3.
Align the guide slots on the NVLink air shroud with the screws on the graphics heat sink.
4.
Lower the NVLink air shroud into the NVLink board until it is firmly seated.
Figure 31. Installing the air shroud for K and M Configurations
Next steps
Follow the procedure listed in
After working inside your system
on page 58.
PowerEdge C4140 installing and removing system components
65