Dell PowerEdge C4140 EMC Installation and Service Manual - Page 108
Installing a GPU
 |
View all Dell PowerEdge C4140 manuals
Add to My Manuals
Save this manual to your list of manuals |
Page 108 highlights
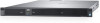
Figure 76. Installing a GPU riser cable from the system board NOTE: The procedure to install the riser cable clip is same for configuration B, C and G. NOTE: Do not hold the GPU by the GPU riser cable board. Next steps 1. Connect the power cables to the GPU. Installing a GPU Prerequisites 1. Follow the safety guidelines listed in Safety instructions on page 57. 2. Follow the GPU installation guidelines listed in GPU installation guidelines on page 98. 3. Install the GPU brackets. 4. Install the GPU riser cable board. Steps 1. Lower the front of the GPU at an angle and slide it to engage the slots on the GPU with the guide pins on the front inner wall of the chassis. NOTE: Do not hold the GPU by the GPU riser cable board. CAUTION: While installing the GPU, ensure that the guide pins on the chassis do not scrape the GPU. 2. Lower the back of the GPU to engage the guide holes on the GPU with the guide pins on the chassis. 3. Connect the GPU power cables to the GPU and the system board or the switch board. 108 PowerEdge C4140 installing and removing system components
-
 1
1 -
2
-
3
-
4
-
5
-
6
-
7
-
8
-
9
-
10
-
11
-
12
-
13
-
14
-
15
-
16
-
17
-
18
-
19
-
20
-
21
-
22
-
23
-
24
-
25
-
26
-
27
-
28
-
29
-
30
-
31
-
32
-
33
-
34
-
35
-
36
-
37
-
38
-
39
-
40
-
41
-
42
-
43
-
44
-
45
-
46
-
47
-
48
-
49
-
50
-
51
-
52
-
53
-
54
-
55
-
56
-
57
-
58
-
59
-
60
-
61
-
62
-
63
-
64
-
65
-
66
-
67
-
68
-
69
-
70
-
71
-
72
-
73
-
74
-
75
-
76
-
77
-
78
-
79
-
80
-
81
-
82
-
83
-
84
-
85
-
86
-
87
-
88
-
89
-
90
-
91
-
92
-
93
-
94
-
95
-
96
-
97
-
98
-
99
-
100
-
101
-
102
-
 103
103 -
 104
104 -
 105
105 -
 106
106 -
 107
107 -
 108
108 -
 109
109 -
 110
110 -
 111
111 -
 112
112 -
 113
113 -
114
-
115
-
116
-
117
-
118
-
119
-
120
-
121
-
122
-
123
-
124
-
125
-
126
-
127
-
128
-
129
-
130
-
131
-
132
-
133
-
134
-
135
-
136
-
137
-
138
-
139
-
140
-
141
 |
 |
