Dell PowerEdge R750 EMC Installation and Service Manual - Page 16
Table 7. Rear view of the system with 4 x 2.5-inch rear drive module continued
 |
View all Dell PowerEdge R750 manuals
Add to My Manuals
Save this manual to your list of manuals |
Page 16 highlights
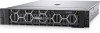
Table 7. Rear view of the system with 4 x 2.5-inch rear drive module (continued) Item Ports, panels, or slots Icon Description 7 Power supply unit (PSU 2) For more information about the PSU configurations, see the PowerEdge R750 Technical Specifications on product documentation page. 8 VGA port For more information about the VGA, see the Dell EMC PowerEdge R750 Technical Specifications on product documentation page. 9 USB 3.0 port (1) This port is USB 3.0-compliant. 10 iDRAC dedicated port 11 System identification button 12 OCP NIC port (optional) N/A 13 NIC port (1,2) 14 Power supply unit (PSU 1) Enables you to remotely access iDRAC. For more information, see the iDRAC User's Guide at www.dell.com/poweredgemanuals. Press the system ID button: ● To locate a particular system within a rack. ● To turn the system ID on or off. To reset iDRAC, press and hold the button for more than 16 s. NOTE: ● To reset iDRAC using system ID, ensure that the system ID button is enabled in the iDRAC setup. ● If the system stops responding during POST, press and hold the system ID button (for more than 5 s) to enter the BIOS progress mode. This port supports OCP 3.0. The NIC ports are integrated on the OCP card which is connected to the system board. The NIC ports are embedded on the LOM card that is connected to the system board. For more information about the PSU configurations, see the Dell EMC PowerEdge R750 Technical Specifications on product documentation page. NOTE: For more information, see the Dell EMC PowerEdge R750 Technical Specifications on the product documentation page. 16 System overview
-
 1
1 -
2
-
3
-
4
-
5
-
6
-
7
-
8
-
9
-
10
-
 11
11 -
 12
12 -
 13
13 -
 14
14 -
 15
15 -
 16
16 -
 17
17 -
 18
18 -
 19
19 -
 20
20 -
 21
21 -
22
-
23
-
24
-
25
-
26
-
27
-
28
-
29
-
30
-
31
-
32
-
33
-
34
-
35
-
36
-
37
-
38
-
39
-
40
-
41
-
42
-
43
-
44
-
45
-
46
-
47
-
48
-
49
-
50
-
51
-
52
-
53
-
54
-
55
-
56
-
57
-
58
-
59
-
60
-
61
-
62
-
63
-
64
-
65
-
66
-
67
-
68
-
69
-
70
-
71
-
72
-
73
-
74
-
75
-
76
-
77
-
78
-
79
-
80
-
81
-
82
-
83
-
84
-
85
-
86
-
87
-
88
-
89
-
90
-
91
-
92
-
93
-
94
-
95
-
96
-
97
-
98
-
99
-
100
-
101
-
102
-
103
-
104
-
105
-
106
-
107
-
108
-
109
-
110
-
111
-
112
-
113
-
114
-
115
-
116
-
117
-
118
-
119
-
120
-
121
-
122
-
123
-
124
-
125
-
126
-
127
-
128
-
129
-
130
-
131
-
132
-
133
-
134
-
135
-
136
-
137
-
138
-
139
-
140
-
141
-
142
-
143
-
144
-
145
-
146
-
147
-
148
-
149
-
150
-
151
-
152
-
153
-
154
-
155
-
156
-
157
-
158
-
159
-
160
-
161
-
162
-
163
-
164
-
165
-
166
-
167
-
168
-
169
-
170
-
171
-
172
-
173
-
174
-
175
-
176
-
177
-
178
-
179
-
180
-
181
-
182
-
183
-
184
-
185
-
186
-
187
-
188
-
189
-
190
-
191
-
192
-
193
-
194
-
195
-
196
-
197
-
198
-
199
-
200
-
201
-
202
-
203
-
204
-
205
-
206
-
207
-
208
-
209
-
210
-
211
-
212
-
213
-
214
-
215
-
216
-
217
-
218
-
219
-
220
-
221
-
222
-
223
-
224
-
225
-
226
-
227
-
228
-
229
-
230
-
231
 |
 |
