Dell PowerVault LTO4-120HH Dell DR Series System Administrator's Guide - Page 34
Connections for Initializing a DR Series System, Initializing the DR Series System
 |
View all Dell PowerVault LTO4-120HH manuals
Add to My Manuals
Save this manual to your list of manuals |
Page 34 highlights
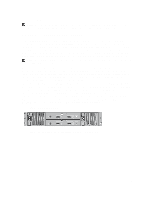
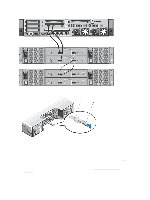
To perform an initial configuration, you need: - An IP address for the system - A subnet mask address - A default gateway address - A DNS suffix address - A primary DNS server IP address - (Optional) A secondary DNS server IP address • NIC Connections: To configure NIC connection bonding remember that, by default, the DR Series system will configure its NIC interfaces together as a bonded team (and only one IP address is needed because the bonded NICs assume the primary interface address). NIC connection bonding can use either of these configurations: - Adaptive load balancing (ALB), which is the default setting, does not require any special network switch support. Ensure that the data source system resides on the same subnet as the DR Series system. For more information, see Configuring Networking Settings. - 802.3ad or dynamic link aggregation (using the IEEE 802.3ad standard). 802.3ad requires special switch configuration before using the system (contact your network administrator for an 802.3ad configuration). NOTE: To configure a 10-GbE NIC or 10-GbE SFP+ bonded configuration, connect only the 10-GbE/10-GbE SFP+ NICs (1-GbE NICs are disabled when the 10-GbE/10-GbE SFP+ NICs are present). • DNS: you need a DNS domain available, and you need to know the primary DNS server IP address (and a secondary DNS server IP address, if you choose to configure one). • Replication ports: the replication service in the DR Series system requires that enabled fixed ports be configured to support replication operations that are to be performed across firewalls (TCP ports 9904, 9911, 9915, and 9916). For more information about replication ports, see Managing Replication Operations, and for more information about system ports, see Supported Ports in a DR Series System. NOTE: For the latest details about supported hardware and software for the Dell DR Series system, see the Dell DR Series System Interoperability Guide at support.dell.com/manuals. NOTE: For information about ports needed for OST operations, see Understanding OST. Connections for Initializing a DR Series System There are two supported methods for connecting to the DR Series system for logging in and performing the initial system configuration via the DR Series system CLI: • Local console connection: this is a local access connection made between a local workstation and the DR Series system (with one connection made to a USB keyboard port on the DR Series front/rear chassis, and a second connection made to the VGA monitor port on the DR Series system rear chassis. (See Figure 1 for locations in the DR Series System Rear Chassis Port Locations in the Local Console Connection.) • iDRAC connection: this is a remote access connection made between an integrated Dell Remote Access Controller (iDRAC) and the dedicated management port on the DR Series system rear chassis. (See Figure 1 for locations in the DR Series System Rear Chassis Port Locations in the Local Console Connection.) Initializing the DR Series System Before you can start using the DR Series system graphical user interface (GUI) for the first time, you must properly initialize the system. To initialize the DR Series system, complete the following: 1. Log in to the DR Series system CLI by using a local console KVM (keyboard-video monitor) connection or an iDRAC connection. For more information, see Local Console Connection, or iDRAC Connection. 2. Configure your system network settings using the Initial System Configuration Wizard. For more information, see Logging in and Initializing the DR Series System. 34
-
 1
1 -
2
-
3
-
4
-
5
-
6
-
7
-
8
-
9
-
10
-
11
-
12
-
13
-
14
-
15
-
16
-
17
-
18
-
19
-
20
-
21
-
22
-
23
-
24
-
25
-
26
-
27
-
28
-
 29
29 -
 30
30 -
 31
31 -
 32
32 -
 33
33 -
 34
34 -
 35
35 -
 36
36 -
 37
37 -
 38
38 -
 39
39 -
40
-
41
-
42
-
43
-
44
-
45
-
46
-
47
-
48
-
49
-
50
-
51
-
52
-
53
-
54
-
55
-
56
-
57
-
58
-
59
-
60
-
61
-
62
-
63
-
64
-
65
-
66
-
67
-
68
-
69
-
70
-
71
-
72
-
73
-
74
-
75
-
76
-
77
-
78
-
79
-
80
-
81
-
82
-
83
-
84
-
85
-
86
-
87
-
88
-
89
-
90
-
91
-
92
-
93
-
94
-
95
-
96
-
97
-
98
-
99
-
100
-
101
-
102
-
103
-
104
-
105
-
106
-
107
-
108
-
109
-
110
-
111
-
112
-
113
-
114
-
115
-
116
-
117
-
118
-
119
-
120
-
121
-
122
-
123
-
124
-
125
-
126
-
127
-
128
-
129
-
130
-
131
-
132
-
133
-
134
-
135
-
136
-
137
-
138
-
139
-
140
-
141
-
142
-
143
-
144
-
145
-
146
-
147
-
148
-
149
-
150
-
151
-
152
-
153
-
154
-
155
-
156
-
157
-
158
-
159
-
160
-
161
-
162
-
163
-
164
-
165
-
166
-
167
-
168
-
169
-
170
-
171
-
172
-
173
-
174
-
175
-
176
 |
 |
