Dell XPS Gen 2 Owner's Manual - Page 47
If the screen is difficult to read, Start, Control Panel, Appearance and Themes, Display, Settings
 |
View all Dell XPS Gen 2 manuals
Add to My Manuals
Save this manual to your list of manuals |
Page 47 highlights
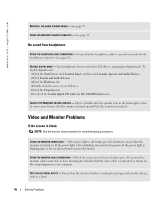
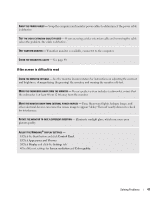
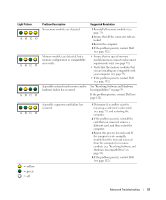
SWAP THE POWER CABLES - Swap the computer and monitor power cables to determine if the power cable is defective. TEST THE VIDEO EXTENSION CABLE (IF USED) - If you are using a video extension cable and removing the cable solves the problem, the cable is defective. TEST ANOTHER MONITOR - If another monitor is available, connect it to the computer. CHECK THE DIAGNOSTIC LIGHTS - See page 49. If the screen is difficult to read CHECK THE MONITOR SETTINGS - See the monitor documentation for instructions on adjusting the contrast and brightness, demagnetizing (degaussing) the monitor, and running the monitor self-test. MOVE THE SUBWOOFER AWAY FROM THE MONITOR - If your speaker system includes a subwoofer, ensure that the subwoofer is at least 60 cm (2 ft) away from the monitor. MOVE THE MONITOR AWAY FROM EXTERNAL POWER SOURCES - Fans, fluorescent lights, halogen lamps, and other electrical devices can cause the screen image to appear "shaky." Turn off nearby devices to check for interference. ROTATE THE MONITOR TO FACE A DIFFERENT DIRECTION - Eliminate sunlight glare, which can cause poor picture quality. ADJUST THE WINDOWS® DISPLAY SETTINGS - 1 Click the Start button and click Control Panel. 2 Click Appearance and Themes. 3 Click Display and click the Settings tab. 4 Try different settings for Screen resolution and Color quality. Solving Problems 47
-
 1
1 -
2
-
3
-
4
-
5
-
6
-
7
-
8
-
9
-
10
-
11
-
12
-
13
-
14
-
15
-
16
-
17
-
18
-
19
-
20
-
21
-
22
-
23
-
24
-
25
-
26
-
27
-
28
-
29
-
30
-
31
-
32
-
33
-
34
-
35
-
36
-
37
-
38
-
39
-
40
-
41
-
 42
42 -
 43
43 -
 44
44 -
 45
45 -
 46
46 -
 47
47 -
 48
48 -
 49
49 -
 50
50 -
 51
51 -
 52
52 -
53
-
54
-
55
-
56
-
57
-
58
-
59
-
60
-
61
-
62
-
63
-
64
-
65
-
66
-
67
-
68
-
69
-
70
-
71
-
72
-
73
-
74
-
75
-
76
-
77
-
78
-
79
-
80
-
81
-
82
-
83
-
84
-
85
-
86
-
87
-
88
-
89
-
90
-
91
-
92
-
93
-
94
-
95
-
96
-
97
-
98
-
99
-
100
-
101
-
102
-
103
-
104
-
105
-
106
-
107
-
108
-
109
-
110
-
111
-
112
-
113
-
114
-
115
-
116
-
117
-
118
-
119
-
120
-
121
-
122
-
123
-
124
-
125
-
126
-
127
-
128
-
129
-
130
-
131
-
132
-
133
-
134
-
135
-
136
-
137
-
138
-
139
-
140
-
141
-
142
 |
 |
