Epson ActionPrinter 5000 User Manual
Epson ActionPrinter 5000 - ActionPrinter-5000 Impact Printer Manual
 |
View all Epson ActionPrinter 5000 manuals
Add to My Manuals
Save this manual to your list of manuals |
Epson ActionPrinter 5000 manual content summary:
- Epson ActionPrinter 5000 | User Manual - Page 1
- Epson ActionPrinter 5000 | User Manual - Page 2
taken in the preparation of this book, Seiko Epson Corporation assumes no responsibility for errors or omissions. Neither is any liability assumed for alterations to this product. Seiko Epson Corporation and its affiliates shall not be liable against any damages or problems arising from the use of - Epson ActionPrinter 5000 | User Manual - Page 3
comply with the limits for a Class B digital device, pursuant to Part 15 of the FCC Rules. These limits are designed to provide reasonable frequency energy and, if not installed and used in accordance with the instructions, may cause harmful interference to radio or television reception. However, - Epson ActionPrinter 5000 | User Manual - Page 4
things you should know about printing on single sheets as opposed to continuous paper. When you print on single sheets, you may notice that your printer prints the first page of your file correctly but then prints too low on the next page, or that it prints the last few lines - Epson ActionPrinter 5000 | User Manual - Page 5
Where to Get Help for United States Users Epson America provides customer support and service through a network of authorized Epson dealers and Customer Care Centers throughout the United States. You can call Epson's Technical Support Center for assistance with installation, configuration, and - Epson ActionPrinter 5000 | User Manual - Page 6
and save them for later reference. 2. Follow all warnings and instructions marked on the product. 3. Unplug this product from the wall outlet before cleaning. Do not use liquid cleaners or aerosol cleaners. Use a damp cloth for - Epson ActionPrinter 5000 | User Manual - Page 7
parts that could result in a risk of fire or electric shock. Never spill liquid of any kind on the product. 12. Except as specifically explained in the User's Manual, do not attempt to service instructions are followed. Adjust only those controls that are covered by the operating instructions - Epson ActionPrinter 5000 | User Manual - Page 8
Way Around 3 Warnings, Cautions, and Notes 3 Printer Parts 4 Chapter 1 Setting Up the Printer 1-1 Unpacking the Printer 1-2 Choosing a Place for the Printer 1-3 Assembling the Printer 1-5 Testing the Printer 1-10 Connecting the Printer to Your Computer 1-13 Configuring Your Software for - Epson ActionPrinter 5000 | User Manual - Page 9
5-2 Replacing the Ribbon Cartridge 5-3 Transporting the Printer 5-4 Chapter 6 Troubleshooting Problems and Solutions Power Supply Printing Paper Handling Options 6-1 6-2 6-3 6-4 6-8 6-10 Chapter 7 Technical Specifications 7-1 Printer Specifications 7-2 Interface Specifications 7-10 - Epson ActionPrinter 5000 | User Manual - Page 10
. Compatibility. The printer supports the Epson ESC/P® commands widely used in application programs written for other Epson LQ and SQ printers. Unique control-panel design. You can choose from nine popular letter-quality fonts and one draft font. The ActionPrinter 5000 and ActionPrinter 5500 are - Epson ActionPrinter 5000 | User Manual - Page 11
multi-part forms. Film Ribbon Cartridge (#7768 for ActionPrinter 5000, #7770 for ActionPrinter 5500) An optional film ribbon cartridge provides even higher quality printing than the standard fabric ribbon. Interface Cards Optional interface cards are available to supplement the printer's built - Epson ActionPrinter 5000 | User Manual - Page 12
printer. . Chapter 6 contains troubleshooting information. If the printer does not operate properly or the printed results are not what you expect, see Chapter 6 for a list of problems and solutions. l Other chapters contain information on options, general maintenance, specifications, and printer - Epson ActionPrinter 5000 | User Manual - Page 13
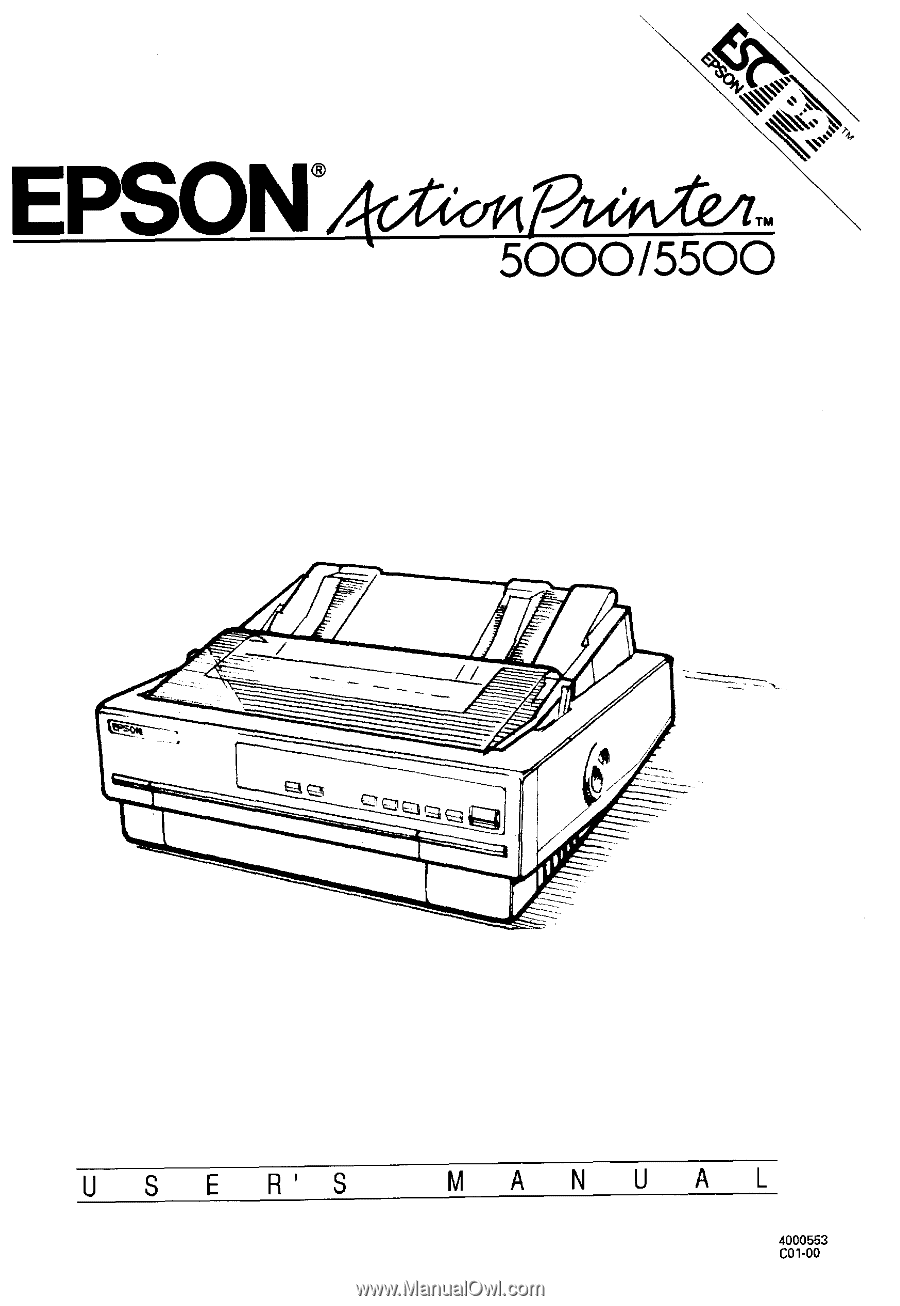
Introduction Printer Parts 4 Introduction - Epson ActionPrinter 5000 | User Manual - Page 14
Chapter 1 Setting Up the Printer Unpacking the Printer 1-2 Checking the parts 1-2 Choosing a Place for the Printer 1-3 Assembling the Printer 1-5 Removing the protective materials 1-5 Installing the ribbon cartridge 1-6 Attaching the paper guide 1-9 Testing the Printer 1-10 Plugging in the - Epson ActionPrinter 5000 | User Manual - Page 15
, make sure you have all the parts shown below and that none is damaged. Printer Power cord Ribbon cartridge Note: In some locations the power cord may be attached to the printer. Store the packing materials in case you ever need to transport your printer. CAUTION: There are several versions of - Epson ActionPrinter 5000 | User Manual - Page 16
Avoid electrical outlets controlled by wall switches or automatic timers. Accidental disruption of power can wipe out information in the memory of your printer or computer. l Avoid outlets on the same circuit as large motors or other appliances that can cause fluctuations in line voltage. l Keep the - Epson ActionPrinter 5000 | User Manual - Page 17
Choosing a Place for the Printer If you plan to use a printer stand, follow these guidelines: Use a stand that supports at least 16.0 kg (35.3 lbs) for the ActionPrinter 5000 or 22.0 kg (48.5 lbs) for the ActionPrinter 5500. Never use a stand that tilts the printer at an angle of more than 15 - Epson ActionPrinter 5000 | User Manual - Page 18
and a locking clip protects the paper-tension unit. Before you turn on the printer, you must remove the locking clip as described here: 1. Remove the paper guide. Lift the printer cover up and off. Grasp both ends of the clear plastic paper-tension unit; lift up the front of the unit and then - Epson ActionPrinter 5000 | User Manual - Page 19
Assembling the Printer Installing the ribbon cartridge Before installing the ribbon cartridge, make sure that the power cord is not plugged into an electrical outlet. 1. If necessary, lift the printer cover up and off. Grasp both ends of the clear plastic paper-tension unit and lift it up and off - Epson ActionPrinter 5000 | User Manual - Page 20
Printer 3. Turn the ribbon-tightening knob in the direction of the arrow. This removes any slack in the ribbon and makes it easier to install. Next, hold the ribbon pen, to guide the ribbon between the print head and ribbon guide. Turn the ribbon-tightening knob to help feed the ribbon into place. - Epson ActionPrinter 5000 | User Manual - Page 21
feel it click into place. 7. Replace the printer cover by first inserting the front tabs into the slots on the printer; then lower it into place. Note: You install the optional #7768 or #7770 film ribbons in the same way as you install the ribbon cartridge. However, you should follow the guidelines - Epson ActionPrinter 5000 | User Manual - Page 22
Assembling the Printer Attaching the paper guide 1. Place the notches on the paper guide straight down over the mounting posts on the printer. 2. Lower the paper guide until it stops in the upright position. Setting Up the Printer 1-9 - Epson ActionPrinter 5000 | User Manual - Page 23
, contact your dealer for assistance. Do not plug in the power cord. 3. If the power cord is not attached to the printer, connect it to the AC inlet on the printer's rear panel. 4. Plug the power cord into a properly grounded electrical outlet. Running the self test You can run the self test - Epson ActionPrinter 5000 | User Manual - Page 24
(Line Feed/Form Feed) button, turn on the printer. The printer beeps and the platen turns for a few seconds, signalling that the printer is in self-test mode. 3. Move the left edge guide until it locks in place next to the guide mark. Then adjust the right edge guide to match the width of your paper - Epson ActionPrinter 5000 | User Manual - Page 25
210 mm (8.2 inches) wide for the ActionPrinter 5000 or 360 mm (14 inches) wide for the ActionPrinter 5500; otherwise, the print head prints directly on the platen. 4. Insert a sheet of paper between the edge guides until it meets resistance. After a few seconds, the printer loads the paper to the - Epson ActionPrinter 5000 | User Manual - Page 26
-in parallel interface. Connect the parallel interface cable as described below: 1. Make sure both the printer and computer are turned off; then plug the cable connector securely into the printer's parallel interface connector. Squeeze the wire clips together until they lock in place on either side - Epson ActionPrinter 5000 | User Manual - Page 27
MX, Epson printer, Standard printer, Draft printer. To use all the features of your printer, however, it is best to choose a program with your printer on its menu. If your program does not list this printer, contact the manufacturer of the software to see if an update that supports the ActionPrinter - Epson ActionPrinter 5000 | User Manual - Page 28
Paper and Single Sheets . . . 2-21 Switching to single sheets 2-21 Switching to continuous paper 2-22 Printing on Special Paper 2-23 Paper-thickness lever 2-23 Multi-part forms 2-24 Labels 2-25 Envelopes 2-26 Paper Handling 2-1 - Epson ActionPrinter 5000 | User Manual - Page 29
Selecting a Paper Feeding Method Your printer can feed single sheets from the top and front and methods of paper handling and includes recommendations on the feeding methods best suited to your specific needs. Setting the paper-release lever The paper-release lever has three positions, with icons - Epson ActionPrinter 5000 | User Manual - Page 30
Selecting a Paper Feeding Method Single sheet This position is for loading single sheets. Push tractor This position is for loading continuous paper from the rear, with the tractor in the push-tractor position. Pull tractor This position is for loading continuous paper from the rear, front, or - Epson ActionPrinter 5000 | User Manual - Page 31
5000 and from 148 mm (5.8 inches) to 420 mm (16.5 inches) wide on the ActionPrinter 5500. You can load single sheets from either the top or front of the printer. Loading single sheets from the top 1. Move the paper-release lever to the single-sheet position. Make sure the paper guide is - Epson ActionPrinter 5000 | User Manual - Page 32
it stops next to the arrow on the paper guide. Then adjust the right edge guide to match the width of your paper. 4. Insert the paper firmly between the edge guides until it meets resistance; after a few seconds, the printer automatically advances the paper to the loading position. Paper Handling - Epson ActionPrinter 5000 | User Manual - Page 33
CAUTION: Use the knob on the right side of the printer only to clear paper jams when the printer is off Otherwise, you may damage the printer or cause it to lose the top-of-form position. If the platen turns but the printer doesn't load the paper, completely remove the paper and re - Epson ActionPrinter 5000 | User Manual - Page 34
in l/10-inch increments to increase the size of the left margin on your paper. 4. While aligning the paper's left edge with the edge guide, insert the paper firmly until it meets resistance; after a few seconds, the printer automatically loads the paper to the loading position. Paper Handling 2-7 - Epson ActionPrinter 5000 | User Manual - Page 35
-form position. If the platen turns but the printer doesn't load the paper, completely remove the paper and re-insert it more firmly. To eject the paper, press the LOAD/EJECT button. Note: The printer's built-in stacker in front of the paper guide can hold up to 50 sheets of ejected paper - Epson ActionPrinter 5000 | User Manual - Page 36
from 101 mm (4 inches) to 254 mm (10 inches) wide on the ActionPrinter 5000 and from 101 m m (4 inches) to 406 mm (16 inches) wide on the ActionPrinter 5500. You can feed continuous paper from the rear, front, or bottom. Your printer comes with the tractor installed in the push-tractor position, for - Epson ActionPrinter 5000 | User Manual - Page 37
the tractor installed in the push-tractor position. Installing in the push-tractor position 1. Make sure the printer is turned off. Lift the printer cover and the paper guide up and off the printer. 2. If necessary, remove the tractor from the pull-tractor position by pressing the lock tabs open - Epson ActionPrinter 5000 | User Manual - Page 38
continuous paper with the push tractor. Installing in the pull-tractor position 1. Make sure the power is turned off. Lift the printer cover and paper guide up and off the printer. 2. Grasp both ends of the clear plastic paper-tension unit and lift it up from the front and lift it off the - Epson ActionPrinter 5000 | User Manual - Page 39
Using Continuous Paper Loading continuous paper with the push tractor 1. Make sure the printer is turned off and the paper guide is removed. 2. Make sure the tractor is in the push-tractor position and the paper-release lever is in the push-tractor position. 3. Release the - Epson ActionPrinter 5000 | User Manual - Page 40
lock it in place. Then slide the right sprocket unit to match the width of your paper, but do not lock it. Move the paper support so it is midway between the sprocket units. 5. Make sure your paper has a clean, straight leading edge. Then open the sprocket covers and fit the - Epson ActionPrinter 5000 | User Manual - Page 41
straight down over the mounting posts on the printer. 9. Slightly lift the paper guide and then lower it until it rests on the printer. 10. Slide both edge guides to the middle of the paper guide. 11. Turn on the printer. The printer automatically advances the paper to the loading position when - Epson ActionPrinter 5000 | User Manual - Page 42
use the TEAR-OFF button or the LOAD/EJECT button to feed the paper back to the standby position. 1. Make sure the printer is turned off and the paper guide and printer cover are removed. 2. Make sure the tractor is in the pull-tractor position and the paper-release lever is in the - Epson ActionPrinter 5000 | User Manual - Page 43
in place. Then slide the right sprocket unit to match the width of your paper, but do not lock it in place. Move the paper support so it is midway between the sprocket units. 2-16 Paper Handling - Epson ActionPrinter 5000 | User Manual - Page 44
5. If you are inserting paper in the front paper slot, remove the front cover and slide the edge guide completely to the left. 6. Make sure your paper has a clean, straight edge. Insert the paper into between the first and second pages is even with the top of the printer's ribbon. Paper Handling 2-17 - Epson ActionPrinter 5000 | User Manual - Page 45
lock lever back. 12. Place the notches on the paper guide straight down over the mounting posts on the printer. 13. Slightly lift the paper guide and then lower it until it rests on the printer. 14. Slide both edge guides to the middle of the paper guide. 15. Turn on the printer. 2-18 Paper Handling - Epson ActionPrinter 5000 | User Manual - Page 46
, adjust the paper position using the micro-feed feature described in Chapter 3. CAUTION: Use the knob on the right side of the printer only to clear paper jams when the printer is off. Otherwise, you may damage the printer or cause it to lose the top-of-form position. 17. To replace the - Epson ActionPrinter 5000 | User Manual - Page 47
Using Continuous Paper Removing continuous paper from the pull tractor 1. To remove continuous paper when using the pull tractor, tear off the paper at a point before it enters the paper slot. 2. Press the LF/FF button to feed the remaining paper forward, out of the printer. 2-20 Paper Handling - Epson ActionPrinter 5000 | User Manual - Page 48
paper. Switching to single sheets To switch from continuous paper to single sheets, follow the steps below. 1. If any printed sheets remain in the printer, press the TEAR OFF button to advance the paper to the tear-off position. 2. Tear off the printed pages. CAUTION: l Always tear off paper - Epson ActionPrinter 5000 | User Manual - Page 49
below. 1. If a single sheet is in the paper path, press the LOAD/EJECT button to eject it. 2. Slightly lift the paper guide and then lower it until it rests on the printer. 3. Slide both edge guides to the middle of the paper guide. 4. Move the paper-release lever to the push-tractor position. The - Epson ActionPrinter 5000 | User Manual - Page 50
Printing on Special Paper In addition to printing on single sheets and continuous paper, your printer can print on a wide variety of other paper types, such as envelopes, labels, and multi-part forms. Before printing on special types of paper, you need to change the paper-thickness setting. CAUTION: - Epson ActionPrinter 5000 | User Manual - Page 51
Type Ordinary paper (with film ribbon) Thin paper Ordinary paper (single sheets or continuous) Multi-part forms (carbonless) 2 sheets (original reduced for paper-thickness lever settings of 2 and above. Multi-part forms Your printer can print on both single-sheet and continuous multipart forms. - Epson ActionPrinter 5000 | User Manual - Page 52
l Use four-sheet thick multi-part forms only under normal operating conditions. l Load single-sheet multi-part forms from the front only. Labels only under normal operating conditions. • Do not leave labels loaded in the printer between jobs; they curl around the platen and may jam when you resume - Epson ActionPrinter 5000 | User Manual - Page 53
-thickness lever to position 2, 3, or 4 depending on the thickness of the envelope. l Always feed envelopes by inserting the wide edge into the printer. CAUTION: l Only use envelopes under normal operating conditions. l Printing on the edge of an envelope can damage the print head. Make sure the - Epson ActionPrinter 5000 | User Manual - Page 54
Chapter 3 Using the Printer Control Panel 3-2 Lights 3-2 Buttons 3-3 Other control-panel features 3-5 DIP Switches 3-6 Changing a DIP-switch setting 3-6 DIP-switch tables 3-7 3-19 Character fonts 3-19 Character spacing 3-23 Condensed printing 3-23 Data Dump Mode 3-24 Using the Printer 3-1 - Epson ActionPrinter 5000 | User Manual - Page 55
ready to print data. The PAUSE light is off unless you press the pause button to prevent printing. DATA (orange) On when the printer's buffer contains data. MULTI-PART (green) On when you move the paper-thickness lever to position 2 or higher. The printing speed is reduced when this light is on - Epson ActionPrinter 5000 | User Manual - Page 56
condensed printing from the control panel. Font (green) On when a specific font is selected. Buttons PAUSE Press this button to temporarily stop single-sheet or continuous paper to the loading position. However, the printer normally loads paper automatically. If single-sheet paper is already in - Epson ActionPrinter 5000 | User Manual - Page 57
other buttons to perform the following tasks: BUFFER CLEAR (PAUSE) Clears the printer's buffer and initializes the printer settings. Note: To clear the buffer but save the top-of-form panel's font name typestyles are meant as guides only; actual printed results may differ slightly. 3-4 Using the - Epson ActionPrinter 5000 | User Manual - Page 58
. Data dump: Hold down the LF/FF and LOAD/EJECT buttons while turning on the printer to enter data dump mode. Data dump mode allows advanced users to find the cause of communication problems between the printer and the computer. The data dump mode is more fully explained at the end of this - Epson ActionPrinter 5000 | User Manual - Page 59
are located inside a compartment next to the control panel. Changing a DIP-switch setting To change a DIP-switch setting, follow these steps: 1. Turn off the printer. 2. Open the DIP-switch cover. 3. Use a pointed instrument, such as the tip of a pen, to turn a switch on or off. The section on DIP - Epson ActionPrinter 5000 | User Manual - Page 60
5 On Off* On Off* * The asterisks indicate the default or factory settings. The defaults for DIP switches 1-1, 1-2, 1-3, 1-4, 2-1, and 2-2 vary according to the country. Using the Printer 3-7 - Epson ActionPrinter 5000 | User Manual - Page 61
2-1 8.5 inches (216 mm) Off 11 inches (279 mm) Off 11.7 inches (296 mm) On 12 inches (305 mm) On 2-2 On Off On Off 3-8 Using the Printer - Epson ActionPrinter 5000 | User Manual - Page 62
If you send the ESC t 0 command (to select italics) while DIP switch 1-4 is on, the international character set is always USA. Character tables Your printer has six character tables built-in: five graphics character tables and one italics character table. You can select the character tables with DIP - Epson ActionPrinter 5000 | User Manual - Page 63
the enhancement is turned off. Also, if a line contains superscript, subscript, dot-graphic, or downloaded characters, printing speed switches to normal draft speed for that line only. Input buffer capacity The printer stores data sent from your computer in its input buffer. Keep DIP switch 1-7 off - Epson ActionPrinter 5000 | User Manual - Page 64
leave a 1-inch (25.4-mm) margin between the last printable line on one page and the first printable line on the next page. This causes the printer to skip over the perforation between continuous sheets. Most application programs take care of the top and bottom margins. Do not turn on skip-over - Epson ActionPrinter 5000 | User Manual - Page 65
DIP Switches Auto line feed When auto line feed is on (DIP switch 2-4 on), the printer accompanies each carriage-return code (CR) received with a linefeed code (LF). If your printer is double spacing, turn DIP switch 2-4 off. If each line overprints the next, turn DIP switch 2-4 on. 3-12 Using the - Epson ActionPrinter 5000 | User Manual - Page 66
-feed feature, you press the ALT button at the same time as you press the LOAD/EJECT or LF/FF button, as indicated on the printer's control panel. To use the micro-feed feature, follow the steps below: 1. Make sure printing has stopped. 2. While holding down the ALT button, press the - Epson ActionPrinter 5000 | User Manual - Page 67
the loading position with the micro-feed feature as follows: 1. Make sure the printer is turned on. 2. Load either continuous or single-sheet paper. (Load continuous paper by pressing the LOAD/EJECT button.) The MULTI-PART light begins to blink. Note: You can adjust the loading position only while - Epson ActionPrinter 5000 | User Manual - Page 68
beeps and paper feeding pauses briefly. Use the factory setting as a reference point when adjusting the loading position. The printer remembers the new loading position for singlesheet paper only until you turn off the power. The loading position returns to the factory setting when the - Epson ActionPrinter 5000 | User Manual - Page 69
using the micro-feed feature. CAUTION: l Never use the tear-off feature to reverse feed labels; they may come off their backing and jam the printer. l Never reverse feed continuous paper when using the pull tractor; the paper could come off the pull tractor and jam the - Epson ActionPrinter 5000 | User Manual - Page 70
the section on adjusting the tear-off position later in this chapter. When you resume printing, the printer automatically feeds the paper back to the loading position and begins printing. (You can also manually feed the paper back to the loading position by pressing the LOAD/EJECT or TEAR OFF button - Epson ActionPrinter 5000 | User Manual - Page 71
remembers the new tear-off position. 3. Tear off any printed pages. 4. When you begin printing, the printer automatically feeds the paper back to the loading position and begins printing. (You can also manually feed the paper back to the loading position by pressing the LOAD/EJECT or TEAR OFF button - Epson ActionPrinter 5000 | User Manual - Page 72
's control panel until the light next to your desired font comes on. The font remains selected until you select another. With Epson's new ESC/P 2 printer control language, the Roman and Sans Serif fonts are scalable. The minimum size of each font is 8 points and the maximum size is 32 points. - Epson ActionPrinter 5000 | User Manual - Page 73
Typestyles The following shows sample characters for each font: Draft (high-speed draft) * * To select high-speed draft, turn DIP-switch 1-6 off. Draft (normal draft) Epson Courier Epson Roman 3-20 Using the Printer - Epson ActionPrinter 5000 | User Manual - Page 74
Epson Roman Proportional Epson Sans Serif Epson Sans Serif Proportional Epson Prestige Epson Script Typestyles Using the Printer 3-21 - Epson ActionPrinter 5000 | User Manual - Page 75
Typestyles Epson Script C Epson Orator Epson Orator-S OCR-B 3-22 Using the Printer - Epson ActionPrinter 5000 | User Manual - Page 76
printing. The printout below shows condensed 10- and 12-cpi printing. This is condensed 10 cpi printing. This is condensed 12 cpi printing. Using the Printer 3-23 - Epson ActionPrinter 5000 | User Manual - Page 77
Data dump mode is a special feature that allows experienced users to find the cause of communication problems between the printer and computer. In data dump mode, the printer produces an exact printout of the codes it receives. To use data dump mode, follow these steps: 1. Make sure paper is loaded - Epson ActionPrinter 5000 | User Manual - Page 78
Chapter 4 Using Printer Options Cut-Sheet Feeders 4-2 Installing a cut-sheet feeder 4-2 Loading paper with the single-bin cut-sheet feeder.. ...... 4-3 Loading 4-12 Interface Cards 4-14 Installing an interface card 4-14 The C823051/C823061 serial interface card 4-16 Using Printer Options 4-1 - Epson ActionPrinter 5000 | User Manual - Page 79
are available for use with your printer: Single-bin High-capacity ActionPrinter 5000 C80637* C80638* ActionPrinter 5500 C80639* C80640* * paper automatically. Assemble the cut-sheet feeder by following the instructions in the manual that comes with it. Installing a cut-sheet feeder You - Epson ActionPrinter 5000 | User Manual - Page 80
steps above. Loading paper with the single-bin cut-sheet feeder Load paper using the single-bin cut-sheet feeder as follows: 1. Turn off the printer. Remove the paper guide, if necessary. Using - Epson ActionPrinter 5000 | User Manual - Page 81
paper guides retract and lock open to allow for paper loading. 4. Take a stack of paper and fan it. Next, tap the side and bottom of the paper on a flat surface to even up the stack. CAUTION: Do not use multi-part forms, carbon paper, or labels in the cut-sheet feeder. 4-4 Using Printer - Epson ActionPrinter 5000 | User Manual - Page 82
8. If necessary, attach the stacker-support wires (that come with the cut-sheet feeder) to the edge guides of the paper guide. 9. Replace the paper guide by placing the notches on the paper guide straight down over the mounting posts on the printer. Lower the paper guide into position and then slide - Epson ActionPrinter 5000 | User Manual - Page 83
guide is aligned with the triangle mark on the front of the cut-sheet feeder; then lock the paper guide in place by pushing back on its lock lever. Next, slide the right paper guide to roughly match the width of your paper. Slide the paper support midway between the paper guides. 4-6 Using Printer - Epson ActionPrinter 5000 | User Manual - Page 84
feeder all the way forward until the paper guides retract and lock open to allow for paper loading even up the stack. CAUTION: Do not use multi-part forms, carbon paper, or labels in the cut-sheet paper guide so that it matches your paper's width. Make sure that the position of the guide allows - Epson ActionPrinter 5000 | User Manual - Page 85
Push the paper-set levers back to clamp the paper or envelopes against the guide rollers. Note: Even when the cut-sheet feeder is installed, you can the slot between the paper guide and stacker. The cut-sheet feeder automatically loads paper when you send print data to the printer (as long as the - Epson ActionPrinter 5000 | User Manual - Page 86
. Fit the notches in the single-bin cut-sheet feeder over the mounting posts on the rear of the high-capacity cut-sheet feeder. Using Printer Options 4-9 - Epson ActionPrinter 5000 | User Manual - Page 87
until they are securely locked together. 4. Install the assembled double-bin cut-sheet feeder on the printer. See the section on installing a cut-sheet feeder in this chapter. 5. Load paper into each application software. See your application software manual for details. 4-10 Using Printer Options - Epson ActionPrinter 5000 | User Manual - Page 88
the TEAR OFF button to advance the continuous paper to the tear-off position. 2. Tear off the printed pages. 3. Press the LOAD/EJECT button. The printer feeds the continuous paper backward to the standby position. The paper is still attached to the push tractor but is no longer in the paper - Epson ActionPrinter 5000 | User Manual - Page 89
tractors, C80019* (for ActionPrinter 5000) and C80022* (for ActionPrinter 5500) provide optimum continuous paper handling. (The asterisk is a substitute for the last digit, which varies according to country.) The pull tractor is especially useful with continuous multi-part forms. For best results - Epson ActionPrinter 5000 | User Manual - Page 90
over the mounting posts on the printer. 10. Slide both edge guides to the middle of the paper guide. Slightly lift the paper guide and then lower it until it rests on the printer. 11. Replace the printer cover by inserting the front tabs into the slots on the printer and then lowering the cover into - Epson ActionPrinter 5000 | User Manual - Page 91
Interface Cards You can use optional interface cards to supplement your printer's built-in parallel interface. The Epson interface cards below are compatible with your printer. (Not all interfaces are available in all countries.) Model Number Name C823051/C823061 Serial interface card C823071/ - Epson ActionPrinter 5000 | User Manual - Page 92
to set any switches and jumpers on the card. See the interface card's manual for details. 4. Slide the interface card along the slots on both sides of insert the connector at the rear of the interface card into the printer's internal socket. 5. Re-insert the screws and tighten to complete - Epson ActionPrinter 5000 | User Manual - Page 93
sections below on selecting a baud rate, handshake timing, and error handling. For all other data transfer conventions, such as C823051/C823061 interface card manual. Handshake timing When the vacant area for data in the input buffer drops to 256 bytes, the printer outputs an X-OFF code or sets the - Epson ActionPrinter 5000 | User Manual - Page 94
Chapter 5 Maintenance and Transportation Cleaning the Printer 5-2 Replacing the Ribbon Cartridge 5-3 Transporting the Printer 5-4 Maintenance and Transportation 5-1 - Epson ActionPrinter 5000 | User Manual - Page 95
operating at its best, you should clean it thoroughly several times a year. 1. Make sure the printer is turned off. Then remove any paper as well as the paper guide and tractor unit. Also remove the optional pull tractor and cut-sheet feeder or feeders, if installed. 2. Use a soft brush to carefully - Epson ActionPrinter 5000 | User Manual - Page 96
, you need to replace the ribbon cartridge. The following Epson ribbon cartridges are recommended: ActIonPrinter 5000 ActionPrinter 5500 Standard fabric # 7753 # 7754 Film # 7768 # 7770 To replace the ribbon cartridge, follow the steps in Installing the ribbon cartridge in Chapter 1. Note: l Use - Epson ActionPrinter 5000 | User Manual - Page 97
-tension unit, and then replace the paper-tension unit. See page 1-5. 7. Make sure the standard tractor is installed in the push-tractor position. 8. Repack the printer, ribbon cartridge, paper guide, and power cord in the original packing materials and place them in the - Epson ActionPrinter 5000 | User Manual - Page 98
Chapter 6 Troubleshooting Problems and Solutions 6-2 Power Supply 6-3 Printing 6-4 Paper Handling 6-8 Options 6-10 Troubleshooting 6-1 - Epson ActionPrinter 5000 | User Manual - Page 99
printer problem, find it in the list below and then see the appropriate page for the solution. Power supply l Power is not being supplied. See page 6-3. Printing l The printer interface, the printer does not operate properly. See page 6-10. See page 6-11. See page 6-11. 6-2 Troubleshooting - Epson ActionPrinter 5000 | User Manual - Page 100
off even when the power is switched on again. Check that the printer's voltage rating matches the voltage of your electrical outlet. If the voltages do not match, unplug the printer and contact your dealer immediately. Do not reconnect the power cord to an electrical outlet. Troubleshooting 6-3 - Epson ActionPrinter 5000 | User Manual - Page 101
Setting the paper-thickness lever in Chapter 2. l The printer makes a strange noise, the buzzer sounds several times, and the printer stops abruptly. Turn off the printer and check for a paper jam, a ribbon jam, or other problems. If the printer still does not print correctly, contact your dealer - Epson ActionPrinter 5000 | User Manual - Page 102
is faint or uneven. l Printed characters have parts missing at the bottom. The ribbon cartridge may not be installed properly. See the section on ribbon installation in Chapter 1. l The printout is faint. The ribbon may be worn out. Replace the ribbon cartridge as described in Chapter 5. Check that - Epson ActionPrinter 5000 | User Manual - Page 103
l All the text is printed on the same line. Set DIP switch 2-4 on so that the printer automatically adds a line-feed code to each carriage return. l The text is printed with extra blank lines between the lines o f length set by your application software and adjust it if necessary. 6-6 Troubleshooting - Epson ActionPrinter 5000 | User Manual - Page 104
of your printer using the self test. (See Running the self test in Chapter 1.) If the self test works properly, the printer is operating properly, and the problem probably lies in the computer, the software, or the cable. If the self test does not work, contact your dealer. Troubleshooting 6-7 - Epson ActionPrinter 5000 | User Manual - Page 105
range. See page 7-4. Make sure the paper is aligned with the edge guides. • The paper does not fully eject. Use the LOAD/EJECT button to eject paper. Do not use the LF/FF button. The paper may be too long. Only use paper that is within the specified range. See page 7-4. 6-8 Troubleshooting - Epson ActionPrinter 5000 | User Manual - Page 106
sure that your paper supply is positioned within 1 meter (3.28 feet) of the printer. The position of your paper supply may be preventing it from feeding straight. Check that and remove it from the printer. Only use paper that is within the specified length range. See page 7-4. Troubleshooting 6-9 - Epson ActionPrinter 5000 | User Manual - Page 107
. See above. You may have forgotten to fan the stack of paper before loading it into the bin. Remove the paper and fan it. 6-10 Troubleshooting - Epson ActionPrinter 5000 | User Manual - Page 108
paper does not feed properly. (Check the section on continuous paper troubleshooting in this chapter.) l Paper feeding is crooked or the paper wrong specifications. Check the specifications to make sure you can use the interface card or cable with this printer. The computer and printer interface - Epson ActionPrinter 5000 | User Manual - Page 109
Options 6-12 Troubleshooting - Epson ActionPrinter 5000 | User Manual - Page 110
Chapter 7 Technical Specifications Printer Specifications 7-2 Printing 7-2 Paper 7-4 Mechanical 7-7 Electrical 7-8 Environmental 7-9 Interface Specifications 7-10 Specifications and pin assignments 7-10 Interface timing 7-13 Option Specifications 7-14 Cut-sheet feeders 7-14 Initialization - Epson ActionPrinter 5000 | User Manual - Page 111
Printer Specifications Printing Printing method: Printing speed: X-pin impact dot matrix Quality High-speed inch line; 2.2 inches per second with continuous feed Maximum printed characters ActionPrinter 5000 ActionPrinter 5500 80 136 137 164 96 204 160 233 7-2 Technical Specifications - Epson ActionPrinter 5000 | User Manual - Page 112
Buffer: Character fonts: Printer Specifications 0 KB or 8 KB (DIP-switch selectable) You can also select other font/pitch combinations using ESC/P 2 commands. See the command summary in Chapter 8 for details. Scalable fonts: Font Epson Roman Epson Sans Serif Min pt 8 8 Max pt 32 32 Increments - Epson ActionPrinter 5000 | User Manual - Page 113
Printer Specifications Paper Single sheets: Width top front Length Thickness Weight 148 to 257 mm (5.8 to 10.1 inches) for ActionPrinter 5000 148 to 420 mm (5.8 to 16.5 inches) for ActionPrinter 5500 182 to 257 mm (7.2 to 10.1 inches) for ActionPrinter 5000 182 to 364 mm (7.2 to 14.3 inches) for - Epson ActionPrinter 5000 | User Manual - Page 114
Printer Specifications Labels: Size 63.5 x 23.8 mm (2½ x 15/16 inches) 101 x 23.8 mm (4 x , the maximum printable width is 203 mm (8 inches) for ActionPrinter 5000 or 345 mm (13.8 inches) for ActionPrinter 5500. C The minimum bottom margin is 13.5 mm (0.53 inches). Technical Specifications 7-5 - Epson ActionPrinter 5000 | User Manual - Page 115
Printer Specifications Continuous paper A The minimum top and bottom margins (above and below the perforation) are 9 mm (0.35 inches). B The minimum left and right margins are 13 mm (0.51 inches). However, the maximum printable width is 203 mm (8 inches) for ActionPrinter 5000 or 345 mm (13.6 inches - Epson ActionPrinter 5000 | User Manual - Page 116
Specifications Mechanical Paper-feed methods: Friction Push tractor Pull tractor Single-bin cut-sheet feeder (optional) High-capacity cut-sheet feeder (optional) Double-bin cut-sheet feeder (by combining both optional cut-sheet feeders) Ribbon: Black ribbon cartridge # 7753 (ActionPrinter 5000 - Epson ActionPrinter 5000 | User Manual - Page 117
during self-test printing in draft mode at 10 cpi) ActionPrinter 5000: approx. 33W ActionPrinter 5500: approx. 36 W Dielectric strength (Between AC line and chassis): AC 1.5 kV, 1 second Note: Check the label on the back of the printer for the voltage of your printer. 7-8 Technical Specifications - Epson ActionPrinter 5000 | User Manual - Page 118
Printer Specifications Environmental Tempera lure: Operation: 5° to 35°C (41° to 95°F) Storage: - 30° to 60°C ( -22° to 140°F) Humidity (without condensation): Operation: 10% to 80% RH Storage: 5% to 85% RH Technical Specifications 7-9 - Epson ActionPrinter 5000 | User Manual - Page 119
Interface Specifications Your printer is equipped with a parallel interface. Specifications and pin assignments The built-in parallel interface has the following characteristics: Data format: B-bit parallel Synchronization: STROBE pulse Handshake timing: BUSY and ACKNLG signals - Epson ActionPrinter 5000 | User Manual - Page 120
is cleared. This level is normally HIGH; its pulse width must be more than 50 microseconds at the receiving terminal. 32 ERROR OUT This level becomes LOW when the printer is: 1) in a paper-out state 2) when the PAUSE button is pressed 3) in an error state. Technical Specifications 7-11 - Epson ActionPrinter 5000 | User Manual - Page 121
up to 5 V through 3.3 Kohm 36 SLCT IN I N The DC1/DC3 code is valid only when this signal is HIGH. This signal is always LOW. Note: The column heading "Direction" refers to the direction of signal flow as viewed from the printer. "Return" denotes the twisted-pair return, to be connected at - Epson ActionPrinter 5000 | User Manual - Page 122
Interface Specifications Interface timing The figure below shows the timing for the parallel interface. Technical Specifications 7-13 - Epson ActionPrinter 5000 | User Manual - Page 123
Option Specifications Cut-sheet feeders * The asterisk is a substitute for the last digit, which varies according to country. Dimensions and weight Dimensions when mounted on the printer; includes printer dimensions Bin capacity Single sheets: C80637* and C80639* Up to 50 sheets of 82-g/m2 (22-lb) - Epson ActionPrinter 5000 | User Manual - Page 124
Paper: Option Specifications Paper storage conditions Temperature: 18° to 22°C (64° to 7 2 ° F ) Humidity: 40% to 60% Environmental Temperature: Humidity (without condensation only with the C80638* and C80640* cut-sheet feeders, under normal environmental conditions. Technical Specifications 7-15 - Epson ActionPrinter 5000 | User Manual - Page 125
(buffer clear). Default settings The table below shows the default conditions that take effect when the printer is initialized. Item Top of form position Page length Left and right margins Line spacing Character erase any text in the data buffer of all text. 7-16 Technical Specifications - Epson ActionPrinter 5000 | User Manual - Page 126
Chapter 8 Command Summary Using the Command Summary 8-2 Commands Arranged by Topic 8-3 General operation 8-3 Paper feeding 8-3 Page format 8-4 Print position motion 8-5 Font selection 8-6 Font enhancement 8-7 Spacing 8-9 Character handling 8-9 Bit image 8-11 Graphics 8-12 Command Summary - Epson ActionPrinter 5000 | User Manual - Page 127
Using the Command Summary This printer uses the Epson ESC/P 2 printer control language. You can use these commands to produce high quality, laser-like printouts. ESC/P 2 commands provide scalable fonts (Epson Roman and Epson Sans Serif) and enhanced graphics. The following section lists and - Epson ActionPrinter 5000 | User Manual - Page 128
Commands Arranged by Topic General operation ASCII Dec. Hex. Description ESC @ 64 40 Initialize Printer ESC U 1/0 85 55 Turn Unidirectional Mode On/Off ESC EM n 25 19 Control Paper Loading/Ejecting n = "1" Select bin 1 of CSF n = "2" Select bin 2 of CSF n = "R" Eject a - Epson ActionPrinter 5000 | User Manual - Page 129
Commands Arranged by Topic Page format ASCII Dec. ESC ( c nn 40 99 ESC ( C nn 40 67 ESC C n 67 ESC C 0 n 67 ESC N n 78 ESC O 79 ESC 1 n 108 ESC Q n 81 Hex. 28 63 28 43 3 43 4E 4F 6C 51 Description Set Page Format ESC ( c 4 0 m1 m2 n1 n2 m = m1 + m2 x 256 m: Top margin in defined - Epson ActionPrinter 5000 | User Manual - Page 130
Commands Arranged by Topic Print position motion ASCII Dec. Hex. ESC $ n1 n2 36 24 Description Set Absolute Horizontal Print Position n = n1 + n2 x 2 5 6 n: Specifies print position from left margin in defined units l The default unit is 1/60 inch. ESC \ n1 n2 92 5C Set Relative Horizontal - Epson ActionPrinter 5000 | User Manual - Page 131
Commands Arranged by Topic ASCII ESC B nn VT ESC J n Dec. 66 11 74 Hex. Description 42 Set Vertical Tabs Up to 16 tabs (1-255); last n should be 0 0B Tab Vertically 4A Perform n/180-inch Line Feed Font selection ASCII Dec. Hex. Description ESC k n 107 6B Select Typeface n = 0: Roman 5: OCR - Epson ActionPrinter 5000 | User Manual - Page 132
Commands Arranged by Topic ASCII ESC P ESC M ESC g ESC p 1/0 ESC x n ESC 4 ESC 5 ESC E ESC F ESC ! n Dec. 80 77 103 112 120 52 53 69 70 33 Hex. 50 4D 67 70 78 34 35 45 46 21 Description Select 10.5 point, 10 cpi Select 10.5 point, 12 cpi Select 10.5 point, 15 cpi Turn Proportional Mode On/Off - Epson ActionPrinter 5000 | User Manual - Page 133
Commands Arranged by Topic Font enhancement ASCII Dec. Hex. SI 15 0F DC2 18 12 so 14 0E ESC W 1/0 87 57 DC4 20 14 ESC w 1/0 119 77 ESC G 71 47 ESC H 72 48 ESC S 0 83 53 ESC S 1 83 53 ESC T 84 54 ESC ( - nn 40 45 28 2D ESC - 1/0 45 2D ESC q n 113 71 Description - Epson ActionPrinter 5000 | User Manual - Page 134
Commands Arranged by Topic Spacing ASCII ESC SP n Dec. 32 ESC ( U nn 40 85 ESC c n1 n2 99 Hex. 20 28 55 63 Description Set Intercharacter Space n = number of units of space added to the space between characters (1-127) Units are 1/120 inch (draft) and 1/180 inch (LQ and proportional) Define - Epson ActionPrinter 5000 | User Manual - Page 135
by ESC ( t n = 0, 1, 2, 3, "1", "2", or "3" n = 2: Remaps downloaded characters from O-127 to 128-255 52 Select an International Character Set n = 0: USA 8: n = 0: Normal set 1: User-defined set 36 Enable Printing of Upper Control Codes With Extended Graphics this command enables the printing of - Epson ActionPrinter 5000 | User Manual - Page 136
Commands Arranged by Topic ASCII ESC 7 ESC (^nn Dec. 55 40 94 Hex. Description 37 Enable Upper Control Codes Cancels ESC 6 28 5E Print Data as Characters ESC ( ^ n1 n2 data n = n1 + n2 x 2 5 6 n: amount of data data: n byte data for printing as character Bit - Epson ActionPrinter 5000 | User Manual - Page 137
Commands Arranged by Topic Graphics ASCII Dec. Hex. Description ESC ( G nn 40 7 1 28 47 Select Graphics Mode ESC ( G 1 0 n n = 1, or 49 l Cancel Graphics mode with ESC @ ESC . n n 46 2E Print Raster Graphics ESC . c v h m n1 n2 data c = 0: Full graphics mode 1: Compressed mode v = 10, - Epson ActionPrinter 5000 | User Manual - Page 138
Appendix Character Tables A-2 Italic Character Table A-2 Graphics Character Tables A-3 International Character Sets A-6 Appendix A-1 - Epson ActionPrinter 5000 | User Manual - Page 139
switches 1-1, 1-2, 1-3, and 1-4, or by using the ESC t software command. For the graphics character tables, the ESC 6 and ESC 7 software commands let you select whether hex codes 80 to 9F are characters (ESC 6) or control codes (ESC 7). Italic Character Table A-2 Appendix - Epson ActionPrinter 5000 | User Manual - Page 140
Graphics Character Tables PC 437 (United States) character table Character Tables PC 850 (Multilingual) character table Appendix A-3 - Epson ActionPrinter 5000 | User Manual - Page 141
Character Tables PC 860 (Portugal) character table PC 863 (Canada-French) character table A-4 Appendix - Epson ActionPrinter 5000 | User Manual - Page 142
PC 865 (Norway) character table Character Tables Character available with ESC ( ^ To print the characters in the table on the left, you must first send the ESC (^ command. This command is available only on printers featuring Epson ESC/P 2. Appendix A-5 - Epson ActionPrinter 5000 | User Manual - Page 143
International Character Sets Country ASCII code (hex) DIP switch 23 24 40 5B 5C 5D 5E 60 7B 7C 7D 7E 1-1 1-2 1-3 1-4 Off The following seven additional sets are available only by using the ESC R software command. Country ASCII code (hex) 23 24 40 56 5C 5D 5E 60 7B 7C 7D 7E 8 Japan (English) 9 - Epson ActionPrinter 5000 | User Manual - Page 144
The following definitions apply specifically to printers. application program A software program that helps you carry out a particular task, such as word processing or financial planning. ASCII American Standard Code for Information Interchange. A standardized coding system for assigning numerical - Epson ActionPrinter 5000 | User Manual - Page 145
feeds single sheets of paper into the printer. data dump A troubleshooting feature that helps advanced users find the cause of communication problems between the printer and the computer. When the printer is in data dump mode, it prints each code it receives in hexadecimal notation and ASCII - Epson ActionPrinter 5000 | User Manual - Page 146
scalable fonts and enhanced graphics printing. ESC/P Abbreviation for Epson Standard Code for Printers. This system of commands gives you software control of your printer from your computer. It is standard for all Epson printers and supported by most application software for personal computers. font - Epson ActionPrinter 5000 | User Manual - Page 147
. initialize To establish the initial default status of the, printer by turning on the printer or sending an INIT signal. interface The connection between the computer and the printer. A parallel interface transmits data one character or code at a time, and a serial interface transmits data one bit - Epson ActionPrinter 5000 | User Manual - Page 148
parallel interface See interface. platen The black roller that provides a backing for the paper during printing. printable area The area of a page on which the printer can print. It is smaller than the physical size of the page due to margins. proportional printing Printing in which the width of the - Epson ActionPrinter 5000 | User Manual - Page 149
in which each character is printed at about two-thirds the normal height in the upper part of the character space. tear off A control panel button that automatically feeds the perforation that are defined and stored in the printer by the user. Also known as downloaded characters. GL-6 Glossary - Epson ActionPrinter 5000 | User Manual - Page 150
indexed here. For information on a specific command, see Chapter 8. A Adjusting , 7-3 tables, 3-7-9, A-2-5 Cleaning the printer, 5-2 Connecting the printer, 1-13 Continuous paper loading, 2-12-19 3-10, 3-20 high-speed, 3-7, 3-10, 3-20 E Edge guides, 4, 1-11, 2-5, 2-14, 4-5 front, 2-7, 2-17 EJECT - Epson ActionPrinter 5000 | User Manual - Page 151
, 3-14 M Micro-feed feature, 3-13 Multi-part forms, 2-24 MULTI-PART light, 3-2 G Graphics character table, A-2 H High-speed draft, 3-7, 3-10, 3-20 I Initialization, 7-16 Input buffer, 3-7, 3-10, 7-3 Interface optional, 2, 4-14 specifications, 7-10 International character sets, A-6 Italic character - Epson ActionPrinter 5000 | User Manual - Page 152
, 3-7, 3-10 Problems, see Troubleshooting Protective materials replacing, 5-4 removing, 1-5 Pull tractor, 2-3, 2-11, 2-15, 4-12 Push tractor, 2-3, 2-10, 2-12 R Ribbon cartridge fabric, 1-2, 5-3, 7-7 film, 2, 5-3, 7-7 installing, 1-6 specifications, 7-7 S Safety instructions, v Scalable fonts - Epson ActionPrinter 5000 | User Manual - Page 153
- Epson ActionPrinter 5000 | User Manual - Page 154
, rear, front, and bottom paper feed paths Easy-to-operate front control panel Efficient, advanced paper handling system Versatile, reliable high-resolution printing backed by Epson two-year limited warranty EPSON AMERICA, INC. 20770 Madrona Avenue,Torrance, CA 90503 Printed in Japan 91.07-4
-
 1
1 -
 2
2 -
 3
3 -
 4
4 -
 5
5 -
 6
6 -
 7
7 -
8
-
9
-
10
-
11
-
12
-
13
-
14
-
15
-
16
-
17
-
18
-
19
-
20
-
21
-
22
-
23
-
24
-
25
-
26
-
27
-
28
-
29
-
30
-
31
-
32
-
33
-
34
-
35
-
36
-
37
-
38
-
39
-
40
-
41
-
42
-
43
-
44
-
45
-
46
-
47
-
48
-
49
-
50
-
51
-
52
-
53
-
54
-
55
-
56
-
57
-
58
-
59
-
60
-
61
-
62
-
63
-
64
-
65
-
66
-
67
-
68
-
69
-
70
-
71
-
72
-
73
-
74
-
75
-
76
-
77
-
78
-
79
-
80
-
81
-
82
-
83
-
84
-
85
-
86
-
87
-
88
-
89
-
90
-
91
-
92
-
93
-
94
-
95
-
96
-
97
-
98
-
99
-
100
-
101
-
102
-
103
-
104
-
105
-
106
-
107
-
108
-
109
-
110
-
111
-
112
-
113
-
114
-
115
-
116
-
117
-
118
-
119
-
120
-
121
-
122
-
123
-
124
-
125
-
126
-
127
-
128
-
129
-
130
-
131
-
132
-
133
-
134
-
135
-
136
-
137
-
138
-
139
-
140
-
141
-
142
-
143
-
144
-
145
-
146
-
147
-
148
-
149
-
150
-
151
-
152
-
153
-
154
 |
 |