Epson ActionPrinter 5000 User Manual - Page 88
Switching between continuous paper and the cut-sheet feeder, Switching to continuous paper
 |
View all Epson ActionPrinter 5000 manuals
Add to My Manuals
Save this manual to your list of manuals |
Page 88 highlights
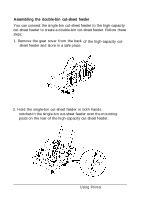
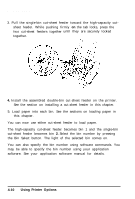
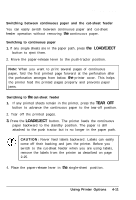
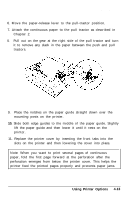
Cut-Sheet Feeders Switching between continuous paper and the cut-sheet feeder You can easily switch between continuous paper and cut-sheet feeder operation without removing the continuous paper. Switching to continuous paper 1. If any single sheets are in the paper path, press the LOAD/EJECT button to eject them. 2. Move the paper-release lever to the push-tractor position. Note: When you want to print several pages of continuous paper, fold the first printed page forward at the perforation after the perforation emerges from below the printer cover. This helps the printer feed the printed pages properly and prevents paper jams. Switching to the cut-sheet feeder 1. If any printed sheets remain in the printer, press the TEAR OFF button to advance the continuous paper to the tear-off position. 2. Tear off the printed pages. 3. Press the LOAD/EJECT button. The printer feeds the continuous paper backward to the standby position. The paper is still attached to the push tractor but is no longer in the paper path. CAUTION: Never feed labels backward. Labels can easily come off their backing and jam the printer. Before you switch to the cut-sheet feeder when you are using labels, remove the labels from the printer as described on page 2-25. 4. Place the paper-release lever in the single-sheet position. Using Printer Options 4-11
-
 1
1 -
2
-
3
-
4
-
5
-
6
-
7
-
8
-
9
-
10
-
11
-
12
-
13
-
14
-
15
-
16
-
17
-
18
-
19
-
20
-
21
-
22
-
23
-
24
-
25
-
26
-
27
-
28
-
29
-
30
-
31
-
32
-
33
-
34
-
35
-
36
-
37
-
38
-
39
-
40
-
41
-
42
-
43
-
44
-
45
-
46
-
47
-
48
-
49
-
50
-
51
-
52
-
53
-
54
-
55
-
56
-
57
-
58
-
59
-
60
-
61
-
62
-
63
-
64
-
65
-
66
-
67
-
68
-
69
-
70
-
71
-
72
-
73
-
74
-
75
-
76
-
77
-
78
-
79
-
80
-
81
-
82
-
 83
83 -
 84
84 -
 85
85 -
 86
86 -
 87
87 -
 88
88 -
 89
89 -
 90
90 -
 91
91 -
 92
92 -
 93
93 -
94
-
95
-
96
-
97
-
98
-
99
-
100
-
101
-
102
-
103
-
104
-
105
-
106
-
107
-
108
-
109
-
110
-
111
-
112
-
113
-
114
-
115
-
116
-
117
-
118
-
119
-
120
-
121
-
122
-
123
-
124
-
125
-
126
-
127
-
128
-
129
-
130
-
131
-
132
-
133
-
134
-
135
-
136
-
137
-
138
-
139
-
140
-
141
-
142
-
143
-
144
-
145
-
146
-
147
-
148
-
149
-
150
-
151
-
152
-
153
-
154
 |
 |
