Epson ActionPrinter 5000 User Manual - Page 45
Slightly lift the paper guide and then lower it until it rests on, the printer.
 |
View all Epson ActionPrinter 5000 manuals
Add to My Manuals
Save this manual to your list of manuals |
Page 45 highlights
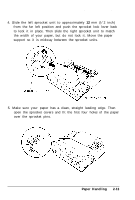
Using Continuous Paper 8. If you insert paper through the front paper slot, re-attach the front cover. 9. Fit the first four holes of the paper over the sprocket pins. 10. Close the sprocket covers. 11. Slide the right sprocket unit to remove any slack in the paper. Then lock it in place by pushing the sprocket lock lever back. 12. Place the notches on the paper guide straight down over the mounting posts on the printer. 13. Slightly lift the paper guide and then lower it until it rests on the printer. 14. Slide both edge guides to the middle of the paper guide. 15. Turn on the printer. 2-18 Paper Handling
-
 1
1 -
2
-
3
-
4
-
5
-
6
-
7
-
8
-
9
-
10
-
11
-
12
-
13
-
14
-
15
-
16
-
17
-
18
-
19
-
20
-
21
-
22
-
23
-
24
-
25
-
26
-
27
-
28
-
29
-
30
-
31
-
32
-
33
-
34
-
35
-
36
-
37
-
38
-
39
-
 40
40 -
 41
41 -
 42
42 -
 43
43 -
 44
44 -
 45
45 -
 46
46 -
 47
47 -
 48
48 -
 49
49 -
 50
50 -
51
-
52
-
53
-
54
-
55
-
56
-
57
-
58
-
59
-
60
-
61
-
62
-
63
-
64
-
65
-
66
-
67
-
68
-
69
-
70
-
71
-
72
-
73
-
74
-
75
-
76
-
77
-
78
-
79
-
80
-
81
-
82
-
83
-
84
-
85
-
86
-
87
-
88
-
89
-
90
-
91
-
92
-
93
-
94
-
95
-
96
-
97
-
98
-
99
-
100
-
101
-
102
-
103
-
104
-
105
-
106
-
107
-
108
-
109
-
110
-
111
-
112
-
113
-
114
-
115
-
116
-
117
-
118
-
119
-
120
-
121
-
122
-
123
-
124
-
125
-
126
-
127
-
128
-
129
-
130
-
131
-
132
-
133
-
134
-
135
-
136
-
137
-
138
-
139
-
140
-
141
-
142
-
143
-
144
-
145
-
146
-
147
-
148
-
149
-
150
-
151
-
152
-
153
-
154
 |
 |

Using Continuous Paper
8. If you insert paper through the front paper slot, re-attach the
front cover.
9. Fit the first four holes of the paper over the sprocket pins.
10. Close the sprocket covers.
11. Slide the right sprocket unit to remove any slack in the paper.
Then lock it in place by pushing the sprocket lock lever back.
12. Place the notches on the paper guide straight down over the
mounting posts on the printer.
13. Slightly lift the paper guide and then lower it until it rests on
the printer.
14.
Slide both edge guides to the middle of the paper guide.
15.
Turn on the printer.
2-18
Paper Handling