Epson Stylus Photo R300M User Manual - Page 48
Copying Photos to Your Computer
 |
View all Epson Stylus Photo R300M manuals
Add to My Manuals
Save this manual to your list of manuals |
Page 48 highlights
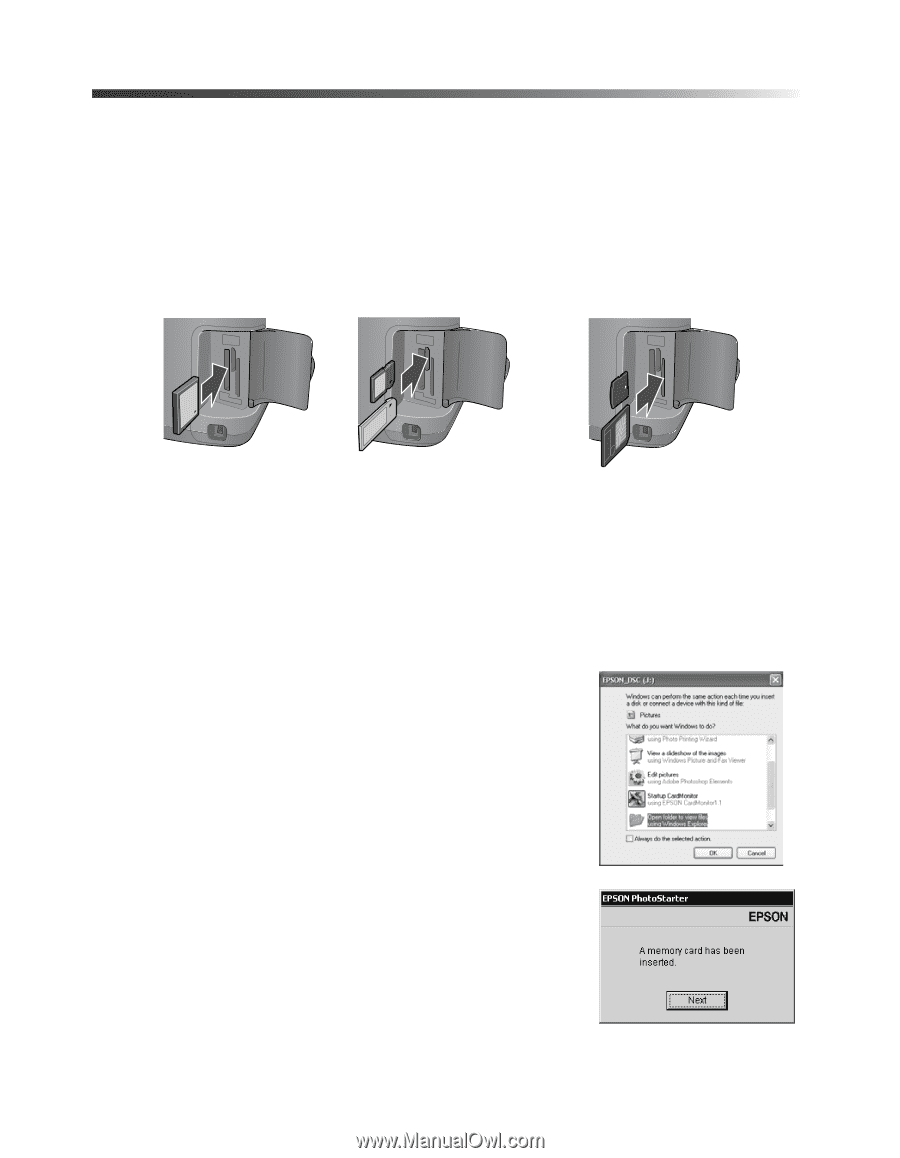
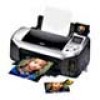
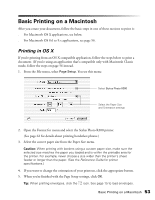
Copying Photos to Your Computer If you've taken digital photos with your camera, you can insert the memory card into your printer's memory card slot and copy the photos to your computer. You can access the contents of the card just like any drive on your computer. 1. Make sure your computer and printer are connected by a USB cable and turned on. 2. Insert the memory card into the appropriate slot on the printer, as shown: CompactFlash or Microdrive (left) Memory Stick, SD (Secure Digital), or MMC (MultiMediaCard) (middle) SmartMedia or xD Picture Card (right) It won't be possible to insert the card fully; this is normal. Avoid inserting more than one card at a time, or you may not be able to tell which card the printer is taking the images from. 3. In Windows XP, you see a screen like this: You can choose any supported programs or options to open, view, or print your photos. On a Macintosh with Mac OS® X or Mac OS 9.x, you see a drive icon appear on your desktop. You can open the drive and copy your photos to your computer. If you have iPhotoTM and you have it set to open when a digital camera is connected, it will open when you insert a memory card. In Windows 2000, Me, 98, or Mac OS 8.6, PhotoStarter opens and copies your pictures to the Photos folder on your desktop. If this is the first time you've inserted a memory card, you see this message instead. Follow the instructions on page 49 to respond to the message and configure PhotoStarter. 48 Printing From Your Computer
-
 1
1 -
2
-
3
-
4
-
5
-
6
-
7
-
8
-
9
-
10
-
11
-
12
-
13
-
14
-
15
-
16
-
17
-
18
-
19
-
20
-
21
-
22
-
23
-
24
-
25
-
26
-
27
-
28
-
29
-
30
-
31
-
32
-
33
-
34
-
35
-
36
-
37
-
38
-
39
-
40
-
41
-
42
-
 43
43 -
 44
44 -
 45
45 -
 46
46 -
 47
47 -
 48
48 -
 49
49 -
 50
50 -
 51
51 -
 52
52 -
 53
53 -
54
-
55
-
56
-
57
-
58
-
59
-
60
-
61
-
62
-
63
-
64
-
65
-
66
-
67
-
68
-
69
-
70
-
71
-
72
-
73
-
74
-
75
-
76
-
77
-
78
-
79
-
80
-
81
-
82
-
83
-
84
-
85
-
86
-
87
-
88
-
89
-
90
-
91
-
92
-
93
-
94
-
95
-
96
-
97
-
98
-
99
-
100
-
101
-
102
-
103
-
104
-
105
-
106
-
107
-
108
-
109
-
110
-
111
-
112
-
113
-
114
-
115
-
116
-
117
-
118
-
119
-
120
-
121
-
122
-
123
-
124
 |
 |