Epson Stylus Photo R300M User Manual - Page 49
Configuring PhotoStarter, In Windows, click
 |
View all Epson Stylus Photo R300M manuals
Add to My Manuals
Save this manual to your list of manuals |
Page 49 highlights
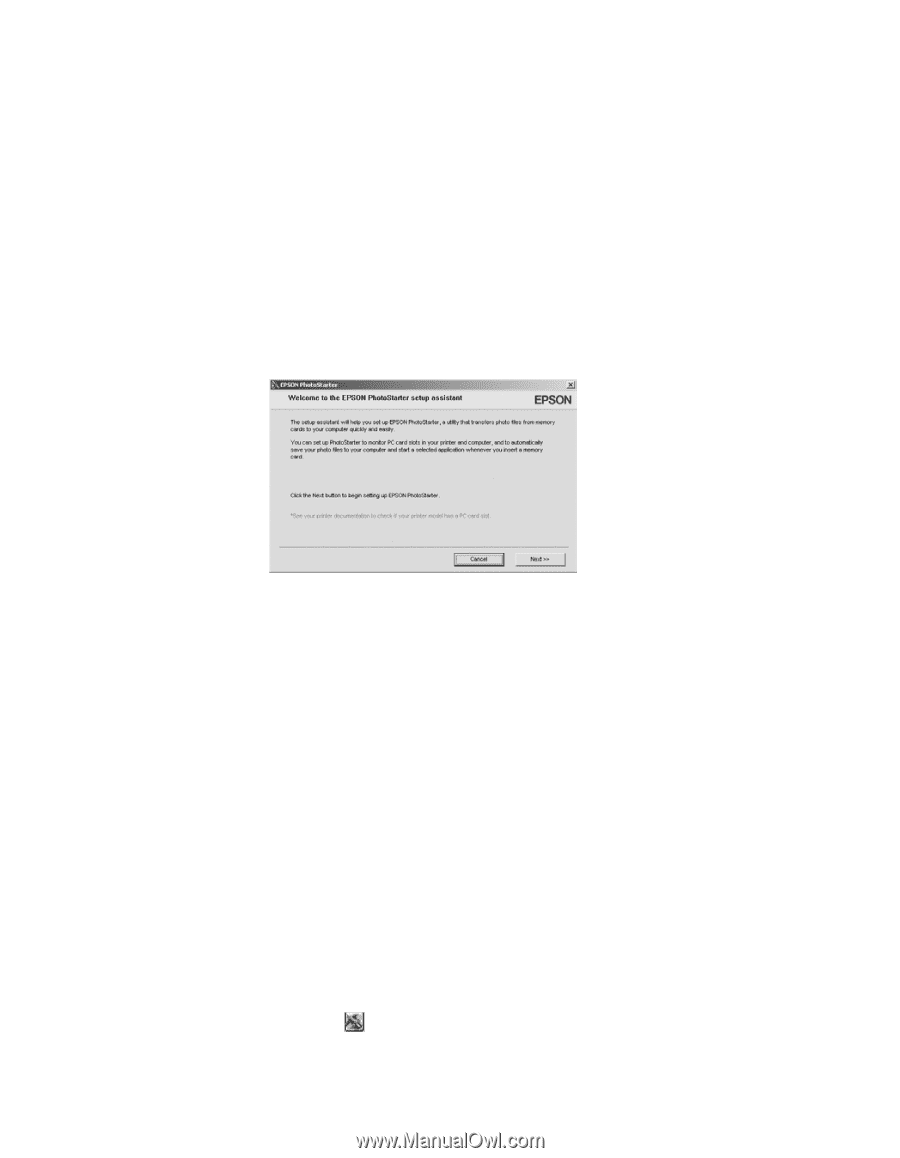
4. When done copying your photos, remove the card as described on page 50. Caution: If you access the card from your computer and delete files from the card, add files to the card, or format the card, the card may not work correctly with your camera and the printer may not be able to read the files on the card. Always format cards and delete pictures using your camera, and do not copy files to the card from your computer. Configuring PhotoStarter 1. When you see the message on page 48, click Next. The PhotoStarter setup assistant opens: 2. Click Next again. The setup assistant asks you a series of questions about how you want PhotoStarter to work. The default settings do the following whenever you insert a memory card: ■ PhotoStarter copies your pictures to the Photos folder on your desktop. ■ The pictures are stored in folders by date. ■ Film Factory opens automatically. Note: Film Factory lets you view, modify, and print photos from your computer quickly and easily. To learn more about this program, see page 78. 3. Change any of the settings you want, then click Next. When you see the Confirmation window, click End. You can go back and change settings at any time by opening PhotoStarter: ■ In Windows, click Start, point to Programs (or All Programs), Film Factory, and click EPSON PhotoStarter3.0. Open the Settings menu and choose Change Settings. ■ On a Macintosh, open the EPSON PhotoStarter folder, then double-click EPSON PhotoStarter. Open the Tools menu and choose Change Settings. Copying Photos to Your Computer 49
-
 1
1 -
2
-
3
-
4
-
5
-
6
-
7
-
8
-
9
-
10
-
11
-
12
-
13
-
14
-
15
-
16
-
17
-
18
-
19
-
20
-
21
-
22
-
23
-
24
-
25
-
26
-
27
-
28
-
29
-
30
-
31
-
32
-
33
-
34
-
35
-
36
-
37
-
38
-
39
-
40
-
41
-
42
-
43
-
 44
44 -
 45
45 -
 46
46 -
 47
47 -
 48
48 -
 49
49 -
 50
50 -
 51
51 -
 52
52 -
 53
53 -
 54
54 -
55
-
56
-
57
-
58
-
59
-
60
-
61
-
62
-
63
-
64
-
65
-
66
-
67
-
68
-
69
-
70
-
71
-
72
-
73
-
74
-
75
-
76
-
77
-
78
-
79
-
80
-
81
-
82
-
83
-
84
-
85
-
86
-
87
-
88
-
89
-
90
-
91
-
92
-
93
-
94
-
95
-
96
-
97
-
98
-
99
-
100
-
101
-
102
-
103
-
104
-
105
-
106
-
107
-
108
-
109
-
110
-
111
-
112
-
113
-
114
-
115
-
116
-
117
-
118
-
119
-
120
-
121
-
122
-
123
-
124
 |
 |