Epson Stylus Photo R300M User Manual - Page 82
Using the P.I.M. II Plug-in for Adobe Photoshop, Windows, Macintosh OS X, Macintosh OS 8.6 to 9.x - drivers
 |
View all Epson Stylus Photo R300M manuals
Add to My Manuals
Save this manual to your list of manuals |
Page 82 highlights
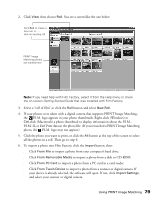
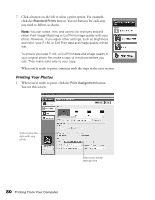
5. If your photo doesn't look right in the preview, click the Back button to change your settings. (Click the Detailed Preview button for a closer look.) 6. Select the number of copies you want to print. 7. Leave the PRINT Image Matching and/or Exif Print box checked for the best results when printing photos containing P.I.M. and/or Exif Print data. 8. Click the Print button at the top of the screen. ■ Windows: Your pictures are printed. ■ Macintosh OS X: You see the Print window; click Print. Your pictures are printed. ■ Macintosh OS 8.6 to 9.x: You see the Print window; click Print. Your pictures are printed. Store your prints in resealable plastic bags, photo albums, or glass-covered picture frames. Keep your pictures and unused paper away from high temperatures, humidity, and direct sunlight. Make sure you return unused paper to its original package. Using the P.I.M. II Plug-in for Adobe Photoshop The P.I.M. II Plug-in for Adobe Photoshop allows you to retain the PRINT Image Matching or Exif Print image quality when you import JPEG or TIFF files from your P.I.M.-, P.I.M. II-, or Exif Print-enabled digital camera. The P.I.M. II Plug-in works with Photoshop 7.0, 6.0, and Photoshop Elements 1.0 and 2.0. You'll also need to use the ICC profiles for your printer that are installed with the plug-in (Windows) or the printer driver (Macintosh). Photoshop doesn't retain the PRINT Image Matching or Exif Print information separately in the header file when you import your P.I.M., P.I.M II, or Exif Print image. Instead, it converts that information in the file and embeds a color space called EPSON RGB 2001. This profile supports all the P.I.M. color advantages and enhancements. You can crop, rotate, resize, work with layers, play with filters, and even make selective color adjustments to the P.I.M. image while retaining P.I.M. quality. However, you won't benefit from global color adjustments (such as Auto Levels, Auto Contrast, Auto Color, etc.). Also, if you try to use your new Photoshop file in another P.I.M.-enabled software program, it won't be recognized as a P.I.M. image. You need to keep your original file if you want to take advantage of P.I.M. information in other programs. Note: The examples in the sections below show Macintosh screens. Windows screens look slightly different, but the settings are the same. 82 Printing From Your Computer
-
 1
1 -
2
-
3
-
4
-
5
-
6
-
7
-
8
-
9
-
10
-
11
-
12
-
13
-
14
-
15
-
16
-
17
-
18
-
19
-
20
-
21
-
22
-
23
-
24
-
25
-
26
-
27
-
28
-
29
-
30
-
31
-
32
-
33
-
34
-
35
-
36
-
37
-
38
-
39
-
40
-
41
-
42
-
43
-
44
-
45
-
46
-
47
-
48
-
49
-
50
-
51
-
52
-
53
-
54
-
55
-
56
-
57
-
58
-
59
-
60
-
61
-
62
-
63
-
64
-
65
-
66
-
67
-
68
-
69
-
70
-
71
-
72
-
73
-
74
-
75
-
76
-
 77
77 -
 78
78 -
 79
79 -
 80
80 -
 81
81 -
 82
82 -
 83
83 -
 84
84 -
 85
85 -
 86
86 -
 87
87 -
88
-
89
-
90
-
91
-
92
-
93
-
94
-
95
-
96
-
97
-
98
-
99
-
100
-
101
-
102
-
103
-
104
-
105
-
106
-
107
-
108
-
109
-
110
-
111
-
112
-
113
-
114
-
115
-
116
-
117
-
118
-
119
-
120
-
121
-
122
-
123
-
124
 |
 |
