Epson SureColor T3270 User Manual - Page 156
Maintenance, Adjusting the Print Head, Checking for clogged nozzles
 |
View all Epson SureColor T3270 manuals
Add to My Manuals
Save this manual to your list of manuals |
Page 156 highlights
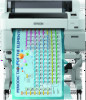
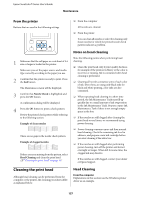
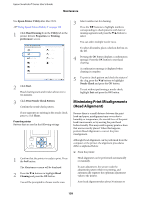
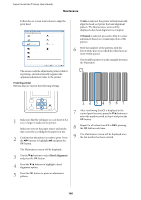
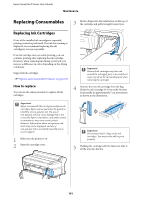
Epson SureColor T-Series User's Guide Maintenance Maintenance Adjusting the Print Head You need to adjust the print head if white lines appear in your print outs or if you notice the print quality has declined. You can perform the following printer maintenance functions for maintaining the print head in good condition to ensure the best print quality. Carry out appropriate maintenance depending on the print results and situation. Checking for clogged nozzles Perform a nozzle check to check for clogs if the printer has not been used for an extended period or before important print jobs. Visually inspect the printed check pattern and clean the print head if you notice faint or missing areas. Cleaning the print head Clean the print head if you notice faint or missing areas in printed documents. Cleans the surface of the print head to improve the print quality. Choose normal or power cleaning according to the level of cleaning required. U"Cleaning the print head" on page 157 Normal cleaning is recommended in most circumstances. Use power cleaning if the nozzles remain clogged after normal cleaning has been performed several times. Adjusting the print head position (Print Head Alignment) Perform Head Alignment if lines are misaligned or print results are grainy. The Head Alignment function corrects print misalignments. U"Minimizing Print Misalignments (Head Alignment)" on page 158 Checking for clogged nozzles Nozzle checks can be performing from a computer or using printer's control panel. From the computer Explanations in this section use the Windows printer driver as an example. Use Epson Printer Utility 4 for Mac OS X. U"Epson Printer Utility 4 Functions" on page 122 1 Make sure that the roll paper or a cut sheet of A4 size or larger is loaded in the printer. Make sure you set the paper source and media type correctly according to the paper you use. 2 Click Nozzle Check from the Utility tab in the printer driver's Properties (or Printing preferences) screen. 3 Click Print. The nozzle check pattern is printed. 4 Check the nozzle check pattern. If there is no problem: click Finish. If there is a problem: click Clean. After printing a nozzle check pattern, make sure that the nozzle check pattern printing is complete before printing your data or cleaning the print head. 156
-
 1
1 -
2
-
3
-
4
-
5
-
6
-
7
-
8
-
9
-
10
-
11
-
12
-
13
-
14
-
15
-
16
-
17
-
18
-
19
-
20
-
21
-
22
-
23
-
24
-
25
-
26
-
27
-
28
-
29
-
30
-
31
-
32
-
33
-
34
-
35
-
36
-
37
-
38
-
39
-
40
-
41
-
42
-
43
-
44
-
45
-
46
-
47
-
48
-
49
-
50
-
51
-
52
-
53
-
54
-
55
-
56
-
57
-
58
-
59
-
60
-
61
-
62
-
63
-
64
-
65
-
66
-
67
-
68
-
69
-
70
-
71
-
72
-
73
-
74
-
75
-
76
-
77
-
78
-
79
-
80
-
81
-
82
-
83
-
84
-
85
-
86
-
87
-
88
-
89
-
90
-
91
-
92
-
93
-
94
-
95
-
96
-
97
-
98
-
99
-
100
-
101
-
102
-
103
-
104
-
105
-
106
-
107
-
108
-
109
-
110
-
111
-
112
-
113
-
114
-
115
-
116
-
117
-
118
-
119
-
120
-
121
-
122
-
123
-
124
-
125
-
126
-
127
-
128
-
129
-
130
-
131
-
132
-
133
-
134
-
135
-
136
-
137
-
138
-
139
-
140
-
141
-
142
-
143
-
144
-
145
-
146
-
147
-
148
-
149
-
150
-
 151
151 -
 152
152 -
 153
153 -
 154
154 -
 155
155 -
 156
156 -
 157
157 -
 158
158 -
 159
159 -
 160
160 -
 161
161 -
162
-
163
-
164
-
165
-
166
-
167
-
168
-
169
-
170
-
171
-
172
-
173
-
174
-
175
-
176
-
177
-
178
-
179
-
180
-
181
-
182
-
183
-
184
-
185
-
186
-
187
-
188
-
189
-
190
-
191
-
192
-
193
-
194
-
195
-
196
-
197
-
198
-
199
-
200
-
201
-
202
-
203
-
204
-
205
-
206
-
207
-
208
-
209
-
210
-
211
-
212
-
213
 |
 |