Epson SureColor T3270 User Manual - Page 52
Using the Control Panel, Attaching the Paper, Taking Up the Paper Printable Side
 |
View all Epson SureColor T3270 manuals
Add to My Manuals
Save this manual to your list of manuals |
Page 52 highlights
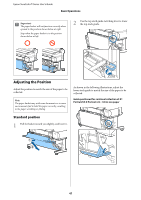
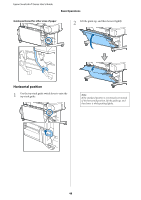
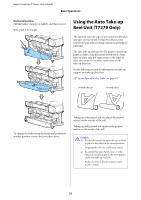
Epson SureColor T-Series User's Guide Basic Operations c Important: Confirm that the end of the roll is cut straight across. The unit will not function as expected if the end of the roll is wavy or curved. U"Manual cut method" on page 33 B Auto switch Forward : The roll is taken up with the printable side out. Off : The auto take-up reel unit does not take up paper. Note: For information on installing the auto take-up reel unit, see the documentation supplied with the auto take-up reel unit attachment. Using the Control Panel This section describes how to use the control panel for the auto take-up reel unit. C Manual switch Selects the manual take-up direction. The setting selected with the Manual switch takes effect when the Auto switch is in the Off position. Backwar d : The roll is taken up with the printable side in. The speed will increase after the button is pressed for more than three seconds. Forward : The roll is taken up with the printable side out. The speed will increase after the button is pressed for more than three seconds. A Power lamp Displays the status of the auto take-up reel unit. On : The auto take-up reel unit is ready for use. Flickering : The auto take-up reel unit is in use. Blinking : The auto take-up reel unit is in power-saving mode. Intermittent blinking : An error has occurred. Off : The power is off. B Auto switch Selects the auto take-up direction. Backwar : The roll is taken up with the printable d side in. Attaching the Paper This section describes how to attach roll paper to the auto take-up reel unit roll core. The procedure varies with the take-up direction. c Important: Before proceeding, select Off for Auto Cut. Using the auto take-up reel unit when On is selected will cause errors. U"Cutting the roll paper" on page 32 Taking Up the Paper Printable Side Out For information on installing the roll core, see the Setup Guide for the optional auto take-up reel unit. 52
-
 1
1 -
2
-
3
-
4
-
5
-
6
-
7
-
8
-
9
-
10
-
11
-
12
-
13
-
14
-
15
-
16
-
17
-
18
-
19
-
20
-
21
-
22
-
23
-
24
-
25
-
26
-
27
-
28
-
29
-
30
-
31
-
32
-
33
-
34
-
35
-
36
-
37
-
38
-
39
-
40
-
41
-
42
-
43
-
44
-
45
-
46
-
 47
47 -
 48
48 -
 49
49 -
 50
50 -
 51
51 -
 52
52 -
 53
53 -
 54
54 -
 55
55 -
 56
56 -
 57
57 -
58
-
59
-
60
-
61
-
62
-
63
-
64
-
65
-
66
-
67
-
68
-
69
-
70
-
71
-
72
-
73
-
74
-
75
-
76
-
77
-
78
-
79
-
80
-
81
-
82
-
83
-
84
-
85
-
86
-
87
-
88
-
89
-
90
-
91
-
92
-
93
-
94
-
95
-
96
-
97
-
98
-
99
-
100
-
101
-
102
-
103
-
104
-
105
-
106
-
107
-
108
-
109
-
110
-
111
-
112
-
113
-
114
-
115
-
116
-
117
-
118
-
119
-
120
-
121
-
122
-
123
-
124
-
125
-
126
-
127
-
128
-
129
-
130
-
131
-
132
-
133
-
134
-
135
-
136
-
137
-
138
-
139
-
140
-
141
-
142
-
143
-
144
-
145
-
146
-
147
-
148
-
149
-
150
-
151
-
152
-
153
-
154
-
155
-
156
-
157
-
158
-
159
-
160
-
161
-
162
-
163
-
164
-
165
-
166
-
167
-
168
-
169
-
170
-
171
-
172
-
173
-
174
-
175
-
176
-
177
-
178
-
179
-
180
-
181
-
182
-
183
-
184
-
185
-
186
-
187
-
188
-
189
-
190
-
191
-
192
-
193
-
194
-
195
-
196
-
197
-
198
-
199
-
200
-
201
-
202
-
203
-
204
-
205
-
206
-
207
-
208
-
209
-
210
-
211
-
212
-
213
 |
 |
