Garmin Forerunner 165 Owners Manual - Page 55
Wireless Sensors, Pairing Your Wireless Sensors, Sensors & Accessories, Add New, Search All
 |
View all Garmin Forerunner 165 manuals
Add to My Manuals
Save this manual to your list of manuals |
Page 55 highlights
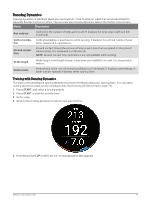
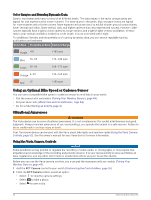
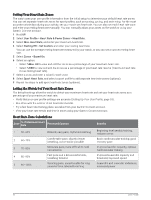
Wireless Sensors Your watch can be paired and used with wireless sensors using ANT+ or Bluetooth technology (Pairing Your Wireless Sensors, page 49). After the devices are paired, you can customize the optional data fields (Customizing the Data Screens, page 70). If your watch was packaged with a sensor, they are already paired. For information about specific Garmin sensor compatibility, purchasing, or to view the owner's manual, go to buy.garmin.com for that sensor. NOTE: Bluetooth sensors are available only with a Forerunner music watch. Sensor Type Description External HR You can use an external sensor, such as the HRM-Pro™ series or HRM-Fit™ heart rate monitor, to view heart rate data during your activities. Foot Pod You can use a foot pod to record pace and distance instead of using GPS when you are training indoors or when your GPS signal is weak. Headphones You can use Bluetooth headphones to listen to music loaded onto your Forerunner music watch (Connecting Bluetooth Headphones, page 56). Lights You can use Varia™ smart bike lights to improve situational awareness. Radar You can use a Varia rearview bike radar to improve situational awareness and send alerts about approaching vehicles. With a Varia radar camera tail light, you can also take photos and record video during a ride (Using the Varia Camera Controls, page 52). Spd./Cad. You can attach speed or cadence sensors to your bike and view the data during your ride. If necessary, you can manually enter your wheel circumference (Wheel Size and Circumference, page 94). Tempe You can attach the tempe temperature sensor to a secure strap or loop where it is exposed to ambient air, so it provides a consistent source of accurate temperature data. Pairing Your Wireless Sensors Before you can pair, you must put on the heart rate monitor or install the sensor. The first time you connect a wireless sensor to your watch using ANT+ or Bluetooth technology, you must pair the watch and sensor. If the sensor has both ANT+ and Bluetooth technology, Garmin recommends that you pair using ANT+ technology. After they are paired, the watch connects to the sensor automatically when you start an activity and the sensor is active and within range. 1 Bring the watch within 3 m (10 ft.) of the sensor. NOTE: Stay 10 m (33 ft.) away from other wireless sensors while pairing. 2 Hold UP. 3 Select Sensors & Accessories > Add New. 4 Select an option: • Select Search All. • Select your sensor type. After the sensor is paired with your watch, the sensor status changes from Searching to Connected. Sensor data appears in the data screen loop or a custom data field. You can customize the optional data fields (Customizing the Data Screens, page 70). Sensors and Accessories 49
-
 1
1 -
2
-
3
-
4
-
5
-
6
-
7
-
8
-
9
-
10
-
11
-
12
-
13
-
14
-
15
-
16
-
17
-
18
-
19
-
20
-
21
-
22
-
23
-
24
-
25
-
26
-
27
-
28
-
29
-
30
-
31
-
32
-
33
-
34
-
35
-
36
-
37
-
38
-
39
-
40
-
41
-
42
-
43
-
44
-
45
-
46
-
47
-
48
-
49
-
 50
50 -
 51
51 -
 52
52 -
 53
53 -
 54
54 -
 55
55 -
 56
56 -
 57
57 -
 58
58 -
 59
59 -
 60
60 -
61
-
62
-
63
-
64
-
65
-
66
-
67
-
68
-
69
-
70
-
71
-
72
-
73
-
74
-
75
-
76
-
77
-
78
-
79
-
80
-
81
-
82
-
83
-
84
-
85
-
86
-
87
-
88
-
89
-
90
-
91
-
92
-
93
-
94
-
95
-
96
-
97
-
98
-
99
-
100
-
101
-
102
 |
 |
