HP 2550L HP Color LaserJet 2550 series - User Guide - Page 110
To clear jams from input areas, After the jam has been removed
 |
UPC - 829160808703
View all HP 2550L manuals
Add to My Manuals
Save this manual to your list of manuals |
Page 110 highlights
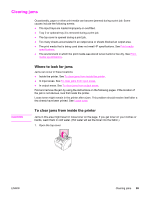
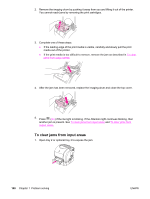
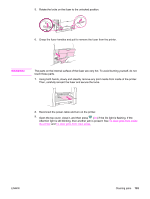
2. Remove the imaging drum by pushing it away from you and lifting it out of the printer. You cannot reach jams by removing the print cartridges. 3. Complete one of these steps: ● If the leading edge of the print media is visible, carefully and slowly pull the print media out of the printer. ● If the print media is too difficult to remove, remove the jam as described in To clear jams from output areas. 4. After the jam has been removed, replace the imaging drum and close the top cover. 5. Press (GO) if the Go light is blinking. If the Attention light continues blinking, then another jam is present. See To clear jams from input areas and To clear jams from output areas. To clear jams from input areas 1. Open tray 2 or optional tray 3 to expose the jam. 100 Chapter 7 Problem solving ENWW
-
 1
1 -
2
-
3
-
4
-
5
-
6
-
7
-
8
-
9
-
10
-
11
-
12
-
13
-
14
-
15
-
16
-
17
-
18
-
19
-
20
-
21
-
22
-
23
-
24
-
25
-
26
-
27
-
28
-
29
-
30
-
31
-
32
-
33
-
34
-
35
-
36
-
37
-
38
-
39
-
40
-
41
-
42
-
43
-
44
-
45
-
46
-
47
-
48
-
49
-
50
-
51
-
52
-
53
-
54
-
55
-
56
-
57
-
58
-
59
-
60
-
61
-
62
-
63
-
64
-
65
-
66
-
67
-
68
-
69
-
70
-
71
-
72
-
73
-
74
-
75
-
76
-
77
-
78
-
79
-
80
-
81
-
82
-
83
-
84
-
85
-
86
-
87
-
88
-
89
-
90
-
91
-
92
-
93
-
94
-
95
-
96
-
97
-
98
-
99
-
100
-
101
-
102
-
103
-
104
-
 105
105 -
 106
106 -
 107
107 -
 108
108 -
 109
109 -
 110
110 -
 111
111 -
 112
112 -
 113
113 -
 114
114 -
 115
115 -
116
-
117
-
118
-
119
-
120
-
121
-
122
-
123
-
124
-
125
-
126
-
127
-
128
-
129
-
130
-
131
-
132
-
133
-
134
-
135
-
136
-
137
-
138
-
139
-
140
-
141
-
142
-
143
-
144
-
145
-
146
-
147
-
148
-
149
-
150
-
151
-
152
-
153
-
154
-
155
-
156
-
157
-
158
-
159
-
160
-
161
-
162
-
163
-
164
-
165
-
166
-
167
-
168
-
169
-
170
-
171
-
172
-
173
-
174
-
175
-
176
 |
 |
