HP 2550L HP Color LaserJet 2550 series - User Guide - Page 144
Repacking the printer
 |
UPC - 829160808703
View all HP 2550L manuals
Add to My Manuals
Save this manual to your list of manuals |
Page 144 highlights
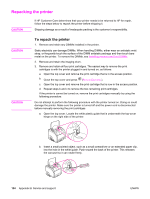
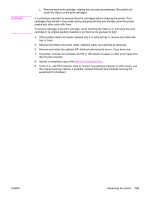
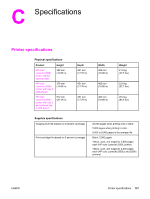
Repacking the printer CAUTION If HP Customer Care determines that your printer needs to be returned to HP for repair, follow the steps below to repack the printer before shipping it. Shipping damage as a result of inadequate packing is the customer's responsibility. CAUTION CAUTION To repack the printer 1. Remove and retain any DIMMs installed in the printer. Static electricity can damage DIMMs. When handling DIMMs, either wear an antistatic wrist strap, or frequently touch the surface of the DIMM antistatic package and then touch bare metal on the printer. To remove the DIMMs, see Installing memory and font DIMMs 2. Remove and retain the imaging drum. 3. Remove and retain all four print cartridges. The easiest way to remove the print cartridges is with the printer plugged in and turned on, as follows: a. Open the top cover and remove the print cartridge that is in the access position. b. Close the top cover and press (ROTATE CAROUSEL). c. Open the top cover and remove the print cartridge that is now in the access position. d. Repeat steps b and c to remove the two remaining print cartridges. If the printer is cannot be turned on, remove the print cartridges manually by using the following procedure: Do not attempt to perform the following procedure with the printer turned on. Doing so could damage the printer. Make sure the printer is turned off and the power cord is disconnected before manually removing the print cartridges. a. Open the top cover. Locate the white plastic guide that is underneath the top-cover hinge on the right side of the printer. b. Insert a small pointed object, such as a small screwdriver or an extended paper clip, into the hole in the white guide. Push toward the back of the printer. This releases the carousel so it can rotate freely. 134 Appendix B Service and support ENWW
-
 1
1 -
2
-
3
-
4
-
5
-
6
-
7
-
8
-
9
-
10
-
11
-
12
-
13
-
14
-
15
-
16
-
17
-
18
-
19
-
20
-
21
-
22
-
23
-
24
-
25
-
26
-
27
-
28
-
29
-
30
-
31
-
32
-
33
-
34
-
35
-
36
-
37
-
38
-
39
-
40
-
41
-
42
-
43
-
44
-
45
-
46
-
47
-
48
-
49
-
50
-
51
-
52
-
53
-
54
-
55
-
56
-
57
-
58
-
59
-
60
-
61
-
62
-
63
-
64
-
65
-
66
-
67
-
68
-
69
-
70
-
71
-
72
-
73
-
74
-
75
-
76
-
77
-
78
-
79
-
80
-
81
-
82
-
83
-
84
-
85
-
86
-
87
-
88
-
89
-
90
-
91
-
92
-
93
-
94
-
95
-
96
-
97
-
98
-
99
-
100
-
101
-
102
-
103
-
104
-
105
-
106
-
107
-
108
-
109
-
110
-
111
-
112
-
113
-
114
-
115
-
116
-
117
-
118
-
119
-
120
-
121
-
122
-
123
-
124
-
125
-
126
-
127
-
128
-
129
-
130
-
131
-
132
-
133
-
134
-
135
-
136
-
137
-
138
-
 139
139 -
 140
140 -
 141
141 -
 142
142 -
 143
143 -
 144
144 -
 145
145 -
 146
146 -
 147
147 -
 148
148 -
 149
149 -
150
-
151
-
152
-
153
-
154
-
155
-
156
-
157
-
158
-
159
-
160
-
161
-
162
-
163
-
164
-
165
-
166
-
167
-
168
-
169
-
170
-
171
-
172
-
173
-
174
-
175
-
176
 |
 |
