HP 2550L HP Color LaserJet 2550 series - User Guide - Page 160
Appendix E, Reconnect the power cable and turn the printer on.
 |
UPC - 829160808703
View all HP 2550L manuals
Add to My Manuals
Save this manual to your list of manuals |
Page 160 highlights
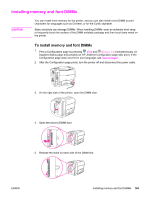
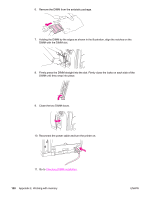
6. Remove the DIMM from the antistatic package. 7. Holding the DIMM by the edges as shown in the illustration, align the notches on the DIMM with the DIMM slot. 8. Firmly press the DIMM straight into the slot. Firmly close the locks on each side of the DIMM until they snap into place. 9. Close the two DIMM doors. 10. Reconnect the power cable and turn the printer on. 11. Go to Checking DIMM installation. 150 Appendix E Working with memory ENWW
-
 1
1 -
2
-
3
-
4
-
5
-
6
-
7
-
8
-
9
-
10
-
11
-
12
-
13
-
14
-
15
-
16
-
17
-
18
-
19
-
20
-
21
-
22
-
23
-
24
-
25
-
26
-
27
-
28
-
29
-
30
-
31
-
32
-
33
-
34
-
35
-
36
-
37
-
38
-
39
-
40
-
41
-
42
-
43
-
44
-
45
-
46
-
47
-
48
-
49
-
50
-
51
-
52
-
53
-
54
-
55
-
56
-
57
-
58
-
59
-
60
-
61
-
62
-
63
-
64
-
65
-
66
-
67
-
68
-
69
-
70
-
71
-
72
-
73
-
74
-
75
-
76
-
77
-
78
-
79
-
80
-
81
-
82
-
83
-
84
-
85
-
86
-
87
-
88
-
89
-
90
-
91
-
92
-
93
-
94
-
95
-
96
-
97
-
98
-
99
-
100
-
101
-
102
-
103
-
104
-
105
-
106
-
107
-
108
-
109
-
110
-
111
-
112
-
113
-
114
-
115
-
116
-
117
-
118
-
119
-
120
-
121
-
122
-
123
-
124
-
125
-
126
-
127
-
128
-
129
-
130
-
131
-
132
-
133
-
134
-
135
-
136
-
137
-
138
-
139
-
140
-
141
-
142
-
143
-
144
-
145
-
146
-
147
-
148
-
149
-
150
-
151
-
152
-
153
-
154
-
 155
155 -
 156
156 -
 157
157 -
 158
158 -
 159
159 -
 160
160 -
 161
161 -
 162
162 -
 163
163 -
 164
164 -
 165
165 -
166
-
167
-
168
-
169
-
170
-
171
-
172
-
173
-
174
-
175
-
176
 |
 |

6.
Remove the DIMM from the antistatic package.
7.
Holding the DIMM by the edges as shown in the illustration, align the notches on the
DIMM with the DIMM slot.
8.
Firmly press the DIMM straight into the slot. Firmly close the locks on each side of the
DIMM until they snap into place.
9.
Close the two DIMM doors.
10.
Reconnect the power cable and turn the printer on.
11.
Go to
Checking
DIMM
installation
.
150
Appendix E
Working with memory
ENWW