HP 2550L HP Color LaserJet 2550 series - User Guide - Page 161
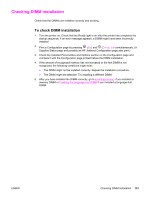
Checking DIMM installation
 |
UPC - 829160808703
View all HP 2550L manuals
Add to My Manuals
Save this manual to your list of manuals |
Page 161 highlights
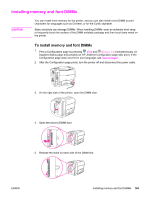
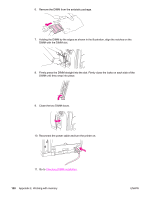
Checking DIMM installation Check that the DIMMs are installed correctly and working. To check DIMM installation 1. Turn the printer on. Check that the Ready light is on after the printer has completed the startup sequence. If an error message appears, a DIMM might have been incorrectly installed. 2. Print a Configuration page by pressing (GO) and (CANCEL JOB) simultaneously. (A Supplies Status page and possibly an HP Jetdirect Configuration page also print.) 3. Check the Installed Personalities and Options section on the Configuration page and compare it with the Configuration page printed before the DIMM installation. 4. If the amount of recognized memory has not increased or the font DIMM is not recognized, the following conditions might exist: ● The DIMM might not be installed correctly. Repeat the installation procedure. ● The DIMM might be defective. Try installing a different DIMM. 5. After you have installed the DIMM correctly, go to Enabling memory if you installed a memory DIMM or Enabling the language-font DIMM if you installed a language-font DIMM. ENWW Checking DIMM installation 151
-
 1
1 -
2
-
3
-
4
-
5
-
6
-
7
-
8
-
9
-
10
-
11
-
12
-
13
-
14
-
15
-
16
-
17
-
18
-
19
-
20
-
21
-
22
-
23
-
24
-
25
-
26
-
27
-
28
-
29
-
30
-
31
-
32
-
33
-
34
-
35
-
36
-
37
-
38
-
39
-
40
-
41
-
42
-
43
-
44
-
45
-
46
-
47
-
48
-
49
-
50
-
51
-
52
-
53
-
54
-
55
-
56
-
57
-
58
-
59
-
60
-
61
-
62
-
63
-
64
-
65
-
66
-
67
-
68
-
69
-
70
-
71
-
72
-
73
-
74
-
75
-
76
-
77
-
78
-
79
-
80
-
81
-
82
-
83
-
84
-
85
-
86
-
87
-
88
-
89
-
90
-
91
-
92
-
93
-
94
-
95
-
96
-
97
-
98
-
99
-
100
-
101
-
102
-
103
-
104
-
105
-
106
-
107
-
108
-
109
-
110
-
111
-
112
-
113
-
114
-
115
-
116
-
117
-
118
-
119
-
120
-
121
-
122
-
123
-
124
-
125
-
126
-
127
-
128
-
129
-
130
-
131
-
132
-
133
-
134
-
135
-
136
-
137
-
138
-
139
-
140
-
141
-
142
-
143
-
144
-
145
-
146
-
147
-
148
-
149
-
150
-
151
-
152
-
153
-
154
-
155
-
 156
156 -
 157
157 -
 158
158 -
 159
159 -
 160
160 -
 161
161 -
 162
162 -
 163
163 -
 164
164 -
 165
165 -
 166
166 -
167
-
168
-
169
-
170
-
171
-
172
-
173
-
174
-
175
-
176
 |
 |
