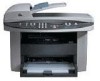
HP 3030 HP LaserJet 3020 and 3030 All-in-One - User Guide - Page 80
Scanning to the Readiris OCR software, Other Applications, Browse, Quick Sets, General, Start - scan software
 |
UPC - 829160074764
View all HP 3030 manuals
Add to My Manuals
Save this manual to your list of manuals |
Page 80 highlights
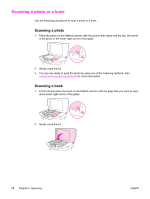
Note Note Note 5. Set the options that you want. On the Other Applications tab, click Browse to locate the program's executable file, which has the file extension ".exe." You can also type the location of the executable file. You can save the settings using the Quick Sets option on the General tab. If you then select the check box after saving a Quick Set, the saved settings will be the default settings the next time you scan to another software program. 6. Select the file type that is supported by this program. 7. Click OK to return to the HP LaserJet Scan dialog box. 8. Click Scan. The options that you set in step 5 are for the current job only, unless you save them as a Quick Set. Scanning to the Readiris OCR software 1. Load the originals that are to be scanned face-up in the automatic document feeder (ADF) input tray. Adjust the media guides to hold the originals in place. OR Lift the flatbed scanner lid and load the original that is to be scanned face-down on the flatbed scanner with the top, left corner of the document at the lower-right corner of the glass. Gently close the lid. 2. On the computer, click Start, select Hewlett-Packard, select hp LaserJet 3030 or hp LaserJet 3020, and then select Scan. OR Press START SCAN on the device. HP LaserJet Scan software opens on the computer. Pressing START SCAN to start the HP LaserJet Scan software is not supported when the device is connected to a network. (Direct-connect only.) 3. In the HP LaserJet Scan dialog box, select Send it to the Readiris OCR software. 4. Click Scan. Readiris must be installed on the computer before the device can scan to the Readiris OCR program. The software CD-ROM that came with the device includes the Readiris OCR program. 70 Chapter 5 Scanning ENWW
-
 1
1 -
2
-
3
-
4
-
5
-
6
-
7
-
8
-
9
-
10
-
11
-
12
-
13
-
14
-
15
-
16
-
17
-
18
-
19
-
20
-
21
-
22
-
23
-
24
-
25
-
26
-
27
-
28
-
29
-
30
-
31
-
32
-
33
-
34
-
35
-
36
-
37
-
38
-
39
-
40
-
41
-
42
-
43
-
44
-
45
-
46
-
47
-
48
-
49
-
50
-
51
-
52
-
53
-
54
-
55
-
56
-
57
-
58
-
59
-
60
-
61
-
62
-
63
-
64
-
65
-
66
-
67
-
68
-
69
-
70
-
71
-
72
-
73
-
74
-
 75
75 -
 76
76 -
 77
77 -
 78
78 -
 79
79 -
 80
80 -
 81
81 -
 82
82 -
 83
83 -
 84
84 -
 85
85 -
86
-
87
-
88
-
89
-
90
-
91
-
92
-
93
-
94
-
95
-
96
-
97
-
98
-
99
-
100
-
101
-
102
-
103
-
104
-
105
-
106
-
107
-
108
-
109
-
110
-
111
-
112
-
113
-
114
-
115
-
116
-
117
-
118
-
119
-
120
-
121
-
122
-
123
-
124
-
125
-
126
-
127
-
128
-
129
-
130
-
131
-
132
-
133
-
134
-
135
-
136
-
137
-
138
-
139
-
140
-
141
-
142
-
143
-
144
-
145
-
146
-
147
-
148
-
149
-
150
-
151
-
152
-
153
-
154
-
155
-
156
-
157
-
158
-
159
-
160
-
161
-
162
-
163
-
164
-
165
-
166
-
167
-
168
-
169
-
170
-
171
-
172
-
173
-
174
-
175
-
176
-
177
-
178
-
179
-
180
-
181
-
182
 |
 |