HP 750c Service Manual - Page 116
Accuracy Calibration, Resets, Create pattern, Status / Calibrating, Load media for calibration - inkjet plotter
 |
View all HP 750c manuals
Add to My Manuals
Save this manual to your list of manuals |
Page 116 highlights
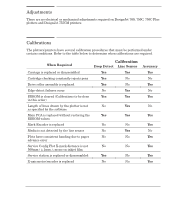
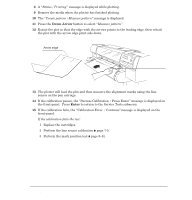
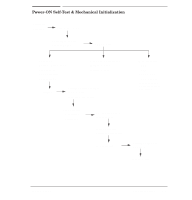
3C. Accuracy Calibration By performing the accuracy calibration procedures the plotter can be restored to its factory settings accuracy, or it can be calibrated to allow for the current environment. Accuracy calibrations are stored in the plotter EEROM. When performing the accuracy calibration from the Service Test" submenu, the factory correction values are recalculated. The calibration performed from the "Utilities" menu calculates a new user calibration test. This value overrides the factory value until the plotter is reset from the "Resets" menu. Once the plotter is reset, it uses the default values until another user calibration is done. Perform the accuracy calibration whenever the: D EEROM is cleared. D Main PCA is replaced without restoring the EEROM values. D Drive roller assembly is replaced. D XĆaxis motorĆencoder is replaced. D Service Station is replaced or disassembled. D Carriage is replaced or disassembled. D Mark Encoder is replaced. Before performing the accuracy calibration, print a service configuration plot (details ' page 8Ć56) on D or EĆsize media. The accuracy calibration is needed if the distance between the centers of the X" marks on the service configuration plot is not 500 mm (20 in.) $ 1 mm (0.04 in.) under normal environmental conditions. Media expansion can affect endpoint accuracy. The plotter endpoint accuracy is specified on inkjet polyester film only at 0.2% of the specified vector length. Recalibration is also required when there is a banding problem due to a paper advance error If the measured accuracy, media thickness, or environmental conditions vary greatly from the factory standards, recalibrate the plotter using the following procedure: Remove any media already loaded into the plotter before performing the calibration. Place a sheet of polyester film over the top of the plotter for approximately 10 minutes to let it stabilize to the environmental conditions. Use a sheet approximately 24 x 36 inches (61 x 91 cms). Roll media may also be used. When using polyester film, load it with the matte(dull) side down. 1 In the Service Tests submenu, scroll to 3C Accuracy cal" and press Enter. 2 The Create pattern / Measure pattern" message is displayed. 3 Press the Up Arrow button to select Create pattern". 4 The Status / Calibrating" message is displayed while the plotter is calibrating. 5 When the plotter has finished calibrating, the Load media for calibration" message is displayed. 6 Load the media. If using DĆsize media, load the short edge as the leading edge in DĆsize plotters and the long edge as the leading edge in EĆsize plotters. 7 When the media is loaded, the plotter will automatically begin to plot the pattern. 7-6 Calibrations C4705-90000
-
 1
1 -
2
-
3
-
4
-
5
-
6
-
7
-
8
-
9
-
10
-
11
-
12
-
13
-
14
-
15
-
16
-
17
-
18
-
19
-
20
-
21
-
22
-
23
-
24
-
25
-
26
-
27
-
28
-
29
-
30
-
31
-
32
-
33
-
34
-
35
-
36
-
37
-
38
-
39
-
40
-
41
-
42
-
43
-
44
-
45
-
46
-
47
-
48
-
49
-
50
-
51
-
52
-
53
-
54
-
55
-
56
-
57
-
58
-
59
-
60
-
61
-
62
-
63
-
64
-
65
-
66
-
67
-
68
-
69
-
70
-
71
-
72
-
73
-
74
-
75
-
76
-
77
-
78
-
79
-
80
-
81
-
82
-
83
-
84
-
85
-
86
-
87
-
88
-
89
-
90
-
91
-
92
-
93
-
94
-
95
-
96
-
97
-
98
-
99
-
100
-
101
-
102
-
103
-
104
-
105
-
106
-
107
-
108
-
109
-
110
-
 111
111 -
 112
112 -
 113
113 -
 114
114 -
 115
115 -
 116
116 -
 117
117 -
 118
118 -
 119
119 -
 120
120 -
 121
121 -
122
-
123
-
124
-
125
-
126
-
127
-
128
-
129
-
130
-
131
-
132
-
133
-
134
-
135
-
136
-
137
-
138
-
139
-
140
-
141
-
142
-
143
-
144
-
145
-
146
-
147
-
148
-
149
-
150
-
151
-
152
-
153
-
154
-
155
-
156
-
157
-
158
-
159
-
160
-
161
-
162
-
163
-
164
-
165
-
166
-
167
-
168
-
169
-
170
-
171
-
172
-
173
-
174
-
175
-
176
-
177
-
178
-
179
-
180
-
181
-
182
-
183
-
184
-
185
-
186
-
187
-
188
-
189
-
190
-
191
-
192
-
193
-
194
-
195
-
196
-
197
-
198
-
199
-
200
-
201
-
202
-
203
-
204
-
205
-
206
-
207
-
208
-
209
-
210
-
211
-
212
-
213
-
214
-
215
-
216
-
217
-
218
-
219
-
220
-
221
-
222
-
223
-
224
-
225
-
226
-
227
-
228
-
229
-
230
-
231
-
232
-
233
-
234
-
235
-
236
-
237
-
238
-
239
-
240
-
241
-
242
-
243
-
244
-
245
-
246
-
247
-
248
-
249
-
250
-
251
-
252
-
253
-
254
-
255
-
256
-
257
-
258
-
259
-
260
-
261
-
262
-
263
-
264
-
265
-
266
-
267
-
268
-
269
-
270
-
271
-
272
-
273
-
274
-
275
-
276
-
277
-
278
-
279
-
280
-
281
-
282
-
283
-
284
-
285
-
286
-
287
-
288
 |
 |