HP 750c Service Manual - Page 86
Removing the Cartridge Carriage and Drive Belt, Remove the trailingĆcable - plotter belt replacement
 |
View all HP 750c manuals
Add to My Manuals
Save this manual to your list of manuals |
Page 86 highlights
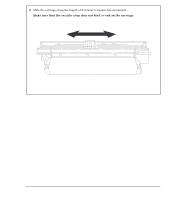
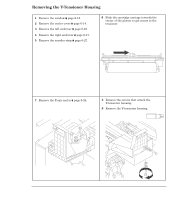
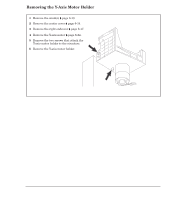
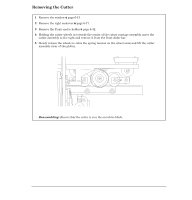
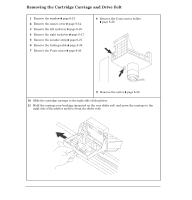
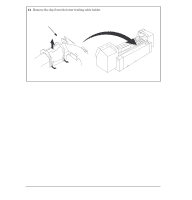
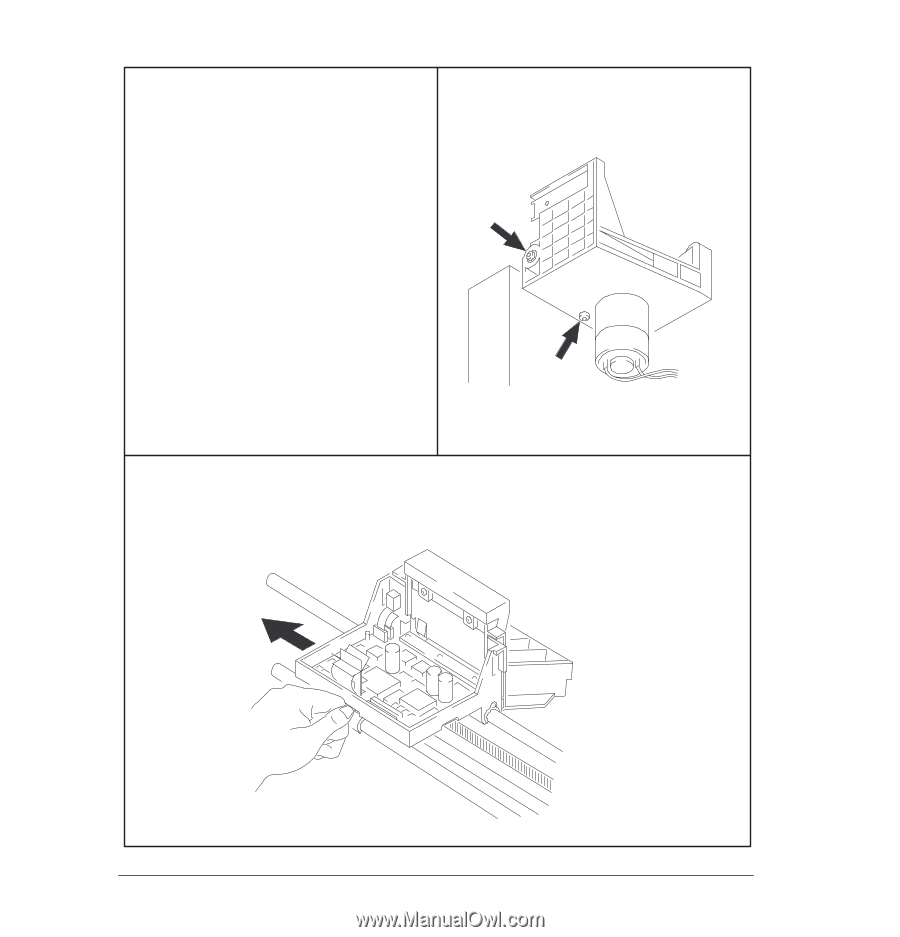
Removing the Cartridge Carriage and Drive Belt 1 Remove the window ' page 6Ć13. 2 Remove the center cover ' page 6Ć14. 3 Remove the left endcover ' page 6Ć16. 4 Remove the right endcover ' page 6Ć17. 5 Remove the encoder strip ' page 6Ć27. 6 Remove the trailingĆcable ' page 6Ć36. 7 Remove the YĆaxis motor ' page 6Ć24. 8 Remove the YĆaxis motor holder ' page 6Ć32. 9 Remove the cutter ' page 6Ć33. 10 Slide the cartridge carriage to the right side of the plotter. 11 Hold the carriage rear bushing (mounted on the rear slider rod) and move the carriage to the right side of the plotter and free from the slider rods. 6-34 Removal and Replacement C4705-90000
-
 1
1 -
2
-
3
-
4
-
5
-
6
-
7
-
8
-
9
-
10
-
11
-
12
-
13
-
14
-
15
-
16
-
17
-
18
-
19
-
20
-
21
-
22
-
23
-
24
-
25
-
26
-
27
-
28
-
29
-
30
-
31
-
32
-
33
-
34
-
35
-
36
-
37
-
38
-
39
-
40
-
41
-
42
-
43
-
44
-
45
-
46
-
47
-
48
-
49
-
50
-
51
-
52
-
53
-
54
-
55
-
56
-
57
-
58
-
59
-
60
-
61
-
62
-
63
-
64
-
65
-
66
-
67
-
68
-
69
-
70
-
71
-
72
-
73
-
74
-
75
-
76
-
77
-
78
-
79
-
80
-
 81
81 -
 82
82 -
 83
83 -
 84
84 -
 85
85 -
 86
86 -
 87
87 -
 88
88 -
 89
89 -
 90
90 -
 91
91 -
92
-
93
-
94
-
95
-
96
-
97
-
98
-
99
-
100
-
101
-
102
-
103
-
104
-
105
-
106
-
107
-
108
-
109
-
110
-
111
-
112
-
113
-
114
-
115
-
116
-
117
-
118
-
119
-
120
-
121
-
122
-
123
-
124
-
125
-
126
-
127
-
128
-
129
-
130
-
131
-
132
-
133
-
134
-
135
-
136
-
137
-
138
-
139
-
140
-
141
-
142
-
143
-
144
-
145
-
146
-
147
-
148
-
149
-
150
-
151
-
152
-
153
-
154
-
155
-
156
-
157
-
158
-
159
-
160
-
161
-
162
-
163
-
164
-
165
-
166
-
167
-
168
-
169
-
170
-
171
-
172
-
173
-
174
-
175
-
176
-
177
-
178
-
179
-
180
-
181
-
182
-
183
-
184
-
185
-
186
-
187
-
188
-
189
-
190
-
191
-
192
-
193
-
194
-
195
-
196
-
197
-
198
-
199
-
200
-
201
-
202
-
203
-
204
-
205
-
206
-
207
-
208
-
209
-
210
-
211
-
212
-
213
-
214
-
215
-
216
-
217
-
218
-
219
-
220
-
221
-
222
-
223
-
224
-
225
-
226
-
227
-
228
-
229
-
230
-
231
-
232
-
233
-
234
-
235
-
236
-
237
-
238
-
239
-
240
-
241
-
242
-
243
-
244
-
245
-
246
-
247
-
248
-
249
-
250
-
251
-
252
-
253
-
254
-
255
-
256
-
257
-
258
-
259
-
260
-
261
-
262
-
263
-
264
-
265
-
266
-
267
-
268
-
269
-
270
-
271
-
272
-
273
-
274
-
275
-
276
-
277
-
278
-
279
-
280
-
281
-
282
-
283
-
284
-
285
-
286
-
287
-
288
 |
 |
1
Remove the window
'
page 6Ć13.
2
Remove the center cover
'
page 6Ć14.
3
Remove the left endcover
'
page 6Ć16.
4
Remove the right endcover
'
page 6Ć17.
5
Remove the encoder strip
'
page 6Ć27.
6
Remove the trailingĆcable
'
page 6Ć36.
7
Remove the YĆaxis motor
'
page 6Ć24.
8
Remove the YĆaxis motor holder
'
page 6Ć32.
9
Remove the cutter
'
page 6Ć33.
10
Slide the cartridge carriage to the right side of the plotter.
11
Hold the carriage rear bushing (mounted on the rear slider rod) and move the carriage to the
right side of the plotter and free from the slider rods.
6-34
Removal and Replacement
C4705-90000
Removing the Cartridge Carriage and Drive Belt