HP 750c Service Manual - Page 40
Cleaning the Drive Roller, WĂAĂRĂNĂIĂNĂG - scrolling display
 |
View all HP 750c manuals
Add to My Manuals
Save this manual to your list of manuals |
Page 40 highlights
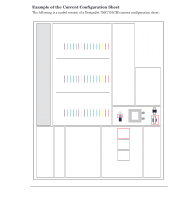
Cleaning the Drive Roller WĂAĂRĂNĂIĂNĂG The drive roller cleaning procedure should be performed only by HP trained personnel: otherwise personal injury may occur. If ink is spilled on the drive roller, remove the ink. Due to the ink's reflectance, ink on the roller can disrupt the plotter's edgeĆsensing function. To remove any ink from the roller, perform the following procedure: 1 Connect the plotter to an ac power source. 2 Hold the Enter button down and switch the plotter ON. 3 Using the arrow buttons, scroll to the Enter button. e menu display, then press the 4 Using the arrow buttons, scroll to the a submenu display. 5 Simultaneously press the Enter and the Up Arrow buttons to access the e e e menu. 6 Using the Up Arrow button, scroll to reach the following display: SERVICE TESTS 22 X Motion control 7 Press the Enter button, and the following display will appear: REMOVE MEDIA PRESS ENTER 8 Remove any media from the plotter. 9 Raise the window. Holding the window sensor down with a pen, pencil or small screwdriver, press the Enter button. The display will show that the arrow buttons can be used to control the roller speed for cleaning. Press the Up Arrow button several times until the drive roller reaches a convenient speed for cleaning. The speed of the roller can be reduced or increased by pressing the appropriate arrow button. 10 Apply any common household cleaning solution (water based only) to a soft, lintĆfree rag and apply it to the drive roller surface while it is rotating. Thoroughly clean the roller surface. 11 Stop the roller by pressing the Enter button when you have finished cleaning. 12 Press the Enter button to return to the SERVICE TESTS menu display. 13 Using the e button, scroll to the U ea e a. display. 14 Allow the drive roller to dry before inserting media in the plotter. C4705-90000 Preventive Maintenance 4-3
-
 1
1 -
2
-
3
-
4
-
5
-
6
-
7
-
8
-
9
-
10
-
11
-
12
-
13
-
14
-
15
-
16
-
17
-
18
-
19
-
20
-
21
-
22
-
23
-
24
-
25
-
26
-
27
-
28
-
29
-
30
-
31
-
32
-
33
-
34
-
 35
35 -
 36
36 -
 37
37 -
 38
38 -
 39
39 -
 40
40 -
 41
41 -
 42
42 -
 43
43 -
 44
44 -
 45
45 -
46
-
47
-
48
-
49
-
50
-
51
-
52
-
53
-
54
-
55
-
56
-
57
-
58
-
59
-
60
-
61
-
62
-
63
-
64
-
65
-
66
-
67
-
68
-
69
-
70
-
71
-
72
-
73
-
74
-
75
-
76
-
77
-
78
-
79
-
80
-
81
-
82
-
83
-
84
-
85
-
86
-
87
-
88
-
89
-
90
-
91
-
92
-
93
-
94
-
95
-
96
-
97
-
98
-
99
-
100
-
101
-
102
-
103
-
104
-
105
-
106
-
107
-
108
-
109
-
110
-
111
-
112
-
113
-
114
-
115
-
116
-
117
-
118
-
119
-
120
-
121
-
122
-
123
-
124
-
125
-
126
-
127
-
128
-
129
-
130
-
131
-
132
-
133
-
134
-
135
-
136
-
137
-
138
-
139
-
140
-
141
-
142
-
143
-
144
-
145
-
146
-
147
-
148
-
149
-
150
-
151
-
152
-
153
-
154
-
155
-
156
-
157
-
158
-
159
-
160
-
161
-
162
-
163
-
164
-
165
-
166
-
167
-
168
-
169
-
170
-
171
-
172
-
173
-
174
-
175
-
176
-
177
-
178
-
179
-
180
-
181
-
182
-
183
-
184
-
185
-
186
-
187
-
188
-
189
-
190
-
191
-
192
-
193
-
194
-
195
-
196
-
197
-
198
-
199
-
200
-
201
-
202
-
203
-
204
-
205
-
206
-
207
-
208
-
209
-
210
-
211
-
212
-
213
-
214
-
215
-
216
-
217
-
218
-
219
-
220
-
221
-
222
-
223
-
224
-
225
-
226
-
227
-
228
-
229
-
230
-
231
-
232
-
233
-
234
-
235
-
236
-
237
-
238
-
239
-
240
-
241
-
242
-
243
-
244
-
245
-
246
-
247
-
248
-
249
-
250
-
251
-
252
-
253
-
254
-
255
-
256
-
257
-
258
-
259
-
260
-
261
-
262
-
263
-
264
-
265
-
266
-
267
-
268
-
269
-
270
-
271
-
272
-
273
-
274
-
275
-
276
-
277
-
278
-
279
-
280
-
281
-
282
-
283
-
284
-
285
-
286
-
287
-
288
 |
 |