HP Brocade 8/12c Fabric Watch Administrator's Guide v6.4.0 (53-1001770-01, Jun - Page 122
Setting port thresholds using the fwCon command, menu item, which is the default, exits
 |
View all HP Brocade 8/12c manuals
Add to My Manuals
Save this manual to your list of manuals |
Page 122 highlights
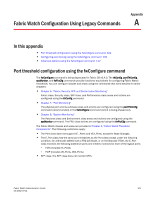
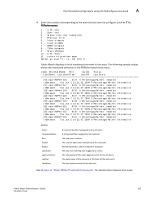
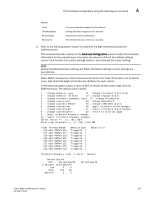
A Port threshold configuration using the fwConfigure command Setting port thresholds using the fwConfigure command Use the fwConfigure command to display and modify threshold information for the Fabric Watch configuration. Switch elements monitored by Fabric Watch are divided into classes, which are further divided into areas. Each area can include multiple thresholds. In addition, the command can be used to disable or enable all thresholds associated with a given port. When executed without operands, this command runs interactively. On switches running Fabric OS v6.1.0 or later, you can use this command to enable port fencing. This feature allows the operating system to disable a port that is operating outside the bounds of normal operation. When an erratically behaving port is fenced, the port is placed into the disabled state and is kept offline, thereby preventing the port from transmitting or receiving frames. Refer to the "Configuring port fencing using the fwConfigure command" on page 109 for information on how to enable port fencing. During your planning activities, you should determine which elements or monitors you want to configure, and in which class they reside. After you have made this decision, you must identify the classes and the corresponding areas. 1. Connect to the switch and log in as admin. 2. Enter the fwConfigure command to display the list of classes. The fwConfigure menu displays. The Quit menu item, which is the default, exits the fwConfigure menu. NOTE For switches with embedded ports or copper ports, the fwConfigure menu has an additional menu item for the FOP_Port and FCU_Port classes. 3. Enter the number from the list that corresponds to the class that you want to configure. For example, if you enter 5, the menu corresponding to the E_Port class displays. switch:admin> fwconfigure 1 : Environment class 2 : SFP class 3 : Port class 4 : Fabric class 5 : E-Port class 6 : F/FL Port (Optical) class 7 : Alpa Performance Monitor class (not supported) 8 : EE Performance Monitor class 9 : Filter Performance Monitor class 10 : Security class 11 : Resource class 12 : Quit Select a class => : (1..12) [12] 5 In this example, the E_Port class was selected. For each class that you select, Fabric Watch provides a list of the areas of the class available for configuration. The final item in the list, which is always the default, returns you to the previous selection screen. 102 Fabric Watch Administrator's Guide 53-1001770-01
-
 1
1 -
2
-
3
-
4
-
5
-
6
-
7
-
8
-
9
-
10
-
11
-
12
-
13
-
14
-
15
-
16
-
17
-
18
-
19
-
20
-
21
-
22
-
23
-
24
-
25
-
26
-
27
-
28
-
29
-
30
-
31
-
32
-
33
-
34
-
35
-
36
-
37
-
38
-
39
-
40
-
41
-
42
-
43
-
44
-
45
-
46
-
47
-
48
-
49
-
50
-
51
-
52
-
53
-
54
-
55
-
56
-
57
-
58
-
59
-
60
-
61
-
62
-
63
-
64
-
65
-
66
-
67
-
68
-
69
-
70
-
71
-
72
-
73
-
74
-
75
-
76
-
77
-
78
-
79
-
80
-
81
-
82
-
83
-
84
-
85
-
86
-
87
-
88
-
89
-
90
-
91
-
92
-
93
-
94
-
95
-
96
-
97
-
98
-
99
-
100
-
101
-
102
-
103
-
104
-
105
-
106
-
107
-
108
-
109
-
110
-
111
-
112
-
113
-
114
-
115
-
116
-
 117
117 -
 118
118 -
 119
119 -
 120
120 -
 121
121 -
 122
122 -
 123
123 -
 124
124 -
 125
125 -
 126
126 -
 127
127 -
128
-
129
-
130
-
131
-
132
-
133
-
134
-
135
-
136
-
137
-
138
-
139
-
140
-
141
-
142
-
143
-
144
 |
 |