HP Carrier-grade cc3300 User Information and Service Guide - HP Carrier-Grade - Page 100
Installing the Heatsink
 |
View all HP Carrier-grade cc3300 manuals
Add to My Manuals
Save this manual to your list of manuals |
Page 100 highlights
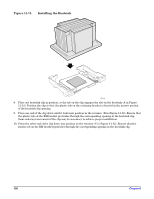
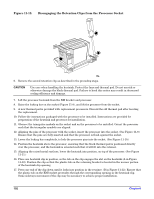
Figure 11-11. Installing the Heatsink TP110 8. Place one heatsink clip in position, so the tab on the clip engages the slot on the heatsink (A in Figure 11-12). Position the clip so that the plastic tab on the retaining bracket is located in the narrow portion of the heatsink clip opening. 9. Press one end of the clip down until it locks into position in the retainer. (B in Figure 11-12). Ensure that the plastic tab on the RM bracket protrudes through the corresponding opening in the heatsink clip. Some sideways movement of the clip may be necessary to achieve proper installation. 10. Press the other end of the clip down into position on the retainer (C in Figure 11-12). Ensure that the plastic tab on the RM bracket protrudes through the corresponding opening in the heatsink clip. 100 Chapter 8
-
 1
1 -
2
-
3
-
4
-
5
-
6
-
7
-
8
-
9
-
10
-
11
-
12
-
13
-
14
-
15
-
16
-
17
-
18
-
19
-
20
-
21
-
22
-
23
-
24
-
25
-
26
-
27
-
28
-
29
-
30
-
31
-
32
-
33
-
34
-
35
-
36
-
37
-
38
-
39
-
40
-
41
-
42
-
43
-
44
-
45
-
46
-
47
-
48
-
49
-
50
-
51
-
52
-
53
-
54
-
55
-
56
-
57
-
58
-
59
-
60
-
61
-
62
-
63
-
64
-
65
-
66
-
67
-
68
-
69
-
70
-
71
-
72
-
73
-
74
-
75
-
76
-
77
-
78
-
79
-
80
-
81
-
82
-
83
-
84
-
85
-
86
-
87
-
88
-
89
-
90
-
91
-
92
-
93
-
94
-
 95
95 -
 96
96 -
 97
97 -
 98
98 -
 99
99 -
 100
100 -
 101
101 -
 102
102 -
 103
103 -
 104
104 -
 105
105 -
106
-
107
-
108
-
109
-
110
-
111
-
112
-
113
-
114
-
115
-
116
-
117
-
118
-
119
-
120
-
121
-
122
-
123
-
124
-
125
 |
 |
