HP Color LaserJet Pro MFP M177 User Guide - Page 53
Con the product, Con fax time, date, and header, Control panel
 |
View all HP Color LaserJet Pro MFP M177 manuals
Add to My Manuals
Save this manual to your list of manuals |
Page 53 highlights
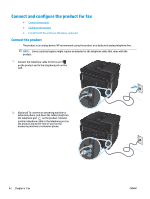
Configure the product How you configure the product varies depending on whether you set it up for standalone fax, with an answering machine, or with an extension phone. NOTE: Configuring the fax time, date, and header settings is required to use the fax feature. ● Configure fax time, date, and header ● Configure for stand-alone fax ● Configure for an answering machine ● Configure for an extension phone Configure fax time, date, and header You might have configured these settings when you installed the software. You can configure these settings at any time by using the product control panel or the HP Fax Setup Wizard. ● Control panel ● HP Fax Setup Wizard (Windows) Control panel 1. From the Home screen on the product control panel, select Setup . 2. Select Fax Setup, and then select Basic Setup. 3. Select Time/Date. 4. Select the 12-hour clock or 24-hour clock. 5. Use the keypad to enter the current time, and then select OK. 6. Select the date format. 7. Use the keypad to enter the current date, and then select OK. 8. Select Fax Header. 9. Use the keypad to enter your fax number, and then select OK. NOTE: The maximum number of characters for the fax number is 20. 10. Use the keypad to enter your company name or header, and then select OK. To enter special characters that are not on the standard keypad, select @#$ to open a keypad that contains special characters. NOTE: The maximum number of characters for the fax header is 40. ENWW Connect and configure the product for fax 43
-
 1
1 -
2
-
3
-
4
-
5
-
6
-
7
-
8
-
9
-
10
-
11
-
12
-
13
-
14
-
15
-
16
-
17
-
18
-
19
-
20
-
21
-
22
-
23
-
24
-
25
-
26
-
27
-
28
-
29
-
30
-
31
-
32
-
33
-
34
-
35
-
36
-
37
-
38
-
39
-
40
-
41
-
42
-
43
-
44
-
45
-
46
-
47
-
 48
48 -
 49
49 -
 50
50 -
 51
51 -
 52
52 -
 53
53 -
 54
54 -
 55
55 -
 56
56 -
 57
57 -
 58
58 -
59
-
60
-
61
-
62
-
63
-
64
-
65
-
66
-
67
-
68
-
69
-
70
-
71
-
72
-
73
-
74
-
75
-
76
-
77
-
78
-
79
-
80
-
81
-
82
-
83
-
84
-
85
-
86
-
87
-
88
-
89
-
90
-
91
-
92
-
93
-
94
-
95
-
96
-
97
-
98
-
99
-
100
-
101
-
102
-
103
-
104
-
105
-
106
-
107
-
108
-
109
-
110
-
111
-
112
-
113
-
114
-
115
-
116
-
117
-
118
-
119
-
120
 |
 |