HP LaserJet 5000 HP LaserJet 5000, 5000 N, 5000 GN, and 5000 DN Printers - Us - Page 149
Paper Handling Menu, accessed from a software application, or from the printer driver if
 |
View all HP LaserJet 5000 manuals
Add to My Manuals
Save this manual to your list of manuals |
Page 149 highlights
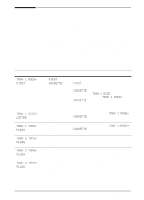
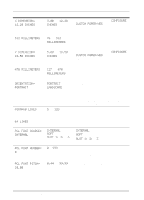
Paper Handling Menu When paper handling settings are correctly configured through the control panel, you can print by choosing the type and size of paper from the printer driver or software application. For more information, see page 60. Some items in this menu (such as duplex and manual feed) can be accessed from a software application, or from the printer driver (if the appropriate driver is installed). Printer driver and software application settings override control panel settings. For more information, see page 56. Paper Handling Menu Item TRAY 1 MODE= FIRST TRAY 1 SIZE= LETTER TRAY 1 TYPE= PLAIN TRAY 2 TYPE= PLAIN TRAY 3 TYPE= PLAIN TRAY 4 TYPE= PLAIN Values Explanation FIRST CASSETTE Determine how the printer will use Tray 1. FIRST: If paper is loaded in Tray 1, the printer will pull paper from that tray first. CASSETTE: A paper size must be assigned to Tray 1 using the TRAY 1 SIZE option (the next item in this menu when TRAY 1 MODE= CASSETTE). This allows Tray 1 to be used as a reserved tray. For more information, see page 58. For supported paper sizes, see page A-3. This item appears only when TRAY 1 MODE= CASSETTE. Set the value to correspond with the paper size currently loaded in Tray 1. For supported paper types, see page A-6. This item appears only when TRAY 1 MODE= CASSETTE. Set the value to correspond with the paper type currently loaded in Tray 1. For supported paper types, see page A-6. Set the value to correspond with the paper type currently loaded in Tray 2. For supported paper types, see page A-6. This item appears only when a third paper tray is installed. Set the value to correspond with the paper type currently loaded in Tray 3. For supported paper types, see page A-6. This item appears only when a fourth paper tray is installed. Set the value to correspond with the paper type currently loaded in Tray 4. EN Control Panel Menus B-3
-
 1
1 -
2
-
3
-
4
-
5
-
6
-
7
-
8
-
9
-
10
-
11
-
12
-
13
-
14
-
15
-
16
-
17
-
18
-
19
-
20
-
21
-
22
-
23
-
24
-
25
-
26
-
27
-
28
-
29
-
30
-
31
-
32
-
33
-
34
-
35
-
36
-
37
-
38
-
39
-
40
-
41
-
42
-
43
-
44
-
45
-
46
-
47
-
48
-
49
-
50
-
51
-
52
-
53
-
54
-
55
-
56
-
57
-
58
-
59
-
60
-
61
-
62
-
63
-
64
-
65
-
66
-
67
-
68
-
69
-
70
-
71
-
72
-
73
-
74
-
75
-
76
-
77
-
78
-
79
-
80
-
81
-
82
-
83
-
84
-
85
-
86
-
87
-
88
-
89
-
90
-
91
-
92
-
93
-
94
-
95
-
96
-
97
-
98
-
99
-
100
-
101
-
102
-
103
-
104
-
105
-
106
-
107
-
108
-
109
-
110
-
111
-
112
-
113
-
114
-
115
-
116
-
117
-
118
-
119
-
120
-
121
-
122
-
123
-
124
-
125
-
126
-
127
-
128
-
129
-
130
-
131
-
132
-
133
-
134
-
135
-
136
-
137
-
138
-
139
-
140
-
141
-
142
-
143
-
 144
144 -
 145
145 -
 146
146 -
 147
147 -
 148
148 -
 149
149 -
 150
150 -
 151
151 -
 152
152 -
 153
153 -
 154
154 -
155
-
156
-
157
-
158
-
159
-
160
-
161
-
162
-
163
-
164
-
165
-
166
-
167
-
168
-
169
-
170
-
171
-
172
-
173
-
174
-
175
-
176
-
177
-
178
-
179
-
180
-
181
-
182
-
183
-
184
-
185
-
186
-
187
-
188
-
189
-
190
-
191
-
192
-
193
-
194
-
195
-
196
-
197
-
198
-
199
-
200
-
201
-
202
-
203
-
204
 |
 |
